Side Dishes – The Fancy Pants Kitchen https://thefancypantskitchen.com Quick and Easy Recipes Tue, 06 May 2025 00:05:26 +0000 en-US hourly 1 https://wordpress.org/?v=6.7.2 https://thefancypantskitchen.com/wp-content/uploads/2021/02/cropped-Favicon-1-32x32.jpg Side Dishes – The Fancy Pants Kitchen https://thefancypantskitchen.com 32 32 Roasted Vegetable Salad with Magic Green Sauce https://thefancypantskitchen.com/recipe/roasted-vegetable-salad-with-magic-green-sauce/ https://thefancypantskitchen.com/recipe/roasted-vegetable-salad-with-magic-green-sauce/#respond Tue, 06 May 2025 00:04:41 +0000 https://thefancypantskitchen.com/?post_type=ranna_recipe&p=27296

Roasted Vegetable Salad with Magic Green Sauce is a bright, delicious salad that needs to be on your table!  Right now!  Lovely root vegetables (think carrots, sweet potatoes, and baby potatoes) are roasted with purple cabbage and broccolini to provide the base to this salad.  Layered over spinach or spring greens, the roasted vegetables are topped with magic green sauce. 

What??!!  Magic green sauce??  I was searching for a different name for this incredible sauce but magic just seems appropriate.  It’s a combination of garlic, serrano peppers, cilantro, Italian parsley, avocado, lime juice and maple syrup.  It’s amazing!

Sprinkled with sesame seeds and chunks of fresh avocado, this salad will become a favorite!

Roast the sweet potatoes, carrots and potatoes on one sheet pan and the cabbage and broccolini on another sheet pan. Toss with oil, curry powder and sea salt and cook until golden brown and tender.

To make the crazy sauce, place all of the ingredients in a food processor and process until smooth.

To assemble, put the mixed greens on the bottom of a serving platter or individual plates.  Top with roasted vegetables and avocado chunks.  Sprinkle sesame seeds over, dollop with magic green sauce and garnish with chopped herbs.  

There you have it…your new house specialty!

Share Your Thoughts...

Lastly, if you make Roasted Vegetable Salad with Magic Green Sauce, be sure to leave a review down below at the bottom of this page (stars are also appreciated)! Above all, I love to hear from you and always do my best to respond to each and every review. And of course, if you do make this recipe, don’t forget to tag me on Instagram! Looking through the photos of recipes you all have made is one of my favorite things to do!

Roasted Vegetable Salad with Magic Green Sauce

Makes: 4 servings

Prep Time: 5 minutes

Cook Time: 25 minutes

Total Time: 30 minutes

Ingredients

Roasted Vegetables:

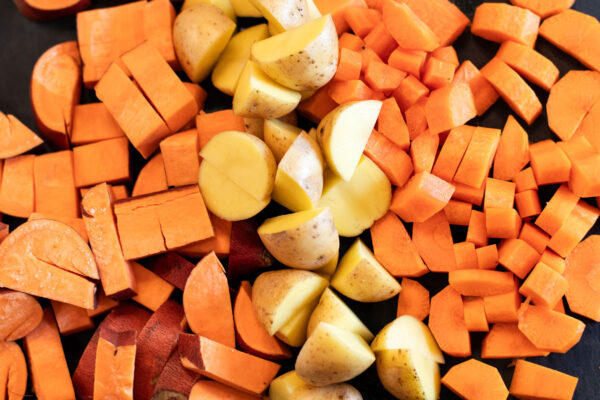
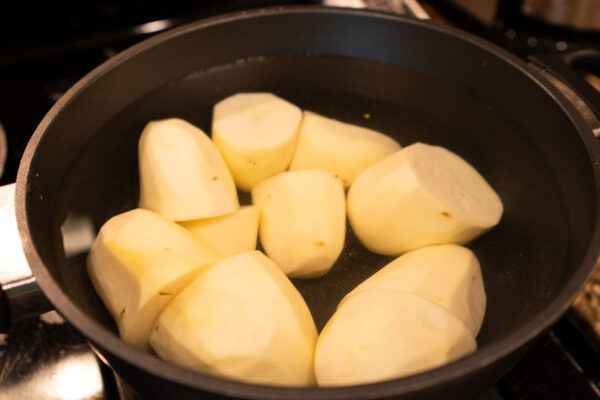
  • 1 large sweet potato, peeled & chopped
  • 6-7 baby yellow or red potatoes, quartered
  • 2 whole carrots, peeled, halved and chopped
  • 2 tbsp melted coconut oil, divided
  • 2 tsp curry powder, divided
  • 1/2 tsp sea salt, divided
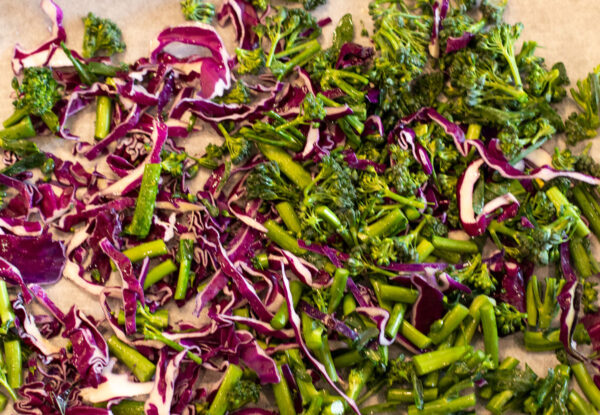
  • 1 cup broccolini, coarsely chopped
  • 2 cups purple cabbage, coarsely chopped

Magic Green Sauce:

  • 5 cloves garlic, peeled and crushed
  • 1 medium serrano or jalapeño pepper, seeds & stems removed (omit if not into spicy food)
  • 1 cup packed cilantro, thick bottom stems cut off
  • 1 cup packed flat-leaf parsley
  • 3 tbsp ripe avocado
  • 1/4 tsp salt (plus more to taste)
  • 3 tbsp lime juice
  • 1 tbsp maple syrup (or other sweetener of choice)
  • water to thin (approx 3 tbsp)

Salad:

  • 4 cups hearty greens (spinach, kale, or mustard greens), chopped
  • 1 medium ripe avocado, diced
  • 3 tbsp sesame seeds
  • fresh herbs (cilantro, parsley, thyme, etc.)

Instructions

Preheat oven to 375°F (190°C) and line 2 baking sheets with parchment paper.

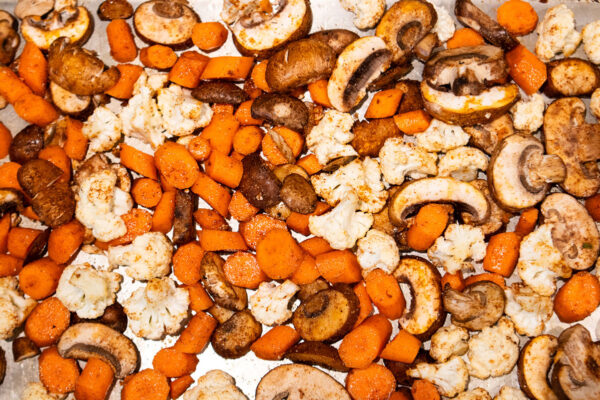
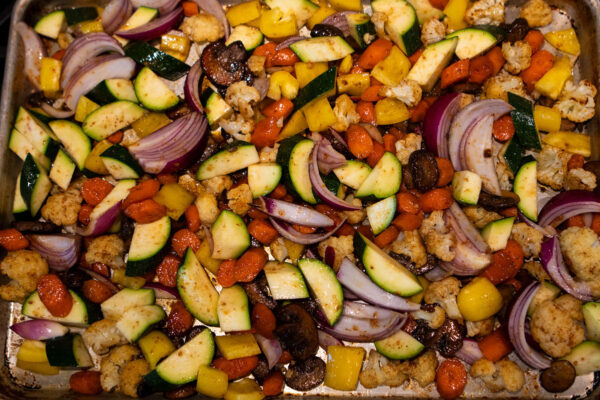
Add the sweet potato, potatoes, and carrots to one baking sheet and toss with half of the oil, half of the curry powder, and half of the sea salt. Bake for 25 minutes total or until golden brown and tender.

To a separate baking sheet, add broccolini and cabbage and toss with remaining half of the oil, half of the curry powder, and half of the sea salt. Bake for 15-20 minutes total or until golden brown and tender (place in oven once the potatoes have been cooking for 5-10 minutes).

In the meantime, make magic green sauce. Place garlic and pepper in a food processor along with the cilantro, parsley, avocado, salt, lime juice, and maple syrup.

Process until smooth, scraping down sides as needed. Thin with water until a semi-thick (but pourable) sauce is formed.

Taste and adjust flavor as needed, adding more pepper for heat, garlic for spice/zing, avocado for creaminess, salt for saltiness, lime for acidity, or maple syrup for sweetness.

Transfer to a serving container. Leftovers will keep covered in the refrigerator up to 4-5 days. Be sure to seal tightly or the sauce will lose its vibrant green color.

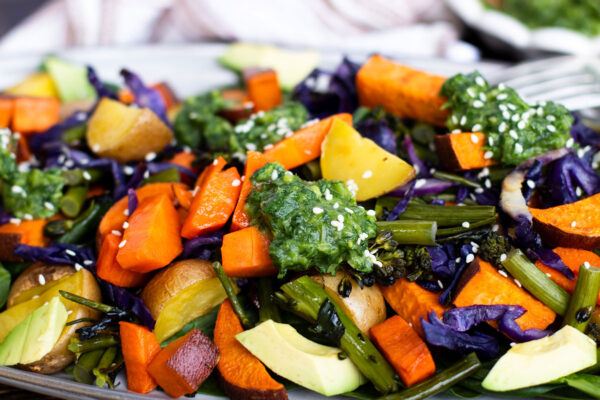
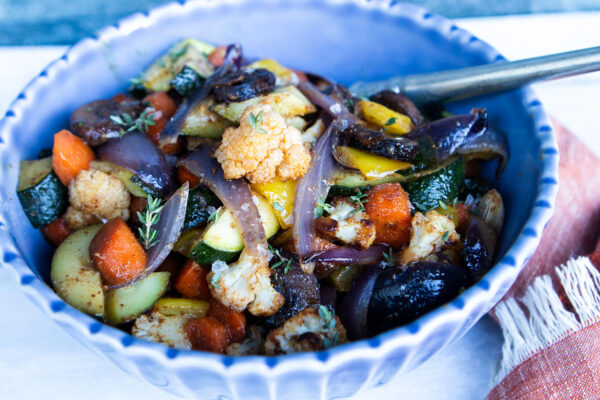
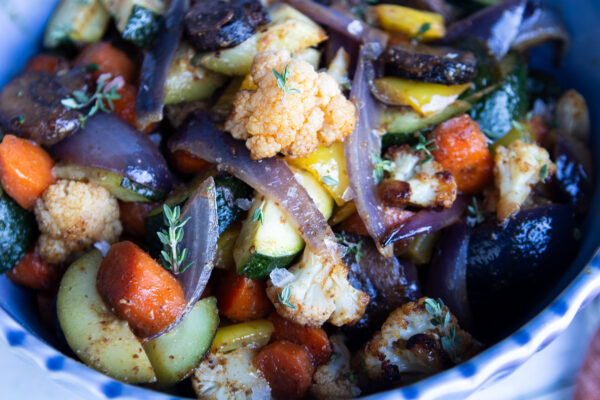
Plate salad by adding mixed greens to a serving platter and topping with roasted vegetables. Arrange avocado along the edges. Sprinkle the top with sesame seeds and serve with dressing on the side. Garnish with herbs.

Keep undressed leftover salad covered in the refrigerator up to 3 days. Eat cold or at room temperature, or reheat on the stovetop (it will cook the greens, so it becomes more of a vegetable scramble).

Recipe by Minimalist Baker

]]>
https://thefancypantskitchen.com/recipe/roasted-vegetable-salad-with-magic-green-sauce/feed/ 0
Pommes Anna Muffin Cups https://thefancypantskitchen.com/recipe/pommes-anna-muffin-cups/ https://thefancypantskitchen.com/recipe/pommes-anna-muffin-cups/#respond Thu, 03 Apr 2025 21:39:56 +0000 https://thefancypantskitchen.com/?post_type=ranna_recipe&p=26968

Pommes Anna Muffin Cups are a mini version of a traditional Pommes Anna recipe.  Thin slices of Yukon Gold potatoes are coated in melted butter  and herbs and layered with parmesan cheese in a muffin cup to create this tiny version of a classic.

They are simple to make with very few ingredients.  The finished potato cups will wow your dinner guests!

Cut the potatoes into thin slices using a mandoline.  I highly recommend using a mandoline as it’s very difficult to cut the potatoes evenly without one.

Melt butter and brush a little into each muffin cup.  Lay a small sprig on thyme on the bottom (which will become the top).

With the remaining butter, add the garlic and thyme and cook it over low heat until it’s fragrant.

Toss the slices with the warm garlic butter, salt and pepper.

Layer the slices in each muffin cup with a little bit of parmesan cheese sprinkled in between the potato slices. Drizzle any remaining butter over the top and cover the potatoes with foil.

Bake until the potatoes are tender, about 40 minutes, and remove the foil.  Loosen the stacks with a butter knife and flip the muffin tray over onto a parchment-lined baking sheet.

Increase the heat and place the sheet back in the oven and bake another 10 minutes.  Flip them again and bake for another 10-15 minutes to get them crisp.

Remove from the oven and flip one last time onto a baking sheet and serve.

Share Your Thoughts...

Lastly, if you make Pommes Anna Muffin Cups, be sure to leave a review down below at the bottom of this page (stars are also appreciated)! Above all, I love to hear from you and always do my best to respond to each and every review. And of course, if you do make this recipe, don’t forget to tag me on Instagram! Looking through the photos of recipes you all have made is one of my favorite things to do!

Pommes Anna Muffin Cups

Makes: 6 servings

Prep Time: 25 minutes

Bake Time: 1 hour

Total Time: 1 hour & 25 minutes

Ingredients

  • 1/2 cup unsalted butter
  • fresh thyme sprigs
  • 2 tsp chopped thyme leaves
  • 2 cloves garlic, finely chopped
  • 1 & 1/2 pounds Yukon Gold potatoes
  • 2 tsp kosher salt
  • fresh ground pepper
  • ½ cup fresh grated parmesan (optional)

Instructions

Preheat oven to 350°F.

Melt butter and brush 6 large muffin cups with a bit of it. Place one thyme sprig in each cup. Stir in chopped thyme and garlic to the rest of it. Cook over low heat until fragrant. Set aside.

Using a mandoline, slice potatoes (no need to peel), into very thin, even rounds. This is the reason to use a mandoline…it’s difficult to get even slices when doing it without the mandoline. Place in a large bowl and toss with garlic herb butter, salt and pepper.

Start placing potato slices into each cup. Remember the bottom of the cup will be the top. If using parmesan sprinkle a little between each layer. When the cup is filled to the rim, press down lightly to compact. Drizzle any remaining butter on top

Cover muffin tin with foil. Place on a baking sheet and bake until potatoes are easily pierced with a knife. This took me about 40 minutes, but this will vary base on the thickness of the potatoes and the size of your muffin cups. Remove foil.

While these are baking place a piece of parchment on a baking sheet with a rim that is large enough to hold your potatoes when they are flipped. When potatoes are ready to be flipped, remove foil. Loosen stacks with a butter knife and place parchment-covered pan on top of your muffin pan. Now holding one hand on the bottom of the muffin pan and one on the top of the baking sheet, carefully flip these over.

Increase oven temperature to 425°F. Place potatoes in oven and bake for about 10 minutes. Now using two spatulas, carefully flip them over again. (I use the back of one spatula to slide the potatoes on and the other as a flipper. Hope that makes sense.)

Bake for an additional 10-15 minutes until the bottom is crisp and golden. Remove from oven and flip thyme side up. Serve and enjoy!

Chef’s Note:

I have had great success reheating these in a convection oven straight from the fridge. Bring them to room temperature. Place on parchment and bake at 350° for about 10 minutes.

Recipe from This is How I Cook

]]>
https://thefancypantskitchen.com/recipe/pommes-anna-muffin-cups/feed/ 0
Parmesan Panko-Crusted Baked Zucchini https://thefancypantskitchen.com/recipe/parmesan-panko-crusted-baked-zucchini/ https://thefancypantskitchen.com/recipe/parmesan-panko-crusted-baked-zucchini/#respond Thu, 27 Mar 2025 16:39:57 +0000 https://thefancypantskitchen.com/?post_type=ranna_recipe&p=26881

Parmesan Panko-Crusted Baked Zucchini is one of those dishes that takes minutes to prep and pop in the oven and is so delicious, you’ll think it was a lot more involved!!! Zucchini slices are coated in melted butter and a parmesan cheese and panko mixture.  Bake them up and watch them disappear!

This is a super easy recipe!  Stir together the parmesan cheese, panko, herbs and spices in a small bowl.

Combine the zucchini slices and melted butter in a separate bowl.  Dredge each piece in the parmesan-panko mixture and place on a baking sheet.

Broil the slices in a hot oven, about 3-4 minutes per side, until the zucchini are golden brown and crispy.

Serve hot!

Share Your Thoughts...

Lastly, if you make Parmesan Panko-Crusted Baked Zucchini, be sure to leave a review down below at the bottom of this page (stars are also appreciated)! Above all, I love to hear from you and always do my best to respond to each and every review. And of course, if you do make this recipe, don’t forget to tag me on Instagram! Looking through the photos of recipes you all have made is one of my favorite things to do!

Parmesan Panko-Crusted Baked Zucchini

Makes: 4 servings

Prep Time: 20 minutes

Cook Time: 10 minutes

Total Time: 30 minutes

Ingredients

  • 2 ounces Parmesan cheese, grated with a Microplane grater (about 1 & 1/4 cups)
  • 1/2 cup panko
  • 2 tbsp finely chopped fresh flat-leaf parsley
  • 2 tbsp chopped fresh chives
  • 1 tbsp chopped fresh thyme
  • 3/4 tsp kosher salt
  • 1/2 tsp black pepper
  • 2 medium zucchini (about 1 pound), cut diagonally into 1/3-inch-thick slices
  • 1/3 cup (2 & 2/3 ounces) unsalted butter, melted

Instructions

Preheat broiler to high with oven rack in middle of oven. Stir together Parmesan, panko, parsley, chives, thyme, salt, and pepper in a medium-size shallow bowl until blended. Toss together zucchini slices and melted butter in a separate medium bowl until zucchini is evenly coated. Remove zucchini from butter, allowing excess to drip off. Dredge zucchini in panko mixture, pressing gently to adhere. Arrange coated zucchini slices on a rimmed baking sheet.

Broil in preheated oven until zucchini is golden brown and crispy, 3 to 4 minutes per side. Serve hot.

Recipe from Food & Wine

]]>
https://thefancypantskitchen.com/recipe/parmesan-panko-crusted-baked-zucchini/feed/ 0
Spaghetti Squash Italiano https://thefancypantskitchen.com/recipe/spaghetti-squash-italiano/ https://thefancypantskitchen.com/recipe/spaghetti-squash-italiano/#respond Mon, 13 Jan 2025 20:47:41 +0000 https://thefancypantskitchen.com/?post_type=ranna_recipe&p=26255

I am a big fan of Spaghetti Squash Italiano.  It is a delicious side dish made from spaghetti squash, sautéed onions & mushrooms, tangy tomato sauce, shredded zucchini and 3 different cheeses.

It is a wonderful accompaniment to chicken or steak and gives you that taste of Italy without the heaviness of pasta!

There are a few ways to cook spaghetti squash but if you are in a hurry, this is the best.  Simply cut the squash in half lengthwise, scoop out the seeds and place the squash with the cut side down in a baking dish.  Add 1/4-cup of water to the pan and cover with plastic wrap or a lid.

I get that not everyone wants to use plastic wrap in a microwave.  You can also cook the halves one at a time if you only have a smaller pan with a lid.

Microwave on high until you can easily flake the squash with a fork.  That typically takes 8-10 minutes.  Once the squash is cool enough to handle, use a fork to scrape the spaghetti squash into a large bowl, being sure to separate the strands.

Sauté the mushrooms, garlic and onions in a medium skillet.  Once browned, add to the spaghetti squash.

Add shredded zucchini, cheddar cheese, tomato sauce, salt & pepper and mix well.  Transfer the mixture to a baking dish, top with fontina and parmesan cheeses and bake for 30 minutes.

You can turn the broiler on if you like to crisp up the top (just watch it carefully). 

It doesn’t take much to get this healthy, hearty dish on the table.

Share Your Thoughts...

Lastly, if you make Spaghetti Squash Italiano, be sure to leave a review down below at the bottom of this page (stars are also appreciated)! Above all, I love to hear from you and always do my best to respond to each and every review. And of course, if you do make this recipe, don’t forget to tag me on Instagram! Looking through the photos of recipes you all have made is one of my favorite things to do!

Spaghetti Squash Italiano

Makes: 4 servings

Prep Time: 15 minutes

Cook Time: 45 minutes

Total Time: 1 hour

Ingredients

  • 1 medium spaghetti squash, halved lengthwise
  • 2 tbsp extra-virgin olive oil
  • 1 clove garlic, crushed
  • 4 ounces sliced mushrooms
  • 2/3 cup diced onions (about 1/2 medium onion)
  • 1 cup shredded zucchini (about 1 medium), squeezed dry
  • 2 ounces grated white cheddar cheese (1 cup)
  • 1/2 cup tomato sauce
  • 1 tsp kosher salt
  • 1/2 tsp freshly ground black pepper
  • 2 ounces fontina, grated
  • 1/4 cup Parmesan cheese, grated

Instructions

Place squash halves, cut side down, in a microwaveable baking dish. Add 1/4 cup water and cover with a lid. (Note: If you don’t have a lid, you can cover with plastic wrap,. Not everyone wants to use plastic wrap in the microwave, however.). You can microwave one half at a time if you don’t have a big enough dish. Microwave on high for 8-10 minutes or until tender enough to flake into strands with a fork. Carefully remove from the microwave and when cool enough, use a fork to separate the shell from the strands of squash and transfer the squash to a large bowl.

Preheat the oven to 400°F. Heat a medium skillet over medium-high heat and add olive oil. Sauté the mushrooms and garlic for 3 minutes and then add the onions, salt and pepper. Continue to sauté for 3 more minutes. Remove mushrooms and onions from skillet and transfer to bowl with squash.

Add zucchini, cheddar cheese, tomato sauce, salt and pepper and mix well. Transfer mixture to a 3-quart or 8×8-inch baking dish and spread out. Top with fontina and parmesan cheeses. Bake for 30 minutes. If desired, brown the top by turning on the broiler for a minute or two. Serve hot!

]]>
https://thefancypantskitchen.com/recipe/spaghetti-squash-italiano/feed/ 0
Roasted Beets & Charred Green Beans https://thefancypantskitchen.com/recipe/roasted-beets-charred-green-beans/ https://thefancypantskitchen.com/recipe/roasted-beets-charred-green-beans/#respond Thu, 02 Jan 2025 19:08:02 +0000 https://thefancypantskitchen.com/?post_type=ranna_recipe&p=26189

Roasted Beets and Charred Green Beans…salad or side dish?  Served cold or warm?  Don’t you love a dish with options?

This very tasty and colorful combination of roasted beets, charred green beans and a mustard/apple cider vinegar dressing is a wonderful addition to any meal!

Begin by roasting the beets with olive oil, thyme springs, salt and pepper. Once tender, set aside to cool and then peel and cut into wedges.

Heat oil in a large skillet and add half the beans.  Cook until charred on both sides and transfer to a plate.  Repeat with the remaining beans.

Toss together the beets, beans, apple cider vinegar, sugar, coarse-grained mustard, and herbs with olive oil.  Refrigerate for up to two days.

Fry up the shallots until golden brown and crisp.  Top the salad with the crisp shallots; garnish with hazelnuts and parsley.

To serve this dish warm, peel and quarter the beets before roasting them.  Char the green beans 10 minutes prior to the beets being done and then finish the dish as if it was cold dish.

Enjoy!

Share Your Thoughts...

Lastly, if you make Roasted Beets & Charred Green Beans, be sure to leave a review down below at the bottom of this page (stars are also appreciated)! Above all, I love to hear from you and always do my best to respond to each and every review. And of course, if you do make this recipe, don’t forget to tag me on Instagram! Looking through the photos of recipes you all have made is one of my favorite things to do!

Roasted Beets & Charred Green Beans

Makes: 8 servings

Prep Time: 15 minutes

Cook Time: 1 hour & 25 minutes

Total Time: 1 hour & 40 minutes plus chill time 2 hours minimum

Ingredients

  • 3 pounds small to medium-size red beets
  • 8 thyme sprigs
  • 5 tbsp extra-virgin olive oil, divided
  • 2 & 1/2 tsp kosher salt, divided
  • 1 tsp black pepper, divided
  • 1/2 cup plus 2 tbsp grapeseed or canola oil, divided
  • 1 pound haricots verts, trimmed, divided (can substitute smaller green beans)
  • 1/4 cup apple cider vinegar
  • 2 tbsp granulated sugar
  • 1 tbsp whole-grain mustard
  • 1 tbsp finely chopped fresh oregano
  • 2 tsp chopped fresh thyme
  • 2 large shallots, thinly sliced
  • Roasted hazelnuts, for garnish
  • Chopped fresh flat-leaf parsley, for garnish

Instructions

Preheat oven to 350°F. Toss together beets, thyme sprigs, 3 tablespoons olive oil, 1/2 teaspoon salt, and 1/4 teaspoon pepper in a roasting pan or baking dish; cover tightly with aluminum foil. Bake in preheated oven until beets are tender, about 1 hour and 15 minutes. Remove foil, and let stand until cool enough to handle. Peel cooled beets, and cut into wedges. Discard thyme sprigs.

Heat 1 tablespoon grapeseed oil in a large cast-iron skillet over high until smoking. Add half of the haricots verts in an even layer. Cook, without stirring, until charred on one side, about 2 minutes. Cook, stirring often, until tender-crisp, about 3 minutes. Transfer to a plate. Repeat process with 1 tablespoon grapeseed oil and remaining haricots verts. Sprinkle beans with 1/2 teaspoon salt and 1/4 teaspoon pepper.

Toss together beets, haricots verts, vinegar, sugar, mustard, oregano, chopped thyme, and remaining 2 tablespoons olive oil. Season with remaining 1 & 1/2 teaspoons salt and remaining 1/2 teaspoon pepper. Cover and refrigerate at least 2 hours or up to 2 days.

Stir together shallots and remaining 1/2 cup grapeseed oil in a small saucepan. Cook over medium-high, stirring occasionally, until golden brown and crisp, about 15 minutes. Using a slotted spoon, transfer fried shallots to paper towels to drain. Top salad with fried shallots; garnish with hazelnuts and parsley.

Chef’s Notes:

This can also be served as a hot side dish. If that’s how you want to serve it, peel and quarter the beets before roasting (your roasting time may be less as the pieces are smaller). When they are about 10 minutes from being cooked, char the green beans. Complete the rest of the dish.

Recipe from Food & Wine

]]>
https://thefancypantskitchen.com/recipe/roasted-beets-charred-green-beans/feed/ 0
Giant Skillet Latke https://thefancypantskitchen.com/recipe/giant-skillet-latke/ https://thefancypantskitchen.com/recipe/giant-skillet-latke/#respond Mon, 23 Dec 2024 23:53:24 +0000 https://thefancypantskitchen.com/?post_type=ranna_recipe&p=26114

This Giant Skillet Latke is a game-changer!  No more splattering oil on my cooktop…no more standing outside with my electric fry pans (yes, I do that, so my kitchen doesn’t smell of fried onions for a week)…no more burning my arms with hot oil!

Simply combine all the typical ingredients, flatten them into hot oil in a skillet and pop it into the oven to bake!  Easy, right?!

This is a genius recipe!  Grated potatoes (you don’t even have to peel them) are combined with minced shallots, an egg, some matzah meal, herbs and salt & pepper.  Let it sit for 10 minutes.

Heat olive oil in a skillet and then press the mixture into the skillet.  You don’t have to make it to even around the edges…it’s a latke, for goodness sakes!!

Drizzle a little more olive oil over the top and place the skillet into a very hot oven.  After letting it cook for 12-14 minutes, turn the broiler on for 3-4 minutes.  Be careful…it can burn easily so keep an eye on it.

Serve it straight out of the skillet topped with sour cream, applesauce and chives.  Happy Chanukah!

Share Your Thoughts...

Lastly, if you make Giant Skillet Latke, be sure to leave a review down below at the bottom of this page (stars are also appreciated)! Above all, I love to hear from you and always do my best to respond to each and every review. And of course, if you do make this recipe, don’t forget to tag me on Instagram! Looking through the photos of recipes you all have made is one of my favorite things to do!

Giant Skillet Latke

Makes: 6-8 servings

Prep Time: 15 minutes

Cook Time: 20 minutes

Total Time: 35 minutes

Ingredients

  • 1 & 1/4 pounds Russet potatoes, unpeeled and scrubbed, grated using the fine disk of a food processor
  • 2 medium shallots, peeled and finely chopped in the food processor
  • 1 large egg, lightly beaten
  • 1/3 cup (scant) matzo meal or very finely ground matzo
  • 1/4 cup finely chopped combination of scallions, chives, and parsley, plus extra chopped chives for garnish
  • 1 & 1/2 tsp kosher salt
  • 1/4 tsp freshly cracked pepper
  • 1/4 cup olive oil (or enough to cover the bottom of your skillet comfortably), plus a little extra for drizzling
  • 1/2 cup applesauce, for serving (or use whatever you like to top)
  • 1/3 cup sour cream, for serving (or use whatever you like to top)

Instructions

Place the grated potato and shallot in a colander over a large bowl. Mix it all around with your hands and squeeze as hard as you possibly can so that any extra moisture leaves the potatoes and onions and drips through to the bowl. When you think you’re done, squeeze some more. Place squeezed potatoes into medium bowl. Toss the liquid that makes it into the bowl, but don’t rinse the bowl out—you want to retain the gluey starch clinging to its bottom.

Add the potato and shallot mixture to the original bowl. Mix in the egg, matzo meal, chopped herbs, kosher salt, and pepper. Make sure the various components are thoroughly combined. Let sit for 10 minutes. Meanwhile, heat your oven to 475°F.

Heat olive oil in a 10- or 12-inch cast-iron skillet over a medium-high flame, until it’s hot enough that if you drop a little pinch of the potato mixture in as a test, it immediately starts to happily sizzle. Add the latke mixture to the skillet and pat it firmly into a single even layer no more than 1/3-inch thick. Don’t try to get the sides too smooth—it’s a latke! The edges are supposed to be frizzy. Drizzle the top with a little extra oil (about 2 tablespoons), and transfer to the oven.

Bake for 12 to 14 minutes, until the top is starting to brown and the sides are crisp. Then, turn on your broiler. Broil the latke for 3 to 4 minutes until the top is golden brown and crispy. Check on it regularly during this time to prevent it from staying in too long and burning. Remove from under the broiler and let cool a few minutes.

Serve straight out of the skillet or by sliding the giant latke onto a serving platter. (Just be careful, the pan is hot!) Top with sour cream and applesauce mounded in the center, with finely chopped chives sprinkled over the whole thing.

Recipe from Food 52

]]>
https://thefancypantskitchen.com/recipe/giant-skillet-latke/feed/ 0
Lentil Stew with Mushroom Gravy https://thefancypantskitchen.com/recipe/lentil-stew-with-mushroom-gravy/ https://thefancypantskitchen.com/recipe/lentil-stew-with-mushroom-gravy/#respond Mon, 09 Dec 2024 17:41:26 +0000 https://thefancypantskitchen.com/?post_type=ranna_recipe&p=25965

This deeply satisfying Lentil Stew with Mushroom Gravy is the perfect comfort food for cold, winter days.  It takes about 10 ingredients and 40 minutes of time, so no excuses to not make it!  It’s vegan, as well!

It starts with sautéed shallots and mushrooms seasoned with coconut aminos, salt, and pepper for rich, deep flavor. Then come the lentils, thyme for aromatics, and vegetable broth. As that’s simmering away, start your mashed potatoes.

The mashed potatoes are easy to make as well. Simply peel (or leave skin on for more texture), boil until tender, and mash!

You can go 100 different ways with seasoning mashed potatoes, but we kept things simple: a little salt, pepper, and olive oil, with a few dashes of almond milk for creaminess. 

To serve, transfer some mashed potatoes to a plate, top with lentil stew and then garnish with a little parsley.  You are going to love this!

Share Your Thoughts...

Lastly, if you make Lentil Stew with Mushroom Gravy, be sure to leave a review down below at the bottom of this page (stars are also appreciated)! Above all, I love to hear from you and always do my best to respond to each and every review. And of course, if you do make this recipe, don’t forget to tag me on Instagram! Looking through the photos of recipes you all have made is one of my favorite things to do!

Lentil Stew with Mushroom Gravy

Makes: 4 servings (side dish)

Prep Time: 10 minutes

Cook Time: 30 minutes

Total Time: 40 minutes

Ingredients

Potatoes:

  • 1 pound yellow potatoes, peeled and quartered evenly (I left on some skin for texture)
  • Sea salt & black pepper to taste
  • 1-2 tbsp olive oil
  • 2-4 tbsp unsweetened almond milk or vegetable broth (for added moisture)

Mushroom Lentil Stew:

  • 1 tbsp water (or avocado or olive oil)
  • 1/2 cup chopped shallot
  • 2 cups sliced cremini (or button) mushrooms
  • 1-2 tbsp coconut aminos
  • 1 pinch each kosher salt & freshly ground pepper
  • 2 tbsp chopped fresh thyme (or rosemary)
  • 2/3 cup dry green lentils, rinsed + drained (optional: soak overnight in cool water to improve digestibility)
  • 2-3 cups vegetable broth
  • 1 tbsp tomato paste
  • 2 tbsp mashed potatoes (recipe above)

Garnish:

  • Fresh chopped parsley

Instructions

Heat a large rimmed pan over medium heat. Once hot, add oil or water and shallot and sauté for 2 minutes, stirring occasionally.

Add mushrooms and coconut aminos and increase heat to medium-high. Sauté for 5 minutes, stirring frequently. Add a pinch of salt and pepper.

Add thyme, lentils, and 2 cups vegetable broth. Bring to a low boil over medium-high heat. Once boiling, reduce heat to a simmer and cook on low for about 20 minutes, adding more broth as needed if the mixture looks dry.

In the meantime, add potatoes to a large pot and cover with water so they are just submerged. Bring to a boil on high heat and cook for 12-15 minutes or until they slide off easily when pierced with a knife.Once tender, drain potatoes and add back to pot or a mixing bowl. Season with salt, pepper, and a bit of olive oil and mash until tender and fluffy. For added moisture in place of oil, add unsweetened plain almond milk or vegetable broth.

Once lentils are tender, taste sauce and adjust flavor as needed, adding more salt or coconut aminos for saltiness, pepper for spice, or tomato paste for more depth of flavor. Turn off heat and let the mixture rest so flavors can deepen. Add the 2 tablespoons of mashed potatoes to the lentil mushroom stew and stir in to thicken.

To serve, divide mashed potatoes between serving plates or bowls and top with desired amount of lentil mushroom stew. Garnish with fresh parsley, or more thyme, if desired.

Store leftovers separately, covered, up to 4 days in the refrigerator or in the freezer up to 1 month. Reheat on the stovetop or in a 350°F oven until hot.

Recipe from Minimalist Baker

]]>
https://thefancypantskitchen.com/recipe/lentil-stew-with-mushroom-gravy/feed/ 0
Maple Mustard Roasted Vegetables https://thefancypantskitchen.com/recipe/maple-mustard-roasted-vegetables/ https://thefancypantskitchen.com/recipe/maple-mustard-roasted-vegetables/#respond Mon, 09 Dec 2024 17:22:24 +0000 https://thefancypantskitchen.com/?post_type=ranna_recipe&p=25959

Maple Mustard Roasted Vegetables are a perfect side dish to round out a winter meal.  Smoky, savory and slightly caramelized, you will be surprised at how delicious they are.  

This recipe has a lot of components that can be prepared a day ahead.  Clean and cut all of the veggies ahead of time and store them in separate containers in the fridge.  The oil/spice blend can also be made in advance and left sealed on the counter.

You can also roast the veggies in advance and then heat in the microwave or back in the oven for a short time.

Either way, begin by making the glaze.  Simply combine the ingredients in a small microwaveable bowl and heat for one minute in the microwave.  Stir to combine and set aside.

Combine the oil, coriander, smoked paprika, salt and pepper in a large bowl.  Add the carrots, cauliflower and mushrooms to the bowl and toss to coat.  Transfer to a prepared sheet pan.  Add the remaining veggies to the same bowl, drizzle with olive oil and set aside.

Roast the vegetables for five minutes, then stir.  Roast for another 15 minutes.

Increase the heat to 475°F. Remove the vegetables from the oven, stir, and  then add the remaining vegetables. Drizzle with the maple mustard glaze and toss.

Roast for 13-18 minutes or until the veggies are golden and caramelized.

To finish, add more salt and garnish with thyme leaves.

Share Your Thoughts...

Lastly, if you make Maple Mustard Roasted Vegetables, be sure to leave a review down below at the bottom of this page (stars are also appreciated)! Above all, I love to hear from you and always do my best to respond to each and every review. And of course, if you do make this recipe, don’t forget to tag me on Instagram! Looking through the photos of recipes you all have made is one of my favorite things to do!

Maple Mustard Roasted Vegetables

Makes: 10 servings

Prep Time: 30 minutes

Cook Time: 35 minutes

Total Time: 1 hour & 5 minutes

Ingredients

Maple Mustard Glaze:

  • 2 tbsp unsalted butter
  • 2 tbsp pure maple syrup
  • 1 & 1/2 tbsp coarse-grain mustard
  • 1 tbsp honey

First Roasting:

  • 3 tbsp olive oil
  • 2 tsp ground coriander
  • 1 tsp smoked paprika
  • 1 tsp kosher salt
  • 1 tsp ground black pepper
  • 1 pound carrots, sliced 1/2-inch thick on a diagonal
  • 1 small head cauliflower, cored and separated into bite-size florets
  • 12 ounces mushrooms, sliced 1/2-inch thick

Second Roasting:

  • 1 medium red onion, halved, peeled and cut into wedges
  • 1 large yellow bell pepper, cut into 3/4-inch squares
  • 2 medium zucchini, halved lengthwise, then sliced 1/2-inch thick, on a diagonal

To Finish:

  • fresh thyme leaves, for garnish

Instructions

For the Prep:

Preheat the oven to 450˚F. Drizzle a sheet pan (18×13-inches) with olive oil. Spread to coat the pan with your fingers or a silicone spatula. Set aside.

Maple Mustard Glaze:

Combine the butter, maple syrup, mustard and honey in a small microwave-safe bowl or measuring cup. Microwave on high power for one minute. Stir well to combine. Set aside for now.

First Roasting:

Combine the olive oil, coriander, smoked paprika, kosher salt and pepper in a large bowl. Stir to combine. Add the carrots, cauliflower and mushrooms to the bowl and toss to coat. Turn the veggies out onto the prepared sheet pan.

Add the remaining veggies to the same bowl, drizzle lightly with olive oil and toss to coat. Set aside for now.

Roast the veggies on the sheet pan for 5 minutes then remove from the oven and stir to redistribute. Return to the oven and roast for another 15 minutes.

Second Roasting:

Increase the heat to 475°F. Remove the veggies from the oven, stir to redistribute, then add the remaining veggies (red onion, yellow bell pepper and zucchini) to the mixture on the sheet pan. Drizzle with the prepared maple mustard glaze. Stir gently one more time to evenly distribute all of the veggies.

Return the pan to the oven and roast for another 13-18 minutes or until golden and caramelized. (Every oven is a little different, so watch the veggies carefully towards the end.)

To Finish:

Taste and add more salt (kosher or flaky sea salt) if needed. Garnish generously with fresh thyme leaves.

Recipe from The Cafe Sucre Farine

]]>
https://thefancypantskitchen.com/recipe/maple-mustard-roasted-vegetables/feed/ 0
Creamy Mashed Potatoes https://thefancypantskitchen.com/recipe/creamy-mashed-potatoes/ https://thefancypantskitchen.com/recipe/creamy-mashed-potatoes/#respond Sat, 16 Nov 2024 23:34:51 +0000 https://thefancypantskitchen.com/?post_type=ranna_recipe&p=25761

Creamy Mashed Potatoes are on every Thanksgiving table.  Drizzled with gravy, they are one of the most traditional side dishes.  This recipe is easy and adaptable (make them as creamy as you like by adjusting the amount of milk you add).  They are also a little healthier (just a little) than some other recipes since there is no cream in the “creamy”.

Whip up a batch of these and your meal will be complete!

Peel and then boil the potatoes.  Once they are tender, drain them and transfer them to the bowl of a stand mixer. 

Use the whisk attachment to break up the potatoes (don’t attach it to the mixer;  just hold it and break the potatoes apart).  Then, attach the whisk and start to whip on low speed.  Slowly drizzle in the hot milk until you reach the desired texture.

I like mine chunkier, so I didn’t use all of the milk.

With the mixer running, add chunks of softened butter one tablespoon at a time.  Add the salt.

Top with chopped parsley or chives and serve.

You can make these ahead of time and keep them warm in an oven (on low heat) or in a slow cooker.

For more variety of mashed potatoes, try Creamy Buttermilk Mashed Potatoes or Cheesy Mashed Potatoes.

Share Your Thoughts...

Lastly, if you make Creamy Mashed Potatoes, be sure to leave a review down below at the bottom of this page (stars are also appreciated)! Above all, I love to hear from you and always do my best to respond to each and every review. And of course, if you do make this recipe, don’t forget to tag me on Instagram! Looking through the photos of recipes you all have made is one of my favorite things to do!

Creamy Mashed Potatoes

Makes: 8 servings

Prep Time: 15 minutes

Cook Time: 25 minutes

Total Time: 40 minutes

Ingredients

  • 4 pounds (12 medium) russet potatoes, peeled
  • 1 & 1/4 cups hot whole milk
  • 16 tbsp unsalted butter (2 sticks), at room temperature (not melted)
  • 1 & 1/2 tsp salt, or to taste (we used sea salt)
  • 1 tbsp fresh parsley or chives, finely chopped for garnish (optional)

Instructions

Peel potatoes and rinse in cold water (cut potatoes in half if very large). If you want the smoothest potatoes possible, remove the little knots from the potatoes with a small spoon or the tip of a potatoes peeler. Place potatoes in a large pot (5 quart or bigger) and cover potatoes with cold water and 1 tbsp salt. Bring to a boil and cook partially covered until easily pierced with a knife (boil 20-25 min depending on the size of your potatoes; mine took 22 min).

Drain well and transfer to the bowl of your stand mixer. Grab the whisk attachment and mash potatoes lightly by hand to break them up. Fit mixer with whisk attachment and start on low speed 30 seconds then increase to medium and slowly drizzle in 1 to 1 & 1/4 cups of the HOT milk to reach your desired texture.

With mixer on, add softened butter 1 tablespoon at a time, waiting a few seconds between each addition. Potatoes will be whipped and fluffy. Finally add 1 & 1/2 tsp salt, or add to taste.

Chef’s Note:

To keep mashed potatoes warm until serving: cover potatoes and place into a warm oven or transfer to a slow cooker on the low setting to keep potatoes warm until ready to serve.

Recipe by Natasha’s Kitchen

]]>
https://thefancypantskitchen.com/recipe/creamy-mashed-potatoes/feed/ 0
Roasted Honeynut Squash with Brown Sugar https://thefancypantskitchen.com/recipe/roasted-honeynut-squash-with-brown-sugar/ https://thefancypantskitchen.com/recipe/roasted-honeynut-squash-with-brown-sugar/#comments Sat, 16 Nov 2024 18:09:00 +0000 https://thefancypantskitchen.com/?post_type=ranna_recipe&p=25799

Roasted Honeynut Squash with Brown Sugar is a lovely side dish for the holidays.  I adore these sweet little winter squash (squashes?) especially when roasted and topped with a sweet and spicy mixture of brown sugar, cinnamon and cayenne.  What could be more perfect for Thanksgiving??!!

Cut the squash lengthwise and remove the seeds.  Place the squash halves on a baking sheet and spread butter on the cut side.

In a small bowl, combine the sugar, salt, cinnamon, and cayenne (if using). Sprinkle the spice mixture evenly over the buttered squash.

Roast the squash for 25 minutes.  Remove them from the oven and sprinkle with pecans.  Return to the oven and continue to roast another 15 minutes until they are fork-tender and browned.

Transfer to a serving platter, sprinkle with salt & freshly ground pepper and serve.

Share Your Thoughts...

Lastly, if you make Roasted Honeynut Squash with Brown Sugar, be sure to leave a review down below at the bottom of this page (stars are also appreciated)! Above all, I love to hear from you and always do my best to respond to each and every review. And of course, if you do make this recipe, don’t forget to tag me on Instagram! Looking through the photos of recipes you all have made is one of my favorite things to do!

Roasted Honeynut Squash with Brown Sugar

Makes: 8 servings

Prep Time: 10 minutes

Cook Time: 40 minutes

Total Time: 50 minutes

Ingredients

  • 4 small honeynut squash, halved lengthwise, seeds removed (about 2-3 pounds)
  • 6 tbsp unsalted butter, softened
  • 2 tbsp brown sugar
  • 3/4 tsp sea salt, plus more to taste
  • 1/4 tsp cinnamon
  • Pinch of cayenne (optional)
  • 1/4 cup finely chopped pecans or pepitas
  • Freshly cracked black pepper, for serving

Instructions

Preheat the oven to 425°F and place a rack in the center position.

Place the squash halves cut sides up on a rimmed sheet pan. Evenly spread the butter on the cut side of each squash.

In a small bowl, combine the sugar, salt, cinnamon, and cayenne (if using). Sprinkle the spice mixture evenly over the buttered squash.

Roast for 25 minutes. Remove from the oven, leaving the oven on. Carefully sprinkle the squash with pecans, then return to the oven until fork-tender and browned, 15 minutes more. Transfer to a serving platter or divide among 8 plates. Sprinkle with salt and pepper before serving.

Recipe from The Modern Proper

]]>
https://thefancypantskitchen.com/recipe/roasted-honeynut-squash-with-brown-sugar/feed/ 2