EASY PEASY CAKES, CUPCAKES & LOAVES – The Fancy Pants Kitchen https://thefancypantskitchen.com Quick and Easy Recipes Wed, 26 Jun 2024 21:48:25 +0000 en-US hourly 1 https://wordpress.org/?v=6.5.5 https://thefancypantskitchen.com/wp-content/uploads/2021/02/cropped-Favicon-1-32x32.jpg EASY PEASY CAKES, CUPCAKES & LOAVES – The Fancy Pants Kitchen https://thefancypantskitchen.com 32 32 No Bake S’Mores Icebox Cake https://thefancypantskitchen.com/recipe/no-bake-smores-icebox-cake/ https://thefancypantskitchen.com/recipe/no-bake-smores-icebox-cake/#respond Tue, 25 Jun 2024 17:15:20 +0000 https://thefancypantskitchen.com/?post_type=ranna_recipe&p=24733

Just in time for summer entertaining, this No Bake S’Mores Icebox Cake is easy peasy and so delicious!  When kids and adults alike are in the mood for a S’Mores-type dessert, this is the one to make.  Layers of graham cracker, home-made marshmallow fluff, and chocolate ganache combine to make the ultimate cake. Chill the whole thing overnight and you’ve got an awesome party dessert.  You gotta try it!  

Let’s start by making the chocolate ganache…heat some heavy cream until it’s just simmering and then pour over chopped chocolate.  Let it sit for a few minutes and then gently stir it until the chocolate is completely melted and combined.

Cover and refrigerate the ganache until you’re ready to use it.

Next comes the marshmallow meringue.  It might seem daunting but I’m here to tell you that it’s really not.  If you have a stand mixer, you can make this.  A double boiler comes in very handy for this, but if you don’t have one, a bowl set over simmering water works just fine.  Don’t let the bowl touch the water.  This is important so that the egg whites don’t scramble.  That would not be good!

Place the egg whites, sugar and cream of tartar in a heat-proof bowl and set over simmering water.  Whisk until the sugar dissolves and then beat on high speed until stiff peaks form.

Let’s assemble this bad boy!

Begin by spreading a thin layer of the marshmallow meringue on the bottom of a baking pan.  Then top it with graham crackers, breaking some up if you need to.  Top the crackers with marshmallow meringue, more graham crackers and then chocolate ganache.  Repeat per the recipe instructions, ending with a top layer of chocolate.  Cover and refrigerate for at least 12 hours.

Remove the cake from the fridge and remove the plastic wrap from the top.  Some of the chocolate may stick to the plastic but that’s okay because we’re covering the top with marshmallow meringue.

Now, remove the cake from the pan using the parchment overhangs and remove the parchment from the bottom of the cake.

Spread the marshmallow meringue over the top, creating peaks and swirls.  If you like working with a kitchen torch, fire up the top of the meringue to look like toasted marshmallows.

Cut the cake and serve!

Share Your Thoughts...

Lastly, if you make No Bake S’Mores Icebox Cake, be sure to leave a review down below at the bottom of this page (stars are also appreciated)! Above all, I love to hear from you and always do my best to respond to each and every review. And of course, if you do make this recipe, don’t forget to tag me on Instagram! Looking through the photos of recipes you all have made is one of my favorite things to do!

No Bake S’Mores Icebox Cake

Makes: 12 servings

Prep Time: 1 hour

Cook Time: 5 minutes

Total Time: 1 hour & 5 minutes plus chill time 12 hours

Ingredients

  • three 4-ounce bars (339g) semi-sweet or milk chocolate, finely chopped
  • 1 & 1/2 cups heavy cream
  • 6 egg whites, at room temperature
  • 1 & 1/2 cups (300g) granulated sugar
  • 3/4 tsp cream of tartar
  • 1 tsp pure vanilla extract
  • 30–36 full-sheet graham crackers (a little over 1 standard box)

Instructions

Line an 8-inch square baking pan or 9-inch square baking pan with parchment paper, leaving an overhang on the sides to lift the cake out (makes cutting and serving possible!). Set aside.

Make the Ganache:

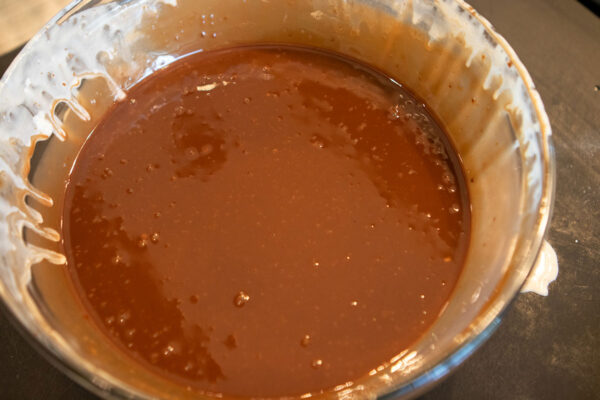
Place chopped chocolate in a bowl. Heat the cream in a small saucepan until it begins to gently simmer. (Do not let it come to a rapid boil—that’s too hot!) Pour over chocolate and let it sit for 2-3 minutes to gently soften the chocolate. Slowly stir until completely combined and chocolate has melted. Cover and refrigerate as you make the meringue. Ganache can be prepared, covered, and refrigerated for up to 3 days before using.

Make the Marshmallow Meringue:

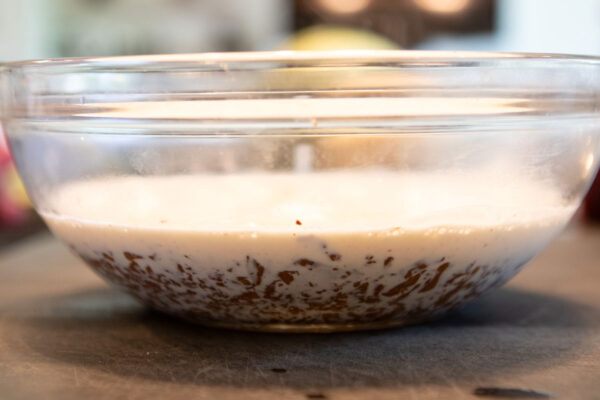
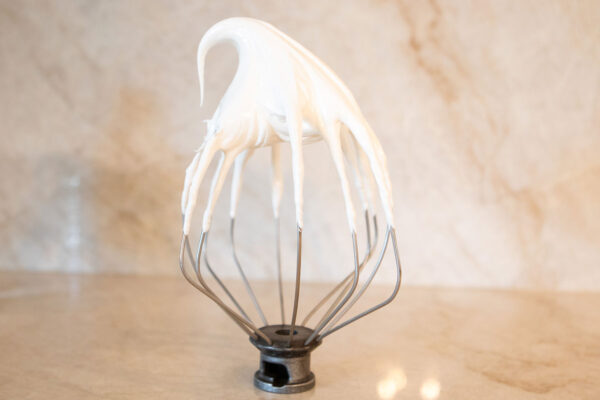
Place egg whites, sugar, and cream of tartar in a heatproof bowl. Set bowl over a saucepan filled with two inches of simmering water. Do not let it touch the water. (You can use a double boiler if you have one.) Whisk constantly until sugar is dissolved and mixture has thinned out, about 4 minutes. Add the vanilla extract, then using a handheld or stand mixer fitted with a whisk attachment, beat on high speed for 5-6 minutes until stiff glossy peaks form. Remove 1 heaping cup (just eyeball it), cover tightly, and refrigerate for up to 2 days. This will be the topping.

Assemble the Cake:

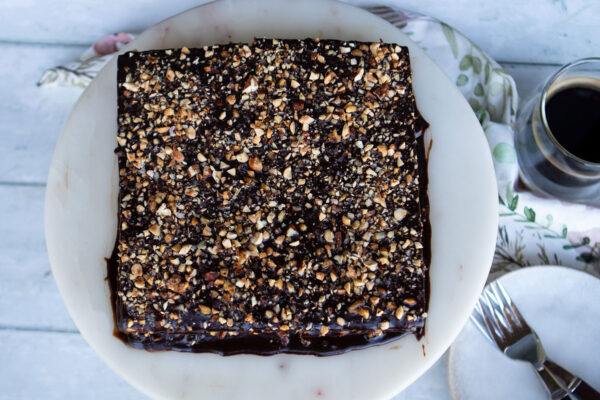
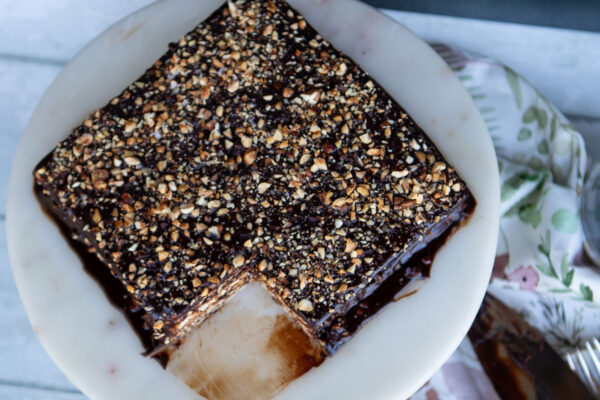
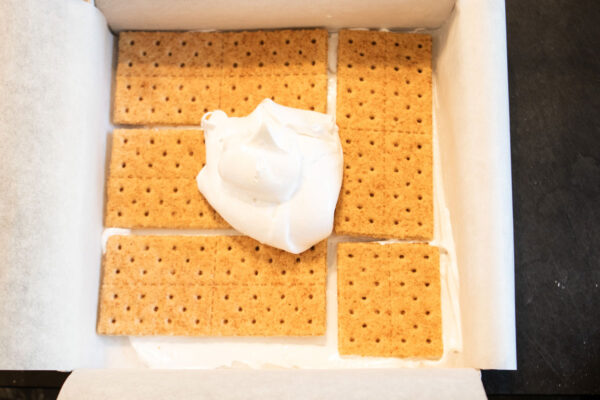
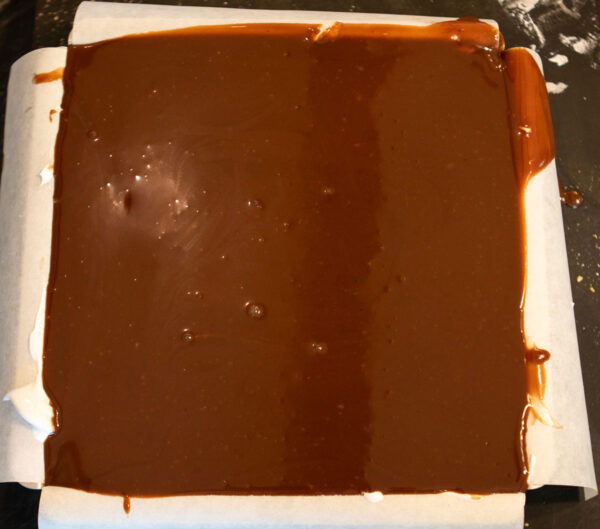
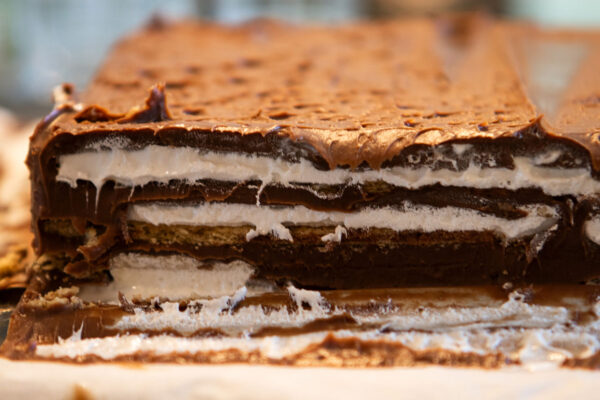
If the marshmallow meringue and ganache are still slightly warm as you assemble the cake, that’s ok. Spread a super thin layer of marshmallow meringue on the bottom of the pan. It doesn’t need to be even or perfect; it’s just so the graham cracker base has something to stick to. Do the best you can with the marshmallow meringue because it’s sticky. Spread it slowly. Top with a layer of graham crackers. You’ll need to break them apart to evenly arrange them; see my photos for a visual. Top with a layer of marshmallow meringue, then another layer of graham crackers, then a layer of chocolate ganache, then a layer of graham crackers, then another layer of marshmallow meringue. Repeat for a total of 6 layers of graham crackers, 4 layers of marshmallow meringue (including the thin bottom layer), and 3 layers of chocolate ganache. The top layer will be chocolate for now. Layers listed out: super thin marshmallow meringue, graham crackers, marshmallow meringue, graham crackers, chocolate, graham crackers, marshmallow meringue, graham crackers, chocolate, graham crackers, marshmallow meringue, graham crackers, chocolate.

Cover tightly and refrigerate for at least 12 hours and up to 2 days.

Remove reserved marshmallow meringue from the refrigerator. If it seems deflated, whip it with a fork or whisk a few times.

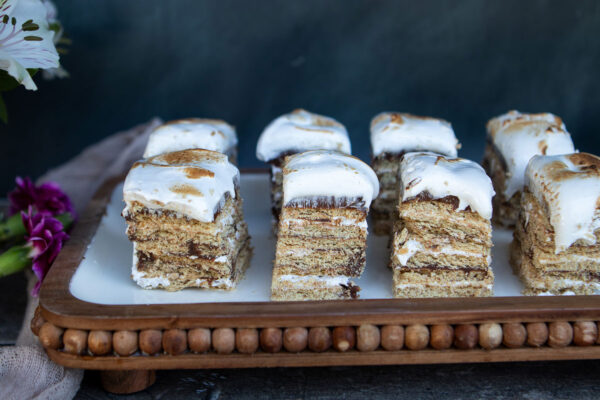
Remove cake from the refrigerator, then remove from the pan using the overhang on the sides. Peel off the parchment paper (or don’t—if you trust yourself torching the top without the paper lighting up!) and place onto a heat-proof serving platter or cutting board. Spread marshmallow meringue on top. Use a spoon to create peaks and swirls. Serve immediately or torch it with a kitchen torch and serve immediately or loosely cover and refrigerate for up to 1 hour before torching/serving.

Cover and store leftovers in the refrigerator or freezer for up to 2 days. Topping may begin to wilt.

Recipe by Sally’s Baking Addiction

]]>
https://thefancypantskitchen.com/recipe/no-bake-smores-icebox-cake/feed/ 0
NYT Original Plum Torte https://thefancypantskitchen.com/recipe/nyt-original-plum-torte/ https://thefancypantskitchen.com/recipe/nyt-original-plum-torte/#respond Wed, 29 May 2024 19:57:57 +0000 https://thefancypantskitchen.com/?post_type=ranna_recipe&p=24630

This NYT Original Plum Torte recipe has a storied history.  Seems that the NY Times published this recipe every September from 1983-1989, to herald the end-of-summer fruit season.  Much to the chagrin of its readers, the recipe stopped being published and the outcry was tremendous.  I can understand why!

This recipe produces a lovely moist cake that is full of ripe plum slices and topped with sugar and cinnamon that bakes into a crunchy topping for this amazing torte!

As animated as the NY Times readers became with the disappearance of the recipe, you can rest assured that you will always find it here!

The original recipe in 1983 called for 1 cup of sugar but was then lowered to 3/4 cup by 1989.  I prefer using the lower amount so that the tartness of the plums can come through.  

Cream the butter and sugar together and add the eggs and vanilla and beat until smooth.

Add the salt, baking powder and flour and mix until just fully combined.

Pour the batter into a prepared cake pan.  I like to use a springform pan as it’s easier to dislodge the cake from the pan, but if you don’t have one, you can use a regular 8 or 9-inch pan.  Just flip the cake quickly over once it’s baked and then flip back again to cool completely.

Anyhow, arrange the plum slices over the batter skin side up.  The original recipe calls for plum halves, but I prefer wedges.  

Dust the top of the cake with cinnamon and sugar and then bake for 35-45 minutes.  The plums should be juicy and bubbling and the top should be golden.

Let the torte cool before releasing it from the springform pan.  Enjoy this beloved recipe!

Share Your Thoughts...

Lastly, if you make NYT Original Plum Torte, be sure to leave a review down below at the bottom of this page (stars are also appreciated)! Above all, I love to hear from you and always do my best to respond to each and every review. And of course, if you do make this recipe, don’t forget to tag me on Instagram! Looking through the photos of recipes you all have made is one of my favorite things to do!

NYT Original Plum Torte

Makes: 8 servings

Prep Time: 10 minutes

Bake Time: 35-45 minutes

Total Time: 45-55 minutes

Ingredients

  • 3/4 cup sugar
  • 1/2 cup unsalted butter, softened
  • 1 cup all-purpose flour
  • 1 tsp baking powder
  • pinch kosher salt
  • 2 eggs
  • 1 tsp vanilla extract
  • 1/2 tsp cinnamon
  • 5 or 6 ripe plums, pitted and cut into wedges or halves, or 12 small, ripe Italian plums
  • Additional sugar and cinnamon for sprinkling

Instructions

Preheat the oven to 350°F. Grease an 8″ or 9″ springform or cake pan, and grease and line the bottom with a parchment round if using a cake pan.

Cream the butter and sugar until light and fluffy. Scrape the bowl. Add the eggs and vanilla and beat until smooth and light. Scrape the bowl again.

Add the salt, baking powder, and flour, and mix just until fully combined.

Pour the batter into the cake pan. Arrange the plum wedges or halves, skin side up, on top of the cake. Feel free to crowd them in there; the cake will rise around them. Dust with a little sugar and the cinnamon.

Bake for 35 to 45 minutes, depending on the size of the cake, or until a cake tester comes out clean, and the plums are juicy and bubbling.

Let cool before releasing the cake from the springform pan or turning out onto a dish.

Chef’s Notes:

A springform pan is preferable because the batter is a bit delicate. But if you are turning this cake out from a regular cake pan, never fear. Place a cooling rack directly over the cake pan, then in one swift, meaningful motion, flip the cake onto the rack. Remove the parchment. Then immediately flip it right side up again onto the serving plate.

Marian Burros’s easy plum torte recipe, originally featured in the New York Times, is an absolutely essential late-summer dessert.

Ms. Burros’s original cake recipe says you can bake this in an 8-, 9-, or 10-inch cake pan. But I prefer an 8-inch or 9-inch pan to give the cake a little more height. Baking times will vary slightly depending on which you choose.

Recipe by Marian Burro via NY Times

]]>
https://thefancypantskitchen.com/recipe/nyt-original-plum-torte/feed/ 0
Green Velvet Cake https://thefancypantskitchen.com/recipe/green-velvet-cake/ https://thefancypantskitchen.com/recipe/green-velvet-cake/#comments Wed, 13 Mar 2024 17:00:06 +0000 https://thefancypantskitchen.com/?post_type=ranna_recipe&p=24136

This Green Velvet Cake is a stunner for St. Patrick’s Day or any time you want an extraordinary cake with a pop of color!  It’s tender, velvety crumb and the almond cream cheese buttercream make a delicious dessert for all occasions!

This is a one-bowl, no-mixer, required cake so there’s no reason not to make it.  Feel free to change the color depending on the holiday (pink is beautiful for Valentine’s Day, yellow for Easter, etc).

What exactly is a “velvet” cake?  This cake first came into existence in the 1800’s.  Cakes that used cocoa were considered a luxury cake.  They would be called velvet cakes and serve them at fancy parties.  The term also implied that the texture would be smooth and soft.

This cake doesn’t include any cocoa but it has the same soft, tender crumb as its red-hued cousin.  It is delicate and tender and the almond-flavored buttercream is the perfect offset for this lovely cake.

We begin this pretty little thing by yelling some Irish funny sayings followed by some jolly songs.  If that’s not your thing, try creaming the butter with sugar and vanilla.  This will produce a very grainy texture.

Add the buttermilk and cake flour alternatively in 3 batches.  Add the baking soda, baking powder and salt.

Add the egg whites one at a time, whisking vigorously for 30 seconds after each addition.  Be sure you give it the full 30 seconds.  This will help create that velvety texture.

Add the food coloring until you get the desired shade that you want.

Pour the batter into the prepared pan and smooth the top.  Rap the pan 3 times on the counter to eliminate air bubbles and then bake it for 35 minutes.

At this point, bring up the sides of the aluminum foil around the pan.  This will prevent the edges of the cake from getting too dark or, heaven forbid, burning!  Bake for another 10-15 minutes or until a cake tester comes out clean.  Let the cake cool completely before frosting it.

To make the buttercream, melt the butter and cream cheese in a microwaveable bowl until the butter has melted and the cream cheese is quite soft.

Whisk the butter and cream cheese until well combined.  It won’t be completely smooth but try to get it as smooth as possible.

Add half-and-half and extracts.  Whisk again until smooth.  Add powdered sugar and whisk until you have a spreadable consistency.

Transfer the cake to a platter and cover the tops and sides with a thin coating.  Then add more cream cheese to completely coat the cake.  Make swirls on the top if desired.

Press nonpareils onto the sides and sprinkle on the top of the cake.  

Share Your Thoughts...

Lastly, if you make Green Velvet Cake, be sure to leave a review down below at the bottom of this page (stars are also appreciated)! Above all, I love to hear from you and always do my best to respond to each and every review. And of course, if you do make this recipe, don’t forget to tag me on Instagram! Looking through the photos of recipes you all have made is one of my favorite things to do!

Green Velvet Cake

Makes: 16 servings

Prep Time: 20 minutes

Bake Time: 40 minutes

Total Time: 1 hour

Ingredients

Cake:

  • 1/2 cup unsalted butter, very soft
  • 1 & 1/2 cups granulated sugar
  • 1 tbsp vanilla extract
  • 1 cup buttermilk
  • 2 cups cake flour
  • 1/2 tsp baking soda
  • 1/2 tsp baking powder
  • 1/2 tsp kosher salt
  • 3 large egg whites
  • green gel or liquid food color (I use Wilton Leaf Green Gel)

Buttercream:

  • 4 ounces (1 stick) unsalted butter
  • 4 ounces cream cheese
  • 1 tbsp half-and-half or cream (maybe a bit more)
  • 1 tsp vanilla extract
  • 1/4-1/2 tsp almond extract
  • 3 & 1/2 -4 cups powdered sugar
  • nonpareils for garnish, if desired

Instructions

Prep:

Preheat the oven to 350°F. Spray a 9-inch cake pan (with sides at least 2 inches tall with baking spray.

Line the pan with a circle of parchment paper. Line a sheet pan with foil. Set both pans aside for now.

Cake:

Stir the butter until light and creamy. Add the sugar and vanilla and stir again until well combined. (It will not be smooth and creamy at this point but instead thick with a sandy texture.)

Add approximately 1/3 (doesn’t have to be exact) of the buttermilk and stir to combine. Then add approximately 1/3 of the flour and stir again. Repeat x 2 until all of the buttermilk and flour have been added. Add the baking soda, baking powder and salt and stir to combine.

Add egg whites, one at a time and whisk vigorously for 30 seconds after each addition. Don’t cheat! I like to set a timer. After the egg whites have been whisked in the batter will be smooth and satiny.

Add green food coloring, stirring after each drop until the desired shade of green is reached. (I used 5-6 drops.)

Pour the batter into the prepared pan and smooth the top to an even layer with an offset knife or spatula. Pick the pan up, lift it a few inches above the counter and let it drop. Repeat this 3-4 times to bring any air bubbles to the surface. Let the pan sit for a minute or two then proceed with the next step.

Bake for 35 minutes then pull up the foil around the edges of the pan to prevent the crust from getting too brown. Bake for an additional 10-15 minutes or until a toothpick inserted into the center comes out clean. Cool for 20 minutes in the pan, then invert the cake onto a cooling rack. (The flat bottom of the cake now becomes the top.) Cool the cake completely before icing with the buttercream. While the cake is cooling, make the cream cheese buttercream.

Buttercream:

Combine the butter and cream cheese in a microwave-safe bowl. Cover with a damp paper towel or plastic wrap and cook on high power for 90-100 seconds or until the butter is melted and the cream cheese is very soft. Whisk the butter and cream cheese together until well combined and very smooth.

Add one tablespoon of half-and-half (or cream), the vanilla extract and 1/4 teaspoon of the almond extract. Whisk again until smooth. Taste and add more almond extract, if desired. Add 3 cups of powdered sugar. Whisk until smooth. Add more powdered sugar till you have a spreadable consistency. I usually go with a little looser consistency as it will thicken up a bit as you spread it on the cake.

To Ice the Cake:

Transfer the cake to a serving plate or platter. Spoon out 1/2-3/4 of the icing onto the top of the cake. With an offset knife spread a very thin layer of icing all over the top and sides of the cake. Add more icing as needed to cover the entire cake. Sprinkle with nonpareils while the icing is still wet, if desired.

Spoon or scrape most of the remaining icing onto the top of the cake. With an offset knife, spread the icing to cover the top and sides of the cake. Smooth the sides and swirl the top with the back of a spoon, if desired. Sprinkle with nonpareils (optional).

Recipe by The Cafe Sucre Farine

]]>
https://thefancypantskitchen.com/recipe/green-velvet-cake/feed/ 4
Auntie Betty’s Poppyseed Cake https://thefancypantskitchen.com/recipe/auntie-bettys-poppyseed-cake/ https://thefancypantskitchen.com/recipe/auntie-bettys-poppyseed-cake/#comments Mon, 08 Jan 2024 23:07:32 +0000 https://thefancypantskitchen.com/?post_type=ranna_recipe&p=23660

Auntie Betty’s Poppyseed Cake is one of those recipes that needs to be in everyone’s recipe box (is that still a thing?). With a crunchy exterior and soft, moist interior, a person can never go wrong with this old-time recipe.  And, I’ve got a great story to go with this recipe!

I recently visited my first cousins in Florida.  My cousin, Brenda, asked me if I often make Auntie Betty’s Poppyseed Cake.  I was embarrassed to say that I didn’t know that cake, especially since Auntie Betty was my mom!  My mom passed in 1983, but her recipes definitely live on!  She was a great baker and cook!  

Brenda showed me the recipe and I was cracking up…it’s one of those three sentence recipes that goes something like this:  Mix all the ingredients, pour into Bundt pan, bake.  Seriously!

Even though I love the challenge of baking a dramatic 3-layer tiered cake with all the decorating, etc, Brenda (and her 3 daughters, Tammy, Diane and Francine) convinced me that I had to try it.  Even more startling for me was that it used boxed cake mix and vanilla instant pudding.  Yikes!  But, I promised that I would try it.

At that point, the conversation went something like this:

Brenda:  Be sure to undercook the cake by about 5 minutes

Diane:  Use the small size Vanilla Pudding.  I used the large one and it was awful!

Tammy:  Be sure to use Duncan Hines Classic Yellow Cake Mix.  No other will work as well!

Francine (my cousin, not me):  Don’t mix the poppyseeds in at the beginning.  They go in right before transferring the mixture to the pan.

Brenda:  Yes, you must use the cream sherry!

All:  It’s our favorite cake EVER!

Brenda:  I can’t wait to see how you make it your own!

It was this last comment that got me sweating…how to take a beloved classic, one from my own mother, and rework it so that it is blog-worthy.  What I decided was that I would leave the cake as it’s written but just add a glaze and a raspberry coulis that you could add if you wanted to.  If you are a purist, don’t add anything.  If you like a little more zhuzh, than drizzle one or both of the extras. You could also sprinkle confectioners’ sugar over the top as I’ve done.  Honestly, I loved using all three!

Here’s the interesting thing about me and this cake…once I tasted it, I remembered it!  I remembered the funny way that the poppyseeds crunched in my mouth when I took a bite.  I remember how delicious it was and how much I loved the crunchy exterior.  It all came back to me!

I shared the cake with my siblings and they all remembered it with fondness!

So, I want to thank my cousins for reminding me about Auntie Betty’s Poppyseed Cake and I want to encourage you all to try it!  You will never realize that it begins with two boxed mixes.  All you will know is that it’s delicious, easy and blog-worthy!!

Share Your Thoughts...

Lastly, if you make Auntie Betty’s Poppyseed Cake, be sure to leave a review down below at the bottom of this page (stars are also appreciated)! Above all, I love to hear from you and always do my best to respond to each and every review. And of course, if you do make this recipe, don’t forget to tag me on Instagram! Looking through the photos of recipes you all have made is one of my favorite things to do!

Auntie Betty’s Poppyseed Cake

Makes: 12 servings

Prep Time: 5 minutes

Bake Time: 50 minutes

Total Time: 55 minutes

Ingredients

  • 1 (15.25 ounce) box Duncan Hines Classic Yellow Cake Mix
  • 1 (3.4 ounce) box Vanilla Instant Pudding and Pie Filling
  • 4 eggs
  • 8 ounces sour cream
  • 1/2 cup cream sherry
  • 1/2 cup vegetable or canola oil
  • 1/3 cup poppy seeds

Cream Sherry Sauce:

  • 1/4 cup unsalted butter
  • 1/2 cup granulated sugar
  • 2 tbsp cream sherry
  • 1/4 cup water

Raspberry Coulis:

  • 1 cup raspberries
  • 2 tbsp granulated sugar
  • 2 tbsp water

Instructions

Preheat oven to 350°F. Spray a bundt pan with baking spray.

In a stand mixer, beat all of the ingredients except the poppy seeds for 5 minutes. Add the poppy seeds and combine for 30 seconds.

Bake for 50 minutes. Remove from the oven and let sit in the pan for 20 minutes. Invert onto a cooling rack. Serve warm or at room temperature with raspberry coulis and Sherry Glaze.

For the glaze, melt all ingredients in a small saucepan on the cooktop. Bring to a boil for a few minutes, cool for a few minutes and pour over the cake.

For the Raspberry Coulis, place the raspberries, sugar and water in a small saucepan on the cooktop and bring to a simmer. Simmer for 5 minutes, gently smashing the raspberries until a sauce forms. Cool before serving.

Recipe adapted from Betty Shostack (my mother, of blessed memory)

]]>
https://thefancypantskitchen.com/recipe/auntie-bettys-poppyseed-cake/feed/ 5
Perfect Chocolate Cupcakes https://thefancypantskitchen.com/recipe/perfect-chocolate-cupcakes/ https://thefancypantskitchen.com/recipe/perfect-chocolate-cupcakes/#respond Fri, 17 Feb 2023 20:43:03 +0000 https://thefancypantskitchen.com/?post_type=ranna_recipe&p=20624

If  you’re all about chocolate (and who isn’t?), then Perfect Chocolate Cupcakes are for you!  Fudgy, chocolatey, and moist, these luscious cupcakes are all you could ask for.  Even better, the cupcakes take just one bowl to make.  Love it!

These cupcakes get their moistness from buttermilk and the rich flavor from cocoa powder and brewed coffee.

I have a feeling that this will be your go-to cupcake recipe from now on!

Begin to make the cupcakes by combining the dry ingredients together.  In a smaller bowl, whisk oil, vanilla, eggs and buttermilk.  Pour the wet ingredients into the dry until the batter is smooth.    Pour in the brewed coffee and stir until just combined.

Divide the batter between the cupcake liners.  Only fill them about 2/3 full or  they might overflow when baked.  Once baked, cool them completely before frosting them.

To  make the frosting, place the room temperature butter and cream cheese into  a stand mixer and cream until  smooth and then add the cocoa powder.  Once combined, add the powdered sugar, coffee, vanilla and salt.  Cream on high speed until the mixture is fluffy.

Transfer the frosting to  a piping bag fitted with a tip (I like to  use a 1M tip) and frost the cooled cupcake.

There is nothing left to do except pour a glass of milk and indulge!  Go for it!

Share Your Thoughts...

Lastly, if you make Perfect Chocolate Cupcakes, be sure to leave a review down below at the bottom of this page (stars are also appreciated)! Above all, I love to hear from you and always do my best to respond to each and every review. And of course, if you do make this recipe, don’t forget to tag me on Instagram! Looking through the photos of recipes you all have made is one of my favorite things to do!

Perfect Chocolate Cupcakes

Makes: 22-24 cupcakes

Prep Time: 15 minutes

Bake Time: 30 minutes

Total Time: 45 minutes

Ingredients

Cupcakes:

  • 1 & 3/4 cups granulated sugar
  • 3/4 cups high quality cocoa powder
  • 2 cups flour
  • 1 & 1/2 tsp baking soda
  • 2 tsp baking powder
  • 1 tsp salt
  • 3/4 cup vegetable oil
  • 2 tsp vanilla extract
  • 3 large eggs
  • 1 cup buttermilk
  • 1/2 cup strongly brewed coffee

Chocolate Frosting:

  • 1 & 3/4 cups salted butter, room temperature
  • 1/2 cup cream cheese, room temperature
  • 1 & 1/2 cups cocoa powder
  • 5 cups powdered sugar
  • 1/2 cup strongly brewed coffee
  • 1 tbsp vanilla extract
  • 1/2 tsp kosher salt

Instructions

Preheat oven to 350°F. Line 24 cupcake tins with cupcake liners. Set aside.

In a large bowl, whisk together sugar, cocoa powder, flour, baking soda, baking powder, and salt. In a separate bowl, whisk oil, vanilla, eggs, and buttermilk.

Pour the wet ingredients into the dry, whisking until no lumps remain. Pour in brewed coffee, mixing until just combined.

Use 1/3 cup measuring cup or a large ice cream scoop to divide the batter evenly between the cupcake liners, filling them about 2/3 of the way. Bake for roughly 25 minutes, or until a knife inserted in the center of the cupcake comes out clean. Cool completely on a wire rack before frosting.

While cupcakes are cooling, make the frosting. Place butter and cream cheese in a standing mixer fitted with a paddle attachment (an electric hand mixer also works). Cream on high speed for 1 minute, then turn speed to low and add in cocoa powder. Mix until combined, then add in powdered sugar, brewed coffee, vanilla extract, and salt. Cream on high speed for 1 minute, until mixture has lightened slightly and is fluffy.

Transfer the frosting to a piping bag fit with desired tip (I used 1M) and frost the cooled cupcakes!

Recipe from Broma Bakery

]]>
https://thefancypantskitchen.com/recipe/perfect-chocolate-cupcakes/feed/ 0
Retro-Style Chocolate Sheet Cake (GF) https://thefancypantskitchen.com/recipe/retro-style-chocolate-sheet-cake-gf/ https://thefancypantskitchen.com/recipe/retro-style-chocolate-sheet-cake-gf/#respond Sun, 15 Jan 2023 19:36:03 +0000 https://thefancypantskitchen.com/?post_type=ranna_recipe&p=20178

This retro-style Chocolate Sheet Cake checks all the boxes…deep chocolate flavor, one bowl, gluten-free, healthy-ish (read on), and Easy Peasy!

My mom used to make sheet cakes in a pyrex baking dish that were supposed to be for snacks after school.  In one bowl, she would mix (from scratch, not a box) the batter, pour it into the pyrex, bake it, cool it and frost it.  She would then insist “hands off” until after school, but I would be first to sneak down and eat a slice for breakfast.  As far as I’m concerned, sheet cake is a breakfast food!

My healthy-ish comment comes from the fact that there is no butter, no sugar and no flour in this recipe.  Instead, we’re using coconut oil, maple syrup and almond flour.  You would never know unless you tend to get sugar headaches or are gluten-free.

Mix all the wet ingredients together, then add the dry ingredients and chocolate chips.  Pour into the baking dish and bake until it’s just set.

The frosting is a traditional chocolate frosting made in a stand mixer (definitely not “healthy-ish”).  Combine the butter, powdered sugar, cocoa powder, vanilla and warm milk in the bowl of the mixer and beat until it’s smooth.

Once the cake is cooled, spread the frosting over the top and let it set for an hour or so, if you can.  I like the frosting to have a slight set to it on top but be slightly runny underneath.  Very retro.

Don’t go eating this for breakfast, now.  It’s strictly for after school.  Yeah, right!

Share Your Thoughts...

Lastly, if you make Retro-Style Chocolate Sheet Cake (GF), be sure to leave a review down below at the bottom of this page (stars are also appreciated)! Above all, I love to hear from you and always do my best to respond to each and every review. And of course, if you do make this recipe, don’t forget to tag me on Instagram! Looking through the photos of recipes you all have made is one of my favorite things to do!

Retro-Style Chocolate Sheet Cake (GF)

Makes: 12 servings

Prep Time: 25 minutes

Bake Time: 30 minutes

Total Time: 55 minutes

Ingredients

  • 1/2 cup melted coconut oil
  • 1/2 cup whole milk
  • 1/2 – 3/4 cup maple syrup
  • 2 eggs, at room temperature
  • 2 tsp vanilla extract
  • 2 cups almond flour
  • 1 cup cocoa powder
  • 1 tsp baking soda
  • 1 tsp kosher salt
  • 3/4 cup brewed coffee
  • 1/2 cup semi-sweet mini chocolate chips (optional)

Chocolate Icing:

  • 1 stick (1/2 cup) salted butter, at room temperature
  • 2-3 cups powdered sugar
  • 1/2 cup cocoa powder
  • 2 tsp vanilla extract
  • 1/4 cup warmed milk, plus more for thinning

Instructions

Preheat oven to 350° F. Line a 9×13 inch baking dish with parchment paper.

In a large bowl, beat together the coconut oil, milk, maple syrup, eggs, and vanilla. Add the almond flour, cocoa powder, baking soda, and salt. Mix until just combined, then slowly beat in the coffee until combined. It will be thin. If using, stir in mini-chocolate chips.

Pour the batter into the prepared pan. Bake 30-35 minutes, until the top is just set and no longer wiggly in the center. Remove and let cool completely before frosting.

To make the frosting, add the butter, 2 cups powdered sugar, cocoa powder, vanilla, and 1/4 cup warm milk to the bowl of a stand mixer. Beat until smooth, adding additional warm milk until the frosting becomes thicker, but still drizzly. Taste, adding more sugar if needed. Spread the frosting over the cake. Let sit for one hour or so to set. Slice and enjoy!

This cake will keep well for 3-4 days at room temperature or in the fridge.

Recipe by Half Baked Harvest

]]>
https://thefancypantskitchen.com/recipe/retro-style-chocolate-sheet-cake-gf/feed/ 0
Apple Cider Bundt Cake https://thefancypantskitchen.com/recipe/apple-cider-bundt-cake/ https://thefancypantskitchen.com/recipe/apple-cider-bundt-cake/#respond Fri, 25 Nov 2022 20:28:34 +0000 https://thefancypantskitchen.com/?post_type=ranna_recipe&p=18531

This Apple Cider Bundt Cake is just what you need when you are looking for an easy, apple-forward flavor in a cake.

It’s got triple the apple flavoring from using apple cider (I’m sure you’ve got a bit left over from Thanksgiving) and applesauce in lieu of butter in the batter, and a delicious apple cider glaze to top the cake.

As well, it’s so darn easy!  Everything gets whisked together in one bowl.  Gotta love that, right??!!

There is an apple cider glaze that goes on top that gives the bundt cake a crispy crunchiness that is truly divine!

Let’s talk details…

Prepare the bundt pan by spraying it with baking spray; use a small piece of paper towel to rub the spray into all of the crevices.  Then lightly spray the pan again.

In a large bowl, combine oil, apple cider, applesauce, both sugars, eggs and vanilla.  Once the batter is smooth, add the baking powder and all the spices, whisking until it’s smooth.  Finally add the flour and whisk again until the flour is incorporated.

Pour the batter into the prepared Bundt pan and bake it until a toothpick inserted in the middle comes out clean.  This will take between 55 and 65 minutes.  Let the cake cool for 10 minutes and then invert it onto a cooling rack set over a sheet of aluminum foil (for easy cleanup).

In the meantime, make the glaze by combining the apple cider, butter and salt and microwaving it until the butter is melted.  Add the powdered sugar and whisk until it’s smooth.

While the cake is still warm, brush the glaze over the cake.  Once it’s completely covered, brush more on until you have used it all up.

Once the cake is completely cooled, the glaze should be dry and a little bit crispy.

I told you this would be easy!  

Share Your Thoughts...

Lastly, if you make Apple Cider Bundt Cake, be sure to leave a comment and/or give this recipe a rating! Above all, I love to hear from you and always do my best to respond to each and every comment. And of course, if you do make this recipe, don’t forget to tag me on Instagram! Looking through the photos of recipes you all have made is one of my favorite things to do!

Apple Cider Bundt Cake

Makes: 20 servings

Prep Time: 20 minutes

Bake Time: 1 hour

Total Time: 1 hour & 20 minutes

Ingredients

For the Cake:

  • 1 cup neutral flavored oil (sunflower, safflower, grape seed, avocado, canola and vegetable oils will all work)
  • 1 cup apple cider
  • 1 cup applesauce, no added sugar
  • 2/3 cup granulated sugar
  • 1 cup brown sugar, packed
  • 3 large eggs
  • 2 tsp vanilla extract
  • 4 tsp baking powder
  • 2 & 1/2 tsp ground cinnamon
  • 1/2 tsp ground ginger
  • 1/2 tsp ground nutmeg
  • 1/4 tsp ground cloves
  • 1 tsp kosher salt
  • 3 cups all-purpose flour

For the Apple Cider Glaze:

  • 1/4 cup apple cider
  • 2 tbsp unsalted butter
  • 2 tsp salt
  • 3/4 cup powdered sugar

Instructions

Preheat your oven to 325˚F. Place a piece of parchment paper or foil on a work surface and set a cooling rack on top of it (for easy cleanup).

For the Cake:

In a large mixing bowl, combine the oil, apple cider, applesauce, sugars, eggs and vanilla. Whisk until well combined and the batter is smooth.

Add the baking powder, all of the spices and the salt. Whisk again until everything is well incorporated.

Add the flour and whisk just until incorporated and the batter is fairly smooth.

Spray a 12-cup Bundt pan (or 2 9×4 or 9×5-inch loaf pans) generously with baking spray. With a small piece of paper towel, rub the baking spray to make sure all the grooves and crevices are coated. Spray the pan again lightly.

Pour the batter into the prepared pan and bake for 55-65 minutes or until a toothpick inserted into the center of the cake comes out clean or with just a few moist crumbs on it OR (even better) an instant thermometer inserted into the center of the cake reads 200-205˚F.

Allow the cake to cool in the pan for 10 minutes and then invert onto the prepared cooling rack.

For the Apple Cider Glaze:

While the cake is cooling for the 10 minutes in the pan, prepare the glaze: In a small microwave-safe bowl or measuring cup, combine the apple cider, butter and salt. Cover with a slightly damp paper towel and microwave on high power for 45-60 seconds or until the butter is melted.

Remove from the microwave and add the powdered sugar. Whisk until nice and smooth

Slowly brush the glaze all over the cake, including the center core. Keep brushing, using all the glaze. Some of it will drip off onto the parchment or foil but most of it should sink into the cake. Allow the cake to cool and the glaze to dry. Serve and enjoy!

Recipe by The Cafe Sucre Farine

]]>
https://thefancypantskitchen.com/recipe/apple-cider-bundt-cake/feed/ 0
Honey Loaf Cake https://thefancypantskitchen.com/recipe/honey-loaf-cake/ https://thefancypantskitchen.com/recipe/honey-loaf-cake/#respond Fri, 23 Sep 2022 00:51:47 +0000 https://thefancypantskitchen.com/?post_type=ranna_recipe&p=16309

For a different take on a Rosh Hashana tradition, try Honey Loaf Cake.  Most of us are familiar with honey cake, but baking it in a loaf pan gives us another delicious way to snack on it.

Anything that includes honey (for a sweet New Year) is a tradition for the Jewish people as we celebrate the arrival of the Jewish New Year.  This twist on the traditional cake is sweet with honey and rich in flavor from the dark brown sugar.  Apple sauce (another nod to the tradition of Apples & Honey) is incorporated into the batter to moisten this cake.  I like to think that it’s healthy in that I’m getting my fruit for the day!  Nice try, right?!

To make this delicious loaf cake, combine the flour, cinnamon, salt and baking soda in a medium bowl.  Mix the applesauce and honey in a small bowl or measuring cup.

In a stand mixer, beat the sugar and eggs on medium speed for a few minutes and drizzle the oil in slowly.

Finally, add the flour in three additions alternating with the applesauce mixture.

Pour the batter into a loaf pan and bake it until it’s golden and the center is baked through.

Serve it topped with pomegranate seeds, drizzled with honey or dusted with powdered sugar (or all of the above)!

Share Your Thoughts...

Lastly, if you make Honey Loaf Cake, be sure to leave a comment and/or give this recipe a rating! Above all, I love to hear from you and always do my best to respond to each and every comment. And of course, if you do make this recipe, don’t forget to tag me on Instagram! Looking through the photos of recipes you all have made is one of my favorite things to do!

Honey Loaf Cake

Makes: 8 servings

Prep Time: 15 minutes

Bake Time: 40 minutes

Total Time: 55 minutes

Ingredients

  • 1 & 2/3 cup unbleached all-purpose flour
  • 2 & 1/2 tsp ground cinnamon
  • 1/2 tsp baking soda
  • pinch kosher salt
  • 1/3 cup + 2 tbsp honey
  • 3/4 cup unsweetened apple sauce
  • 3/4 cup dark or light brown sugar
  • 2 large eggs
  • 1 cup vegetable oil
  • 2 cups pomegranate seeds, optional

Instructions

Preheat the oven to 340°F. Line the bottom of a nine-inch loaf pan with parchment paper and grease the sides.

In a medium bowl, sift the flour, cinnamon, salt, and baking soda together and set aside. In a large measuring cup, mix the applesauce and honey. Set aside.

In a bowl of a standing mixer, place the sugar and eggs and mix on medium speed for a few minutes until the mix is lighter in color. Slowly drizzle the oil into the bowl. Mix just until incorporated.

Add the flour in 3 additions alternating with the applesauce/honey mixture, starting and ending with the flour mixture.

Pour the batter into the greased loaf pan or divide between the mini pans. Bake until the center is golden and a toothpick comes out with a few moist crumbs from the center of the cake, about 45-50 minutes.

Remove the cake from the oven and let cool before slicing.

If you chose, drizzle the cake with 1/4 of warm honey or dust it with some powdered sugar.

Chef’s Notes:

Do not over-mix the eggs, sugar, and oil otherwise; the cake will collapse at the center.

You can replace the applesauce with other acidic ingredients such as sour cream, buttermilk, or coffee.

Add up to 1 cup of chopped nuts and raisins to the batter.

The cake can be baked in a bundt pan, mini loaf pans, cupcake liners, or as a layer cake. Be sure not to fill the pan more than 3/4 full.

Best to store the cake at room temperature, covered for up to 3 days. Do not refrigerate.

To freeze, wrap the cake with plastic wrap and in a plastic bag and freeze for up to two months.

Recipe by One Sarcastic Baker

]]>
https://thefancypantskitchen.com/recipe/honey-loaf-cake/feed/ 0
Nutella Chocolate Chip Cookie Icebox Cake https://thefancypantskitchen.com/recipe/nutella-chocolate-chip-cookie-icebox-cake/ https://thefancypantskitchen.com/recipe/nutella-chocolate-chip-cookie-icebox-cake/#respond Thu, 08 Sep 2022 17:05:55 +0000 https://thefancypantskitchen.com/?post_type=ranna_recipe&p=16100

Nutella Chocolate Chip Cookie Icebox Cake is a perfect dessert!  Why? 

  • It’s no-bake.  Yes, you heard me!  Whip it, layer it, freeze it.  Done.
  • Only a few ingredients, most of which you’ve already got in the fridge or pantry (powdered sugar, vanilla, cream, milk).  The only items you may not have are Chips Ahoy Chocolate Chip Cookies and Nutella, and we know you want to have those in your pantry!
  • It takes about 15 minutes to throw together.  What??!!
  • Delicious!
  • Pretty as can be!

Do you need any more convincing?  Let’s get started!

This is one of the easier desserts I’ve ever made.  All you need to do is whip some heavy cream with powdered sugar, vanilla and salt.  

Once that’s done, you’re going to layer it in a loaf pan that’s been lined with plastic wrap.  We line the pan so that it’s easier to remove once it’s frozen.

Begin by spreading the whipped cream mixture on the bottom of the pan.  Top it with Chips Ahoy cookies that have been dipped in milk (ah yes, the old milk and cookies combo!). Then drizzle and spread Nutella over the top of the cookies.  Repeat until all of the ingredients have been used up.  If you have extra, just pile it all on a spoon and eat it!

The beauty of this cake is that you cake make different layers as thick or as thin as you like.  You can have thick layers of Nutella.  You can thicken up the whipped cream layers.  It’s really all up to you and your taste buds.

Once layered, freeze this icebox cake for about 3 hours.  When you are ready to serve this, invert it onto a serving platter or cutting board.  You might need to wriggle it a bit using the plastic wrap or running a hot cloth over the bottom of the pan to loosen it from the pan.  Remove the plastic wrap.

You can top it with crushed up Chips Ahoy cookies, if there are any left (hide a few away so that you can pretty up the top…eat the rest while no one is looking).

When you are ready to slice it, use a hot sharp knife and serve it.  Have fun eating this yummy treat!

Share Your Thoughts...

Lastly, if you make Nutella Chocolate Chip Cookie Icebox Cake, be sure to leave a comment and/or give this recipe a rating! Above all, I love to hear from you and always do my best to respond to each and every comment. And of course, if you do make this recipe, don’t forget to tag me on Instagram! Looking through the photos of recipes you all have made is one of my favorite things to do!

Nutella Chocolate Chip Cookie Icebox Cake

Makes: 10 servings

Prep Time: 15 minutes

Freeze Time: 3 hours

Total Time: 3 hours & 15 minutes

Ingredients

  • 2 cups heavy cream
  • 1 tsp vanilla extract
  • 1/4 cup powdered sugar
  • 1/2 cup milk
  • 33 Chips Ahoy Cookies (13 ounce or 18 ounce package if you want extra)
  • 1 cup Nutella spread (about 1 7.7 ounce jar)

Instructions

In a standing mixer fitted with a whisk attachment, beat the heavy cream until soft peaks form. Add the powdered sugar, vanilla extract and salt and beat well. Set aside.

Line the inside of a standard-sized loaf pan with plastic wrap on all sides. Working in layers, start with the whipped cream mixture, spoon and spread it over the bottom. Dunk the Chips Ahoy cookies in milk and lay them in an even layer, breaking the cookies up into small pieces to fill in and cover the whipped cream. Drizzle a few heaping tablespoons of Nutella over the cookies, using an offset spatula or a spoon to spread into an even layer.

Repeat layers until your loaf pan is full, finishing with a layer of whipped cream. It’s completely up to you how much you spoon on each layer– if you want more whipped cream, do it! More Nutella, do it!

Cover with plastic wrap and place in the freezer to set for at least 3 hours. When ready to serve, take the icebox cake out of the freezer. and lift out of the loaf pan, inverting the cake onto a serving dish. If desired, top with crumbled cookies. Use a hot, sharp knife to slice and serve! Enjoy.

Recipe from Broma Bakery

]]>
https://thefancypantskitchen.com/recipe/nutella-chocolate-chip-cookie-icebox-cake/feed/ 0
10-Minute Gooey Peach Mug Cake https://thefancypantskitchen.com/recipe/10-minute-gooey-peach-mug-cake/ https://thefancypantskitchen.com/recipe/10-minute-gooey-peach-mug-cake/#comments Fri, 12 Aug 2022 16:19:36 +0000 https://thefancypantskitchen.com/?post_type=ranna_recipe&p=15800

10-Minute Gooey Peach Mug Cake…doesn’t that just say it all?  This peachy dessert takes only 10 minutes to make, it’s filled with peaches and cinnamon-spiced cake, and has a beautifully caramelized brown sugar topping.

It’s made in the microwave and literally takes minutes.  The idea of an individual mug cake is brilliant…it’s the perfect snack when it’s just you and you’ve got the urge to indulge.  It’s also perfect when there are more snacky people around..just double or triple the recipe!

Layer some peach slices, brown sugar and butter in the bottom of a mug.  I used a 10-ounce mug, but you might want something a tiny bit larger as I got a little over-run.  There will be less cleanup if you use a bigger mug.

Since each microwave has a different wattage, you’ll want to watch to see how long it takes to melt the butter and soften the peaches, but it shouldn’t take more than one minute.

The cake batter is a combination of melted butter, brown sugar, egg and vanilla.  Once whisked, add flour, rolled oats, baking powder, and salt, and stir until it’s just combined.

Pour the batter over the peaches that are already in the mug and place the remaining peaches on top, sprinkle some more brown sugar, butter and cinnamon over top and pop it back in the microwave for 2 minutes.

I love eating this with ice cream, but it’s your world…you do you!

Share Your Thoughts...

Lastly, if you make 10-Minute Gooey Peach Mug Cake, be sure to leave a comment and/or give this recipe a rating! Above all, I love to hear from you and always do my best to respond to each and every comment. And of course, if you do make this recipe, don’t forget to tag me on Instagram! Looking through the photos of recipes you all have made is one of my favorite things to do!

10-Minute Gooey Peach Mug Cake

Makes: 1 big mug

Prep Time:  7 minutes

Bake Time: 3 minutes

Total Time: 10 minutes

Ingredients

  • 1/2 of a peach, sliced thin or chopped
  • 3 tbsp brown sugar
  • 2 tbsp unsalted butter
  • 1 egg
  • 1 tsp vanilla extract
  • 1/4 cup all-purpose flour
  • 2 tbsp old fashioned oats
  • 1/4 tsp baking powder
  • 1/4 tsp kosher salt
  • 1 pinch cinnamon

Instructions

Melt 1/2 tablespoon butter in a (10-12 ounce) microwave-safe mug with 3-4 peach slices and 1 tablespoon brown sugar for 30 seconds to 1 minute.

In a bowl, whisk 1 tablespoon melted butter with 1 tablespoon brown sugar, the egg, and vanilla. Add the flour, oats, baking powder, and salt, stirring until just combined.

Spoon the batter over the peaches in the mug. Do not stir. Place the remaining peach slices on top. Sprinkle with 1 tablespoon of brown sugar and a pinch of cinnamon. Add 1/2 a tablespoon of butter. Microwave on full power for 1 minute 45 seconds to 2 minutes (I always do 2 minutes). Serve with ice cream. ENJOY.

Recipe from Half Baked Harvest

]]>
https://thefancypantskitchen.com/recipe/10-minute-gooey-peach-mug-cake/feed/ 2