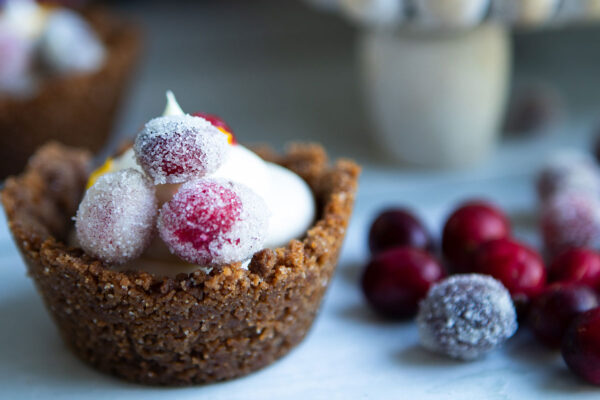
The Ritz Paris Cookie Tart is one of those desserts you’re likely to serve over and over again! With it’s rich butterscotch-flavored cookie base and it’s “turtle”-like topping of chocolate, buttery caramel and toasted almonds, this is sure to wow anyone who is lucky enough to get a taste!
This cookie tart was originally posted by the New York Times and was “inspired” by the chef at the Ritz in Paris. Although this recipe has been tweaked to make the base more moist and flavorful and to make the topping able to withstand transportation (perfect for a picnic or potluck), it still harkens back to the original recipe.
The base of this cookie tart gets its deep butterscotch flavor from the browned butter and brown sugar. Once the butter is browned (easily done in the microwave if you don’t want to dirty a pan), add water, brown and white sugars, almond butter and vanilla. Whisk it all together and add the egg and yolk and stir again.
Add the baking powder, baking soda and salt, and combine. Add in the flour until just incorporated. Transfer to a tart pan and sprinkle the chocolate chips and almond pieces over the top.
Bake the tart for 20 minutes or so. Let it cool in the pan and then remove from tart pan.
For the caramel drizzle, microwave the caramels and cream together until melted and mixed together.
Drizzle over the top in little pools of caramel. Sprinkle lightly with flaky sea salt, if desired, cut and enjoy!
Makes: 12 servings
Prep Time: 20 minutes
Bake Time: 22 minutes
Total Time: 42 minutes
For the Cookie Dough:
For the Topping:
For the Caramel Drizzle:
For Garnish:
Instructions
For the Brown Butter:
Put the butter in a large (2 quart) microwave-safe bowl. Cover tightly with plastic wrap. With a small, sharp knife, make 3-4 small slits in the plastic wrap (for venting).
Microwave on high power for 4 minutes. Check to see if the butter is starting to brown. You’re looking for a golden color. If it’s not there yet, microwave another minute then check again. Continue adding a minute then check the color until it’s golden. (My microwave is 900 watts and takes 6 minutes to achieve the golden brown butter.)
Carefully remove the bowl from the microwave and peel back the plastic wrap (it will be HOT!). Allow the butter to cool for 10 minutes.
For the Prep:
Center a rack in the oven and heat to 350˚F. Spray a 9- or 10-inch tart pan (with a removable bottom) generously with baking spray. Line the pan with a circle of parchment paper. Get a sheet pan out and set aside.
For the Cookie Dough:
After 10 minutes, add the water, both sugars, the almond butter and the vanilla to the brown butter. Whisk until everything is well combined. Add the egg and yolk and stir again.
Add the baking powder, baking soda and salt and stir to incorporate. Add the flour and stir just until it disappears. Transfer the batter to the prepared pan and spread to an even layer. Scatter the chocolate chips over the top then the almond pieces.
Place the tart pan on a sheet pan and bake for 20-23 minutes or until a toothpick inserted into the center of the tart comes out clean. Don’t over bake. (You can also test with an instant thermometer for doneness. It should read 175-185˚F.
Remove the tart from the oven and allow it to cool for 10 minutes in the pan then remove the outer ring from the tart pan.
For the Caramel Drizzle:
Combine the soft caramels and cream (or half-and-half) in a small microwave-safe bowl. Microwave on high power for 15-20 seconds. Stir to melt the caramels. If needed, return to the microwave for another 10 seconds. Drizzle the caramel over the top of the tart in small pools. If the caramel starts to thicken, just pop it back into the microwave for another 10 seconds. Sprinkle lightly with flaky sea salt, if desired.
Recipe by The Cafe Sucre Farine
This Maple Pecan Tart is the prettiest little tart I’ve seen lately! A filling of chopped and whole pecans, flavored with maple syrup, is poured over a tender, flaky crust and topped with cute little leaf cut-outs. Finished with maple cinnamon whipped cream, this is sure to become a family favorite!
This is not a traditional pecan pie with a gooey filling. Instead, it is more like a pecan bar and it is out of this world!
The crust is made in the food processor which eliminates the need to chop in the hard butter. Simply combine the flour, salt and sugar in the processor and add the cubed butter and process until it resembles coarse meal.
With the processor running, add ice water until the dough holds together. Wrap the dough in plastic and chill in the refrigerator for at least one hour.
When ready, roll out the dough until it is 1/4-inch thick (about a 12-inch circle). Transfer it to a tart pan and lightly press down. Trim off the excess and use that to cut out leaf-shaped cookies to top the pie. Chill the crust and cut-outs.
For the filling, combine brown sugar, maple syrup, butter and heavy cream in a sauce pan and heat over medium-high heat. Bring to a boil and add chopped pecans. Take the pan off the heat and let sit for 10 minutes.
Spoon the filling into the prepared crust and top with pecan halves. Place it in the oven on a pre-heated sheet pan (the pan will catch any drippings). Bake the tart for 40-45 minutes and then cool on a wire rack for at least one hour prior to serving.
To bake the cut-out leaves, first brush heavy cream over them and sprinkle with sugar. Pop them into the hot oven and bake for 13-15 minutes, until golden brown. Let them cool before adding them to the top of the tart.
To make the maple cinnamon whipped cream, pour the heavy cream into a mixer bowl and add sugar. Whip on medium speed until the cream starts to thicken. Add the maple extract and cinnamon and whip until soft peaks form.
Makes: 8 servings
Prep Time: 1 hour
Bake Time: 45 minutes
Total Time: 1 hour 45 minutes
Crust:
Filling:
Maple Cinnamon Whipped Cream:
Crust:
Combine flour, salt, and sugar in a food processor. Add cubed butter and process for 10 seconds, just until the mixture resembles coarse meal. With the food processor running, add 2 tablespoons ice water in a steady stream through feed tube. If needed, add additional ice water 1 tablespoon at a time, and process just until dough holds together in large clumps (no more than 30 seconds). Wrap dough in plastic and flatten slightly to form a disc. Chill in the refrigerator at least 1 hour (or up to 2 days, or place in a freezer bag and freeze up to 1 month).
Spray a 9-inch round removable-bottom tart pan lightly with nonstick spray. Place disc of dough on a floured board and dust dough with flour. Roll out dough (roll dough in one direction, then lift up dough and rotate a quarter turn and roll, then repeat) until dough is 1/4-inch thick, approximately a 12-inch circle. If dough starts to stick, use a bench scraper to lift dough from board. Transfer dough to prepared tart pan, lightly pressing down into the bottom and sides of the pan. Run the rolling pin over the top of the tart pan to remove the excess dough, and chill in the freezer for 20 minutes. If desired, punch out decorative leaf shapes from the leftover dough; chill cut outs in the refrigerator until ready to bake.
Filling:
Combine brown sugar, maple syrup, butter, heavy cream, and salt in a heavy saucepan over medium-high heat. Bring mixture to a boil and stir in chopped pecans. Remove from heat; let stand 10 minutes before assembling tart.
Preheat oven to 350°F and place a rimmed baking sheet in the middle of the oven. Spoon filling into chilled tart shell and top with pecan halves in a decorative pattern. Place tart on pre-heated baking sheet.
Bake tart for 40 to 45 minutes, until filling is bubbly and pastry is golden. Cool tart on a wire rack for at least 1 hour before serving.
Brush pastry leaf cut outs with heavy cream and sprinkle with sugar. Bake for 13 to 15 minutes, until golden brown. Let cool before adding to the top of the tart.
Maple Cinnamon Whipped Cream:
Pour heavy cream into a chilled mixer bowl fitted with wire whip attachment. Add sugar and whip on medium speed until cream begins to thicken. Add maple extract and cinnamon; whip the cream on medium-high speed until soft peaks form. Serve immediately.
Recipe by Tutti Dolci
Easy Blueberry Cobbler is a wonderful dessert that I love to serve all year long. When blueberries are in season, it’s heavenly but frozen blueberries work just as well!
I add cinnamon to the berries to give them that extra bit of autumn deliciousness and a little lemon juice to brighten the flavor.
Then, I top the blueberries with a biscuit cobbler topping. It comes together easily, using just your (clean) hands to combine. Sprinkle some coarse sugar over and bake it up and the only thing left is some ice cream for serving!
For this preparation, we combine the blueberries, sugar, flour, salt, cinnamon and lemon juice in a large bowl. Transfer them to a pie plate and dot with butter pieces.
Place the pie plate on a parchment-lined baking sheet (this will make clean-up a snap!) and bake for 15 minutes.
While the blueberries are baking, make the biscuit topping.
Combine the flour, baking powder, sugar and salt in a bowl. Add the diced butter and work together with your fingers. You aren’t trying to incorporate all of the dry ingredients into the butter, just to work the butter until it is pea-sized.
Whisk the egg and milk together and then pour into the flour mixture. Using your hands, mix until there is no liquid left and you have a shaggy mass.
Remove the blueberries carefully from the oven and drop dollops of biscuit topping over them. I like to spread out the topping so that it’s not too thick. If it’s really thick, it’s hard to cut through when you are eating it.
Bake the cobbler for an additional 30 minutes or until the berries are juicy and bubbling and the biscuit topping is golden brown.
Let the cobbler cool for 30 minutes and serve warm or at room temperature with vanilla ice cream or whipped cream.
Makes: 8 servings
Prep Time: 15 minutes
Bake Time: 50 minutes
Total Time: 65 minutes
Blueberry Cobbler Filling:
Biscuit Topping and to Finish:
Blueberry Cobbler Filling:
Preheat the oven to 425°F and lightly grease a standard or deep-dish 9″ pie plate.
In a large mixing bowl, mix together the blueberries, sugar, flour, salt, cinnamon, and lemon juice. Pour the blueberry mixture into the pie plate and even out the berries. If you have extra blueberries, save for another purpose. They will settle a little while baking, but the berries should not be above the rim.
Dot with the tablespoon of diced butter, and place the blueberry-filled pie plate on top of a parchment-lined sheet pan to bake. This will catch any juices that may bubble over when baking. Bake the blueberry filling, uncovered, for 15 minutes.
For the Cobbler Biscuit Topping and to Finish:
While the blueberries get their head start on baking, make the biscuit topping. Mix together the all-purpose flour, baking powder, sugar, and salt. Add the diced butter. Work the butter into the flour with your hands until the butter is the texture of small peas. The butter does not have to be too combined – there should still be loose flour.
Whisk the egg and milk together. Add into the flour-butter mixture and mix (I use my hands) just until the liquid has been absorbed and dough comes together as a shaggy mass.
Carefully remove the partially-baked blueberries from the oven. Dollop dunks of biscuit topping over the surface. Try not to make the chunks too thick (spread them out) as this will create a thick firm topping, making it difficult to cut through with a fork or spoon when eating. Sprinkle with a little additional sugar. Return the pie plate to the oven and bake for 30 to 40 minutes more, until the berries are juicy and bubbling, and the biscuit topping is golden brown.
Cool for at least 30 minutes, then serve the blueberry cobbler with vanilla ice cream or fresh whipped cream.
Chef’s Notes:
You can use fresh and frozen blueberries interchangeably. Don’t worry about defrosting the blueberries. They’ll bake exactly the same.
This blueberry cobbler recipe is best served warm or at room temperature on the day it is baked. But it will also be quite good the next day. Store covered with plastic wrap or foil.
Recipe by Unpeeled Journal
I just love a summer crisp and this Skillet Peach, Berry and Caramel Crisp is incredible! If you’ve been following me for a while, you know that I love caramel. I love it drizzled over crisp but I had never thought about including it in my filling! Until now!
This crisp is loaded with fresh peaches, strawberries, raspberries and, of course, caramel sauce and then topped with a delicious crisp topping. Add a scoop (or two) of ice cream and another drizzle of caramel sauce and life can’t get much better.
Let’s start with making the caramel sauce. Add the sugar and a bit of water to a saucepan. Cook, without stirring, until the butter and sugar have completely melted and started to bubble.
Very carefully, stir the mixture occasionally until it is a deep golden brown. Be very careful to not walk away from the pan as it can burn very quickly! Add the heavy cream and whisk it until it is smooth and then add the vanilla and salt. Whisk it until there are no lumps and it is smooth.
Carefully pour the caramel into a heat-proof container to cool down.
To make the filling, combine all of the ingredients in a large mixing bowl. Drizzle 1/4 cup of caramel sauce over the top and stir again. Scrape the fruit and all of their juices into an oven-safe skillet (I like to use a cast-iron skillet).
In the same bowl, make the topping. Combine the flour, oats, pecans, sugar and salt. Add the softened butter and use your fingers to mash it into the dry ingredients until crumbs form. Pour it evenly over the filling and bake the crisp until the topping is golden and the juices are bubbling. This will take 40-50 minutes.
Serve warm with more caramel sauce and ice cream!
Makes: 8-10 servings
Prep Time: 15 minutes
Cook Time: 1 hour & 10 minutes
Total Time: 1 hour & 25 minutes
Caramel Sauce:
Filling:
Topping:
Make the Caramel Sauce:
Add the granulated sugar and 1/4 cup water to a 3-quart saucepan and stir to combine. Add the butter and set it over medium-high heat, but do not stir. Cook, without stirring, until the butter and sugar have completely melted and started to bubble, 5-10 minutes.
After the mixture has begun to brown at the edges, use a heatproof spatula to carefully stir it occasionally until it is deep golden brown and beginning to smoke just slightly, about 4 to 5 minutes. Do not walk away from the pan during this process as the caramel will go from perfectly golden to burned in moments.
When the mixture is deep golden, remove the pan from the heat, and carefully whisk in the heavy cream. The mixture will expand and sputter before turning into a smooth sauce. Add the vanilla and salt. If the caramel is at all lumpy, return the pan to the stove on low heat and whisk until smooth. You should have about 2 cups. Carefully pour the caramel into a heat-safe container to cool.
Prepare the Filling:
Heat your oven to 350°F and set a rack in the center. Combine the sliced peaches, raspberries, strawberries, cornstarch, sugar, lemon juice, and vanilla in a large bowl, and stir to combine. Drizzle 1/4 cup caramel sauce over the top and stir again. Scrape the fruit and all of their juices into a 9- or 10-inch oven-safe skillet.
Make the Topping:
In the same bowl, combine the flour, oats, pecans, sugar and salt. Stir until well combined, then add the butter and mash it into the dry ingredients with your fingers until crumbs form. Pour the crumb topping evenly over the apples. Bake the crisp until the topping is golden and the juices are bubbling, 40 to 50 minutes. Serve warm with more warm caramel sauce and ice cream. Store any remaining sauce in an airtight container in the refrigerator for about a week. It can be rewarmed for later use in a saucepan over low heat.
How gorgeous is this Fresh Peach Pie?! It is so easy to make and highlights the incredible ripe peach flavor. It’s also part of my Easy Peasy category, which means that even novice bakers can make this one!
The crust is made with vegetable and olive oil, so there’s no worry about blending butter into the dry ingredients, which can be a little daunting for newer bakers. There’s also no “blind baking” silliness (that’s where you pre-bake the crust using pie weights)…just press the dough into the tart pan (see, you don’t even have to roll it), top it with the yummy peaches, sprinkle some crumble over it and bake it!
I’m telling you, this is a go-to recipe! Don’t feel restricted to using peaches…you can use nectarines or plums or combine them!
For this easy crust, stir the flour, salt and a bit of sugar together. This eliminates the sifting process as the salt and sugar sift the flour.
In a separate bowl, whisk the oils, milk and almond extract. I love almond extract with peaches, but if you object to it, vanilla extract will be a good substitute. Pour this mixture over the flour and use a fork to just combine the wet and dry ingredients. Don’t overwork it.
Transfer the dough to an 11-inch tart pan and press it up the sides (that’s where I like to start) and then cover the bottom. This is a thin crust. If you make it too thick, you won’t have enough dough to fill the pan.
Make the crumble by combining sugar, flour, salt and butter. Pinch the butter with your fingers until the dry ingredients are crumbly and you have a mix of fine granules and tiny pebbles.
Starting on the outside, arrange the peaches in a circle, overlapping the slices. Fill the center however you desire. Sprinkle the crumble over the top and bake for 35-45 minutes or until the crust is brown and the peaches begin to bubble.
Serve the tart warm or at room temperature. Whipped cream or ice cream are wonderful toppings!
Makes: 8 servings
Prep Time: 20 minutes
Bake Time: 35 minutes
Total Time: 55 minutes
Heat the oven to 425°F. In a mixing bowl, stir together 1 & 1/2 cups flour, 1/2 teaspoon salt and 1 teaspoon sugar. Stirring enables the salt and sugar to sift the flour, so you don’t need to sift it in advance.
In a small bowl, whisk together the oils, milk and almond extract. Pour this mixture into the flour mixture and mix gently with a fork, just enough to dampen; do not over work it. Then, transfer the dough to an 11-inch tart pan (you can use a smaller one if needed), and use your hands to pat out the dough so it covers the bottom of the pan, pushing it up the sides to meet the edge. This will work if you pat firmly and confidently, but not if you curl your fingertips into the dough. It should be about 1/8-inch thick all around; trim and discard excess dough.
In a bowl, combine 3/4 cup sugar, 2 tablespoons flour, 1/4 teaspoon salt and the butter. (If your peaches are especially juicy, add 1 tablespoon additional flour.) Using your fingers, pinch the butter into the dry ingredients until crumbly, with a mixture of fine granules and tiny pebbles.
Starting on the outside, arrange the peaches overlapping in a circle over the pastry; fill in the center in whatever pattern makes sense. The peaches should fit snugly.
Sprinkle the pebbly butter mixture over top (it will seem like a lot). Bake for 35 to 45 minutes, until shiny, thick bubbles begin enveloping the fruit and the crust is slightly brown. Cool on a rack. Serve warm or room temperature, preferably with generous dollops of whipped cream or ice cream.
Recipe by Food52
This S’Mores Puff Pastry Tart is like heaven wrapped in puff pastry! Everything that you love about S’mores is here: melty marshmallows, graham crackers, smooth warm milk chocolate and we’ve wrapped it up in an easy, but fancy-looking, puff pastry enclosure.
This is too good to be true! Best of all, from start to bottom, we’re talking 30 minutes of time!
Begin by combining soft butter, cocoa powder and sugar in a small bowl and set aside.
Open up the thawed puff pastry on a sheet of parchment and stretch it out a bit to create a rectangle. Transfer it to a baking sheet.
Spread the cocoa butter down the middle third of the pastry. Place 3 pieces of graham crackers on the chocolate. Top with Hershey’s chocolate squares and then marshmallows.
Make diagonal cuts in the non-covered pastry and fold alternating strips over one another per the instructions in the recipe. Secure the bottom pieces by tucking under.
Brush an egg wash over the pastry and sprinkle Turbinado sugar over the top.
Bake for 10 or 15 minutes or until you see that the chocolate has melted and the marshmallows are bubbling.
Cut the tart while it’s still warm. Enjoy!
Makes: 8 slices
Prep Time: 15 minutes
Bake Time: 15 minutes
Total Time: 30 minutes plus thaw time 30 minutes
Preheat oven to 425°F. In a small bowl mix the 3 tablespoons of softened butter with the tablespoon of cocoa powder and the 2 tablespoons of sugar.
Open puff pastry over a parchment paper and stretch it a bit up and down, right and left, until you have more of a rectangular shape. Pulling the parchment, transfer it to a baking sheet.
Spread the cocoa butter throughout the middle of the sheet, covering about 4” of the dough.
Place 3 crackers on top. Snap the chocolate bar in half and arrange on top of the crackers. Arrange halved marshmallows on top.
From the corners of the top graham crackers, make a cut diagonally to the top with a small and sharp pairing knife. Repeat the same at the bottom. Turn the top piece inside and press the inside corners. Cut the dough on the sides diagonally towards the top.
Start crossing in each strip, alternating sides, leaving the last two stripes on each side open. Close the middle piece of dough at the bottom as you did at the top. Close the remaining stripes to secure the bottom of the braid and tucking them below the tart if necessary.
Beat the egg with a bit of water or milk (about half a teaspoon) and brush all the exposed dough of the tart. Sprinkle coarse grain sugar on top.
Bake 10 to 15 minutes, until the pastry is golden brown and you can see the chocolate and marshmallow bubbling. If at any point towards the end you feel your tart is burning but it’s not quite done, drop the temperature to 400° during the last few minutes.
Cut while still warm. Store any remaining left over in an airtight container on a cool dry place, you don’t need to place it in the fridge. Reheat in a 350° oven 5 to 7 minutes.
Recipe by The Yellow Butterfly
These Mini Cranberry-Cheesecake Pies are a wonderful treat to serve this holiday. Small, cute and so tasty, they will bring smiles to everyone who tries them.
The gingersnap pie shells are crunchy and sweet. The cream cheese filling is smooth and creamy. The cranberry compote has a delicious sweet-sour mashup going on and the sugared cranberries are a delight in of themselves.
Let’s get busy!
Make the sugared cranberries by dipping the cranberries in maple syrup. Working with a few at a time, roll the cranberries in sanding sugar until they are coated. Let them dry at room temperature.
To make the cranberry compote, mix the remaining cranberries with orange zest and juice and sugar. Simmer and mash the cranberries until the mixture has thickened. Cook for 4-5 minutes and then use a fork to mash the cranberries until almost smooth. Cool completely.
For the gingersnap shells, combine gingersnap crumbs with melted butter, sugar and salt. Spoon some into each cup of a sprayed muffin pan and press the crumbs into the bottom and up the sides. Try to press the crumbs evenly and thick as possible. When you take them out of the pan, they can crumble if parts are thinner than others. Bake them and then cool completely.
To make the filling, combine the cream cheese, sour cream, vanilla and sugar in a mixer and beat until light and smooth. Transfer the filling to a piping bag fitting with an open tip.
Carefully remove the crusts from the muffin pan. This is a little tricky…I used a very sharp knife to gently loosen the crust from the pan and then tipped the pan over a bit so that the crust starts to fall out. I had a little bit of crumbling on the sides of some of the crusts. You can see that in my photos. It’s fine…we’re all human, right??
Pipe filling into the crusts. You can store the mini pies covered in the fridge if you are serving them later in the day or the next day (yes, they will keep!). When you are ready to serve them, drizzle each one with some cranberry compote and top them with sugared cranberries and a bit of orange zest.
Serve the remaining compote on the side.
Makes: 12 servings
Prep Time: 30 minutes
Cook Time: 20 minutes
Total Time: 50 minutes plus drying time 1 hour
Place 1/2 cup of the cranberries in a bowl; add maple syrup, and toss to coat. Place sanding sugar in a separate bowl. Working in batches of about 2 tablespoons each, add cranberries to sanding sugar; toss to coat. Arrange cranberries in 1 layer on a plate. Set aside to dry at room temperature, at least 1 hour or up to overnight.
Meanwhile, stir together orange zest, orange juice, 2 tablespoons of the granulated sugar, and remaining ¼ cup cranberries in a small saucepan. Bring to a simmer over medium. Cook, stirring occasionally and mashing cranberries with the back of a spoon, until mixture is slightly thickened, 4 to 5 minutes. Remove from heat. Using a fork, mash cranberries until mixture is almost smooth. Cool completely, about 30 minutes. (If needed, stir in up to 1 tablespoon water, ½ teaspoon at a time, until mixture has consistency of loose jam.)
Preheat oven to 350°F. Spray a 12-cup muffin pan with cooking spray; set aside. Stir together gingersnap crumbs, melted butter, 1/3 cup of the granulated sugar, and 3/4 teaspoon of the salt in a bowl. Spoon into muffin cups (about 3 & 1/2 tablespoons each); press into bottom and up sides.
Bake pie crusts in preheated oven until set, 12 to 16 minutes. Transfer pan to a wire rack. Use the handle of a wooden spoon to press hot crusts back into a cup shape. Cool completely, about 30 minutes.
Combine cream cheese, sour cream, vanilla, and remaining 2/3 cup granulated sugar and ¼ teaspoon salt in bowl of a stand mixer fitted with a paddle attachment. Beat on medium-high speed until light and smooth, 2 to 3 minutes. Transfer cheesecake mixture to a piping bag fitted with a large (¾-inch) open star tip.
Carefully remove cooled crusts from pan by using a sharp knife to loosen them. It’s possible that some of the edges may crumble a bit. It gives a rustic look! Pipe filling into crusts (about 3 tablespoons each). Before serving, top each pie with about 1/2 teaspoon cranberry compote. Top with sugared cranberries and orange zest. Serve remaining compote on the side.
Recipe by Southern Living
This No-Bake Pumpkin Cookie Pie is exactly what the doctor ordered for this Thanksgiving celebration! If you have people in your life that aren’t pumpkin pie fans (ahem…everyone I know), then this is the answer!
Often it’s the texture of pumpkin pie that turns them off. No worries here as this pie has a mousse-like consistency. Often, it’s the flavor. This pie is filled with gingersnap cookies, cloves, nutmeg and cinnamon to give it a light, delicious pumpkin reminiscence. It’s like an icebox cake for the holiday!
Most important is that you don’t bake this pie. Make it ahead and enjoy the freedom to stress out over the rest of the holiday meal!
Make the crust by combining graham cracker crumbs, brown sugar, cinnamon and melted butter. Press it into the bottom and sides of a pie plate. Refrigerate it while you make the filling (see, no baking necessary).
For the filling mix the cream cheese and sugar until it’s smooth. Make sure the cream cheese is at room temperature to get the smoothest mixture.
In a separate bowl, whip the cream with powdered sugar, milk powder and vanilla. Once stiff peaks are formed, spoon 1/2 cup into the pumpkin mixture and fold in until there is no more white whipped cream to be seen. Be gentle as you don’t want to deflate the whipped cream.
Layer the gingersnap cookies with the pumpkin mixture beginning with the cookies. Continue to layer until you run out of filling. Top with cookies, the remaining whipped cream and then refrigerate.
The cookies will soften in the refrigerator. It becomes similar to an icebox cake. I really like the Trader Joe’s Ginger cookies as they have chunks of ginger in them that stay firm.
Place the pie in the refrigerator so that the filling sets up. It should be in the refrigerator for at least 4 hours.
When you are ready to serve it, top with extra gingersnap cookies and enjoy!
Makes: 8-10 servings
Prep Time: 35 minutes
Total Time: 35 minutes plus chill time 4 hours
Graham Cracker Crust (homemade or store-bought):
No-Bake Pumpkin Pie Filling:
Graham Cracker Crust:
Mix together the ground graham crackers, brown sugar, and cinnamon. Once evenly mixed, stir in the melted butter. Press the crust into a 9″ pie dish, covering the bottom and sides. Place the crust in the refrigerator while you make the filling.
No-Bake Pumpkin Pie Filling:
Using a hand or stand mixer with the whisk attachment, mix together the cream cheese and sugar until smooth. Scrape down the bowl and then mix in the pumpkin and spices. Set aside.
In a separate mixing bowl using a hand or stand mixer with the whisk attachment, add the whipping cream, powdered sugar, milk powder, and vanilla. Whip on high speed until you reach a smooth consistency with stiff peaks. Be careful not to over-whip, so keep a close eye on it!
Spoon 1/2 cup of the whipped cream into the pumpkin mixture, reserving the remaining whipped cream for later, and gently fold the two together, using a rubber spatula. Run the spatula around the bowl and through the batter, repeating this process until you can no longer see any white streaks of whipped cream.
Spread a thin layer of filling in the bottom of the crust. Arrange a single layer of gingersnap cookies on top, breaking cookies as needed to fill big gaps. Scoop another layer of filling on top (thicker than the first) and repeat the process. Keep alternating layers until you run out of filling (you likely will not use the entire box of cookies, but close to it). It’s okay if the filling overtakes the crust.
Top the pie with the remaining whipped cream and place in an air tight container (you can also place a large bowl upside down over the pie if you don’t have a container large enough). Place the pie in the refrigerator and allow it to chill for at least 4 hours but preferably overnight.
When ready to serve, top with extra gingersnap cookies and serve chilled. Enjoy!
Recipe adapted from Butternut Bakery Blog
For a stunning end to a holiday dinner or just because, the Apple Caramel Fennel Tart is the answer. A delicious sweet shortbread crust is topped with a fennel-infused caramel and then a glorious spiral of apples. This take a traditional apple tart to a new level!
A French apple tart typically has an apple purée below the apple spiral but switching it to a fennel-infused caramel just says “special”! Apples and fennel play off of each other so nicely, and caramel and apples, well…easily one of the more enjoyable fall treats!
This tart has a few steps, but none are terribly difficult. So, for something beautiful and delicious that yells “Autumn is here”, try this apple caramel fennel tart!
Make the crust by combining the flour, confectioners’ sugar and salt. Add the butter and toss until all of the butter pieces are coated. Rub the mixture between your fingers until it’s like breadcrumbs. Add the egg and a bit of ice-cold water and use your fingers to bring it together.
Form it into a ball and refrigerate for an hour to rest.
Roll the dough into a circle about 12 inches around. Lift the dough and place it into a floured 9-inch tart pan. Use your fingers to push the dough into the corners and up the sides into the flutes. Use a knife or scissors to cut off the excess dough at the top of the pan. Refrigerate the crust for an hour.
Once it’s ready, preheat the oven and prick the base of the tart all over with a fork.
Line the crust with parchment and add pie weights. Bake the tart for 15 minutes, remove the weights and parchment and continue baking for another 10 minutes or so. Let the shell cool while you make the caramel.
Lightly toast fennel seeds in a small skillet and then grind with a mortar and pestle. If you want to skip this step, you definitely can. You can leave the fennel out altogether but it creates such a lovely flavor, I think it’s a shame not to add the fennel.
Heat the sugar in a saucepan and once it melts and turns an amber color, carefully add the butter. Then carefully add the cream. Continue to heat while stirring for 5 minutes until the sauce starts to thicken.
Stir in the fennel, if you are using it, the vanilla and salt and pour it into a bowl to cool.
Pour one cup into the bottom of the cooled crust and smooth it out.
Cut the apples into thin wedges and toss with lemon juice.
Arrange the apples over the caramel in whatever design you prefer. Dust with confectioners’ sugar and pop into the oven for 30 minutes.
Allow the tart to cool for 15 minutes in the pan and then remove the tart from the pan and place it on a serving platter.
Serve the tart with extra caramel sauce and ice cream, if desired. Enjoy!
Makes: 10 servings
Prep Time: 25 minutes
Cook Time: 1 hour
Total Time: 1 hour & 25 minutes
Sweet Shortcrust Pastry:
Fennel Caramel Sauce:
Apple Filling:
Sweet Shortcrust Pastry:
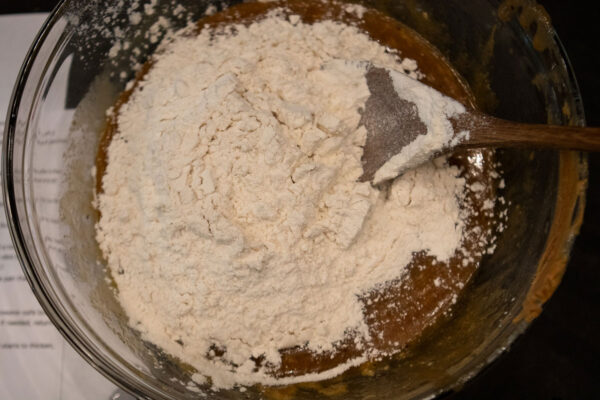
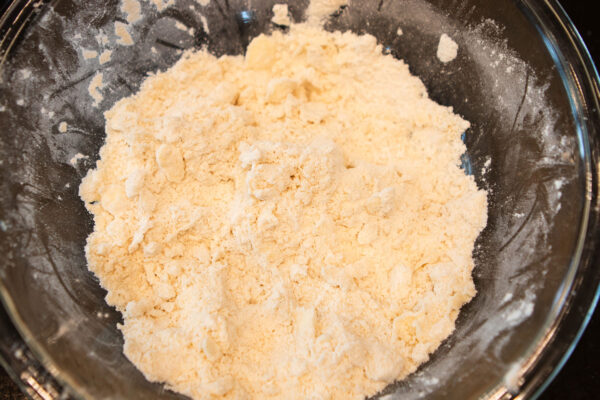
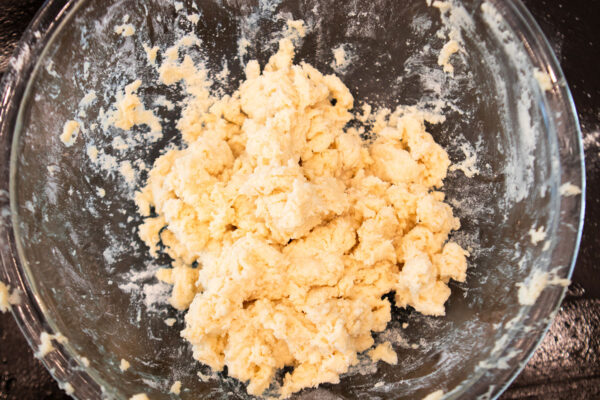
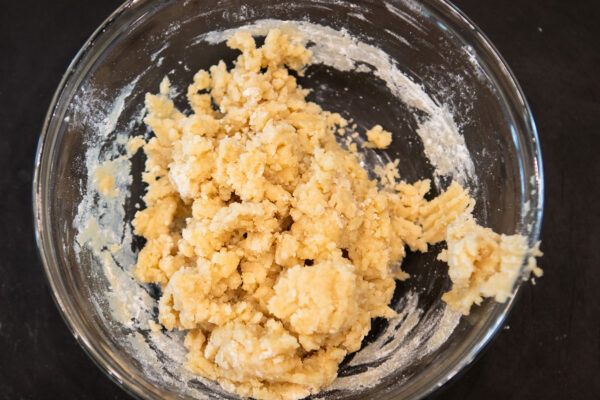
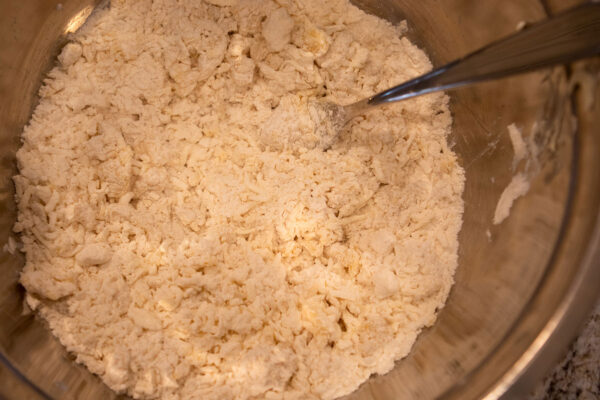
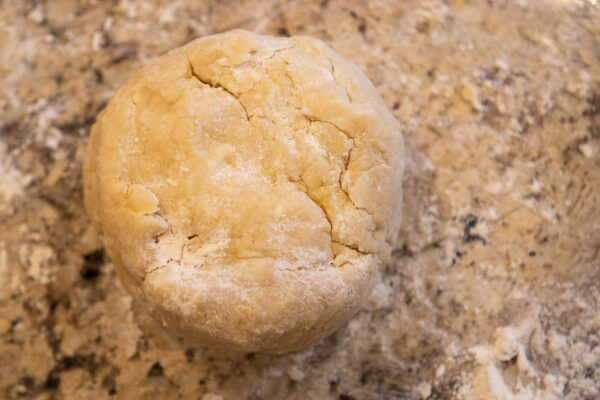
In a large mixing bowl, sift the flour, confectioners’ sugar and salt. Add the butter and toss until the cubes are coated. Rub the mixture together between your fingers until it reaches a breadcrumb consistency with a few hazelnut-sized pieces of butter still visible. Make a well in the centre and add the egg. Using a fork, mix the egg into the flour. Add 1 tablespoon of the ice-cold water, and use your fingertips to bring the dough together. If the dough isn’t clumping together, add more water sparingly.
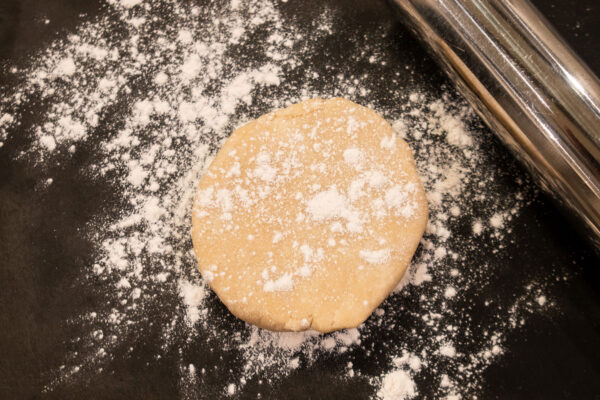
Tip the dough onto a lightly floured countertop, and use floured hands to shape the dough into a ball, taking care not to overwork it. Flatten slightly into a disc, and wrap well in plastic wrap. Place in the fridge for at least 1 hour to let the dough rest.
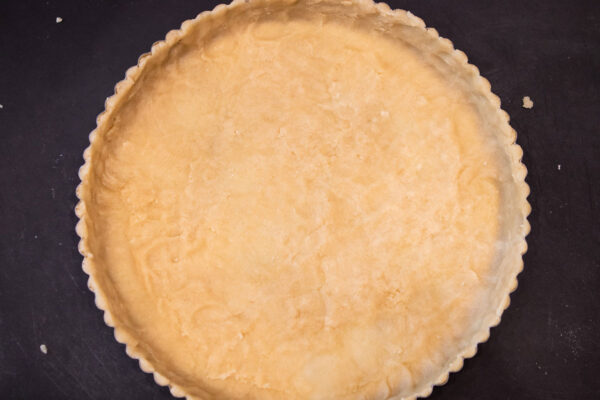
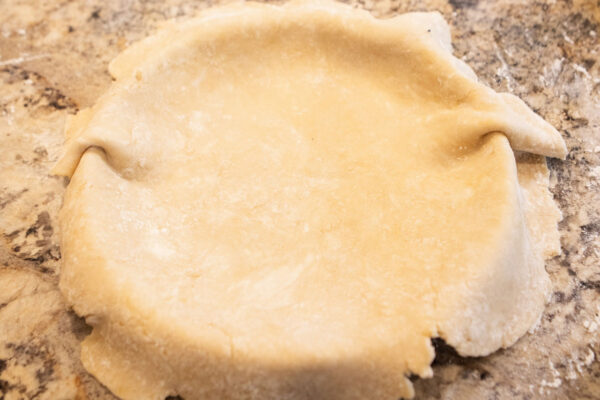
Remove the chilled dough disc from the fridge and set it aside on your countertop for 15 minutes or so to allow the dough to warm up slightly so it’s easier to roll out. Trying to roll dough that is too cold will cause the edges to crack. To roll out, lightly flour your countertop and rolling pin, and using firm, even strokes, roll from the centre outward, turning the dough a quarter turn every few strokes. Roll the dough out to the thickness of a coin (⅛-inch thick) and into a 12-inch circle.
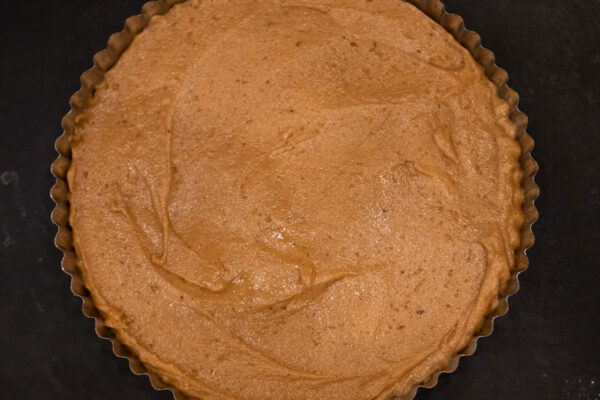
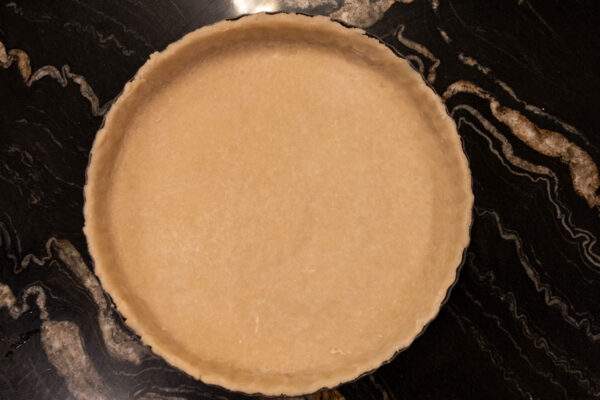
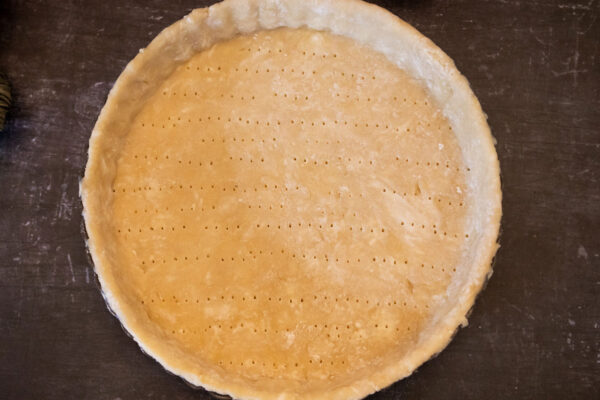
Flour the base of a 9-inch shallow fluted tart pan with a removable base, and gently lift the dough and place it into the prepared pan. Use your fingers to push the dough up the sides of the pan and into the grooves. Using a sharp knife, trim off the excess dough from the rim. Refrigerate the prepared tart shell for at least 1 hour to allow the dough to relax further.
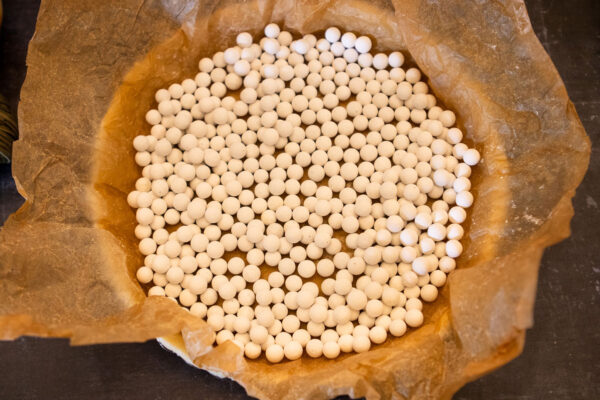
Preheat the oven to 350°F. Once the dough is chilled, prick the tart base all over with a fork, and then line with parchment paper and fill with pie weights all the way up the sides. Blind bake for 15 minutes, and then remove the parchment paper and pie weights. Return the tart back to the oven and bake for 7 to 10 minutes, or until the base is dry and a light golden color. Remove from the oven, and leave the tart shell to cool while you make the caramel and prepare the filling.
Fennel Caramel Sauce:
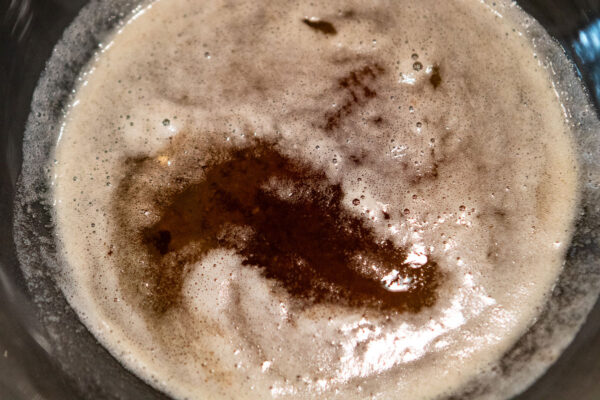
In a small skillet over low heat, lightly toast the fennel seeds. Once fragrant and lightly browned, add to a pestle and mortar and grind to a powder. Set aside.
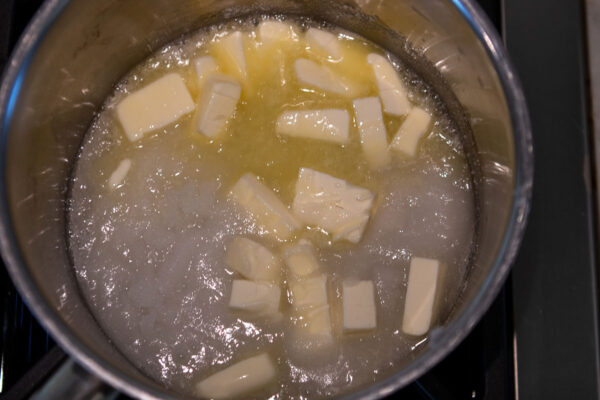
In a high-sided nonstick saucepan, heat the sugar over medium heat, stirring often. Once the sugar is in liquid form, stop stirring and just swirl the liquid sugar while the color changes to an amber color. Keep an eagle eye on it at this stage as it can turn to burnt sugar very quickly.
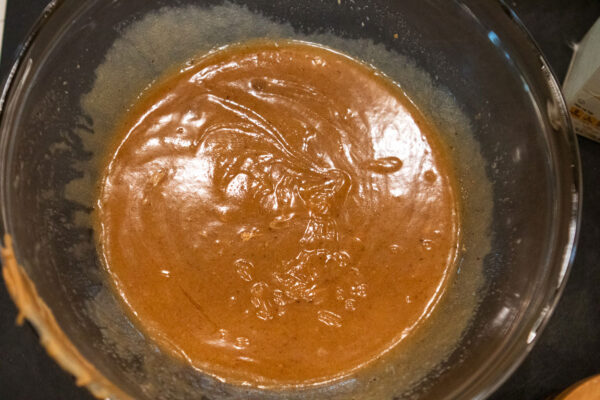
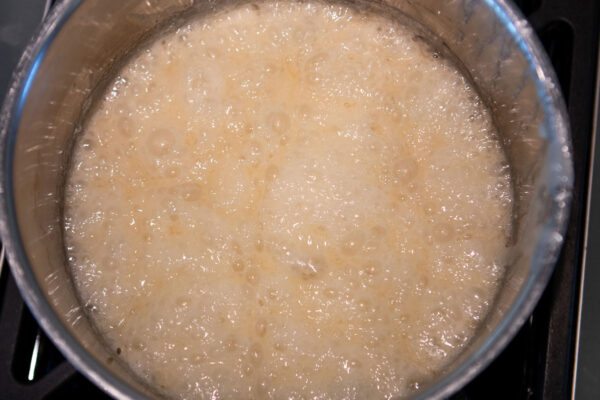
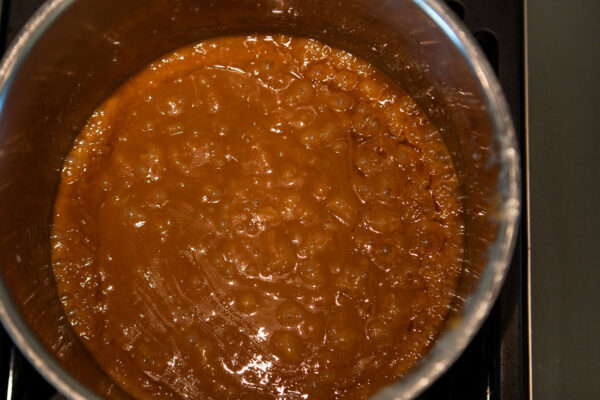
Carefully add the butter. It will bubble up but whisk continuously until it has thoroughly melted. Then remove from the heat. Pour in the cream, but be careful as it will bubble up again, but keep whisking and the bubbling will die down. Return it to medium heat, stirring occasionally, so that the caramel can thicken. This takes around 5 minutes.
Remove from the heat, stir in the ground fennel seeds (add half if you want a more subtle flavor), vanilla extract and salt, and stir thoroughly to combine. Pour into a bowl and set aside to cool for 10 minutes.
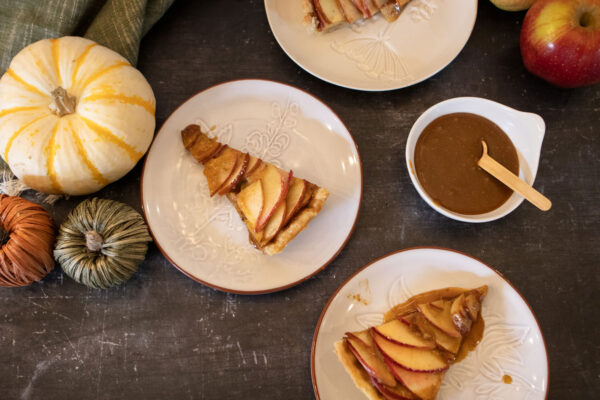
Pour 1 cup into the bottom of the tart shell and smooth out flat. Pour any remaining caramel into a small serving dish and serve alongside the tart.
Apple Filling and Assembly:
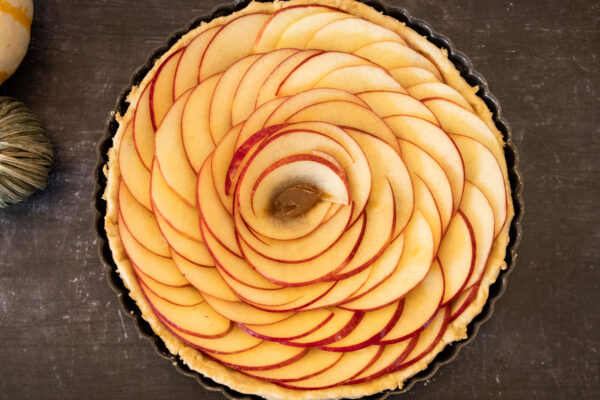
Add the lemon juice to a large bowl. Cut the apples in half through the core. Remove the core with a sharp knife or melon baller. Slice the apple crossways as thinly as you can. An option is to use a mandoline for this part. Add the apple slices to the bowl and gently toss to prevent them from browning.
Arrange the apple slices into the tart shell in any pattern you desire. I started on the outside of the tart shell and laid them overlapping, continuing in a spiral until the centre of the tart. Use your fingers to reposition any if necessary. The thinner the slices, the easier it will be to spiral in the centre. Dust with confectioners’ sugar.
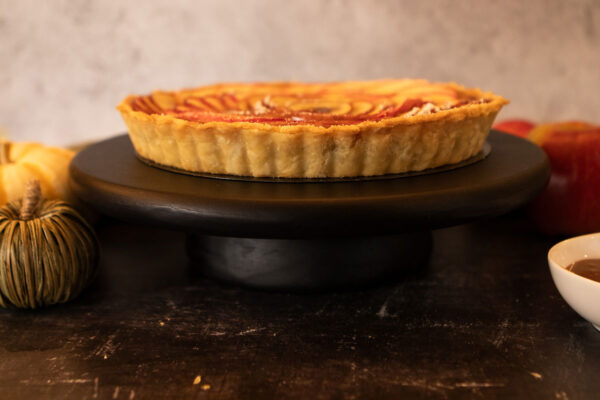
Place the tart onto a baking sheet and bake in the oven for 30 minutes until the caramel is bubbling, the apples have softened and the apple edges have caramelized. Cover the edges with foil if the tart shell is browning too quickly and continue to bake. Be careful when removing the tart from the oven as the caramel will be molten hot and melted to a liquid and the apple slices can slide around.
Allow the tart to cool in the tart pan for 15 minutes, repositioning any slices that may have moved when taking the tart out of the oven. After 15 minutes, carefully remove the tart from the pan and slide it onto a serving plate.
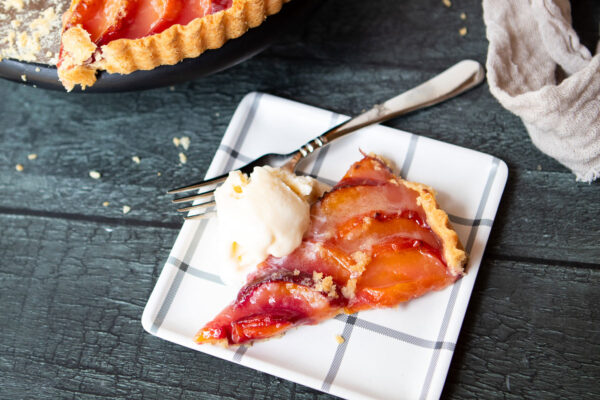
Serve warm with any remaining caramel sauce drizzled on top and with a scoop of vanilla ice cream.
Recipe from Emma Duckworth Bakes
Peach Crisp is a wonderful dessert to serve any time but especially when ripe peaches are still available. Yes, we are getting down to the end of the summer stone fruit season but it still is possible to find these glorious globes! Combine them with a wonderful walnut-y topping and a little vanilla ice cream. It’s all you need for a mouth-watering finale!
Bake the peach crisp is a cast-iron skillet and you can serve it right out of the oven!
Begin by combining ripe peach wedges, cornstarch, sugar, lemon juice and vanilla extract.
In a medium bowl, combine old fashioned-rolled oats, almond flour, brown sugar, chopped walnuts, cinnamon and salt. Work in firm coconut oil or butter until the mixture begins to clump together.
Scoop the peach mixture into the skillet. Sprinkle with the topping and bake until the fruit is soft and the topping is golden. I like to position some of the peach wedges on top of the topping so that it creates a pretty look to the crisp.
Let the crisp cool a bit and then serve with vanilla ice cream!
Makes: 4-6 servings
Prep Time: 15 minutes
Bake Time: 25 minutes
Total Time: 40 minutes
Topping:
Preheat the oven to 400°F and grease a 10-inch cast-iron skillet.
In a large bowl, combine the peaches, cornstarch, sugar, lemon juice, and vanilla and toss to coat.
In a medium bowl, combine the oats, almond flour, brown sugar, walnuts, cinnamon, and salt. Using your hands, work in the firm coconut oil until the mixture is crumbly.
Scoop the peach filling into the prepared skillet. Sprinkle with the topping and bake for 20 to 30 minutes, or until the fruit is soft and the topping is golden brown. Remove from the oven and let cool for 5 minutes. Serve with vanilla ice cream.