EASY PEASY BRUNCH & BREAKFAST – The Fancy Pants Kitchen https://thefancypantskitchen.com Quick and Easy Recipes Thu, 11 Apr 2024 16:55:24 +0000 en-US hourly 1 https://wordpress.org/?v=6.5.5 https://thefancypantskitchen.com/wp-content/uploads/2021/02/cropped-Favicon-1-32x32.jpg EASY PEASY BRUNCH & BREAKFAST – The Fancy Pants Kitchen https://thefancypantskitchen.com 32 32 Matzah Rosti with Eggs and Arugula https://thefancypantskitchen.com/recipe/matzah-rosti-with-eggs-and-arugula/ https://thefancypantskitchen.com/recipe/matzah-rosti-with-eggs-and-arugula/#respond Thu, 11 Apr 2024 14:40:37 +0000 https://thefancypantskitchen.com/?post_type=ranna_recipe&p=24365

For breakfast during Passover, this Matzah Rosti with Eggs and Arugula is amazing!  It’s a round pancake of softened matzah topped with ricotta cheese, eggs, arugula and feta.  Sounds delicious, right?

Many of us spend tons of time planning for our Passover seder, the telling of the Passover story and feast, that occurs on the first two nights of Passover.  But what about the remaining days of Passover?  What are we going to eat?  And, more importantly, what’s for breakfast???

Yes, we can eat cottage cheese and fruit or a scrambled egg, but after a day or two, that gets dull.  This recipe, along with The Best Ever Matzah Granola, are two new recipes that will help you through breakfast/brunch ideas for the upcoming holiday.

A beloved traditional breakfast during Passover Is Matzah Brei (check out Asparagus Matzah Brei or Mexican Matzah Brei).  It’s a quasi-omelette but we mix softened matzah pieces with beaten eggs.  

In this recipe, we use matzah brei as the base for the rest of the ingredients.  Soften the matzah pieces by soaking them in warm water for a few minutes.  Most of the water will be absorbed.

Meanwhile, beat 4 eggs with salt and pepper.  Add it to the soaked matzah and let that sit for about 5 minutes to absorb in.

Toss the arugula with olive oil, balsamic vinegar and black pepper and set aside.

Heat olive oil in a large skillet and add the matzah mixture, shaped into a disc.  Once the bottom is brown and it holds together, place a sheet pan over the top and flip the skillet over to invert the rosti onto the pan. 

Spread the top of the rosti with ricotta cheese and place in a preheated oven for 5 minutes.

While the rosti is in the oven, cook 4 eggs in a skillet, sunny side up, until the whites are just cooked through and the yolks are still runny.  This will take about 3 minutes.

The serve the rosti cut it into 4 wedges, top with arugula and an egg.  Sprinkle the feta over and serve it immediately.  Delicious!

Share Your Thoughts...

Lastly, if you make Matzah Rosti with Eggs and Arugula, be sure to leave a review down below at the bottom of this page (stars are also appreciated)! Above all, I love to hear from you and always do my best to respond to each and every review. And of course, if you do make this recipe, don’t forget to tag me on Instagram! Looking through the photos of recipes you all have made is one of my favorite things to do!

Matzah Rosti with Eggs and Arugula

Makes: 4 servings

Prep Time: 10 minutes

Cook Time: 10 minutes

Total Time: 20 minutes

Ingredients

  • 4 matzah, broken in 1-inch pieces
  • 8 eggs
  • 1/4 + 1/8 tsp salt, divided
  • 4 cups baby arugula
  • 3 tbsp olive oil, divided
  • 1 tsp balsamic vinegar
  • 1/8 tsp black pepper
  • 3/4 cup part skim ricotta
  • 2 tbsp crumbled feta cheese (or more to taste)

Instructions

Preheat the oven to 350°F. Coat a baking sheet pan with cooking spray.

Add 3/4 cup warm water to the broken matzah and toss. Allow to sit 3-5 minutes, until the water is absorbed.

Beat 4 of the eggs lightly with a fork, stir in 1/4 teaspoon salt and the pepper, and add to the matzah. Toss the mixture well, and then occasionally for the next 5 minutes to allow some of the egg to be absorbed.

Meanwhile, toss the arugula with 1 tablespoon of the oil, the vinegar, and the remaining 1/8 teaspoon salt.

Heat 1 tablespoon of the oil in a large nonstick skillet over medium heat. Add the matzah mixture and press it lightly into an even disc in the pan. Cook until the bottom is browned and the mixture holds together well when you shake the pan, about 5 minutes. Place the sheet pan (sprayed side down) over the skillet and invert the rosti onto the pan. (The browned side will face up.) Spread the top evenly with the ricotta and place in the oven for 5 minutes.

Meanwhile, heat the remaining 1 tablespoon olive oil in the skillet. Crack the remaining 4 eggs in the skillet and cook them, sunny side up, until the whites are just cooked through and the yolks still runny, about 3 minutes.

Cut the rosti into four wedges and place each on a plate. Top with the arugula and then an egg; sprinkle with the feta and serve immediately.

Recipe by A Sweet and Savory Life

]]>
https://thefancypantskitchen.com/recipe/matzah-rosti-with-eggs-and-arugula/feed/ 0
Smoky Breakfast Pizzas https://thefancypantskitchen.com/recipe/smoky-breakfast-pizzas/ https://thefancypantskitchen.com/recipe/smoky-breakfast-pizzas/#respond Mon, 10 Apr 2023 17:15:13 +0000 https://thefancypantskitchen.com/?post_type=ranna_recipe&p=21214

Smoky Breakfast Pizzas….pizza for breakfast?  Just ask my brother, Ron.  But Ron’s breakfast pizza would be leftover pepperoni pizza from a night or two ago. Since none of us would do that anymore, let’s elevate it a bit and try a pizza with smoked mozzarella and pecorino Romano cheeses, mixed wild mushrooms and an egg, of course!  Top it all with a delicious basil oil and you have the perfect way to start your morning!  It’s also great for leftover dinner. That’s flipping the world on its side, don’t you think?? 

You may be tempted to use regular mozzarella cheese for this pizza but I highly encourage picking up some smoked mozzarella.  It has such a deep smoky flavor and it truly makes the pizza, along with the salty pecorino Romano.  Don’t skip it!

These pizzas are easy when you use store-bought pizza dough.  Just cut the dough into 4 pieces and let them sit until they reach room temperature.

While that’s happening, make the basil oil by pulsing fresh basil leaves, olive oil and garlic in a food processor until it’s combined and the basil is chopped.  Season it with salt and pepper and set it aside.

Working with one piece of dough at a time, stretch the dough into a 7-inch circle.  It doesn’t have to be precisely a circle.  As you can see, mine are irregular-shaped, which makes them that much more charming!

Sprinkle each dough circle with the cheeses and mushrooms.  Season with salt, pepper and crushed red pepper.  Bake until the crusts are puffed and starting to brown.

Remove them from the oven and crack an egg into a well you’ve formed on the top of each pizza.  Return the pizzas to the oven and back until the whites are set but the yolks are still runny.  This will take between 5 and 7 minutes.

Remove them from the oven and drizzle some basil oil on top.  Serve them right away and enjoy your morning!

Share Your Thoughts...

Lastly, if you make Smoky Breakfast Pizzas, be sure to leave a review down below at the bottom of this page (stars are also appreciated)! Above all, I love to hear from you and always do my best to respond to each and every review. And of course, if you do make this recipe, don’t forget to tag me on Instagram! Looking through the photos of recipes you all have made is one of my favorite things to do!

Smoky Breakfast Pizzas

Makes: 4 pizzas

Prep Time: 15 minutes

Bake Time: 16 minutes

Total Time: 31 minutes

Ingredients

  • 1 cup loosely packed fresh basil leaves (about 1/2 ounce)
  • 1/4 cup plus 2 tablespoons extra-virgin olive oil, plus more for greasing pans
  • 1 small garlic clove, finely grated
  • Kosher salt, to taste
  • Black pepper, to taste
  • 1 pound fresh prepared pizza dough or store-bought pizza dough, cut evenly into 4 pieces, at room temperature
  • All-purpose flour, for dusting
  • 6 ounces smoked mozzarella cheese, shredded (about 1 & 1/2 cups)
  • 2 ounces pecorino Romano cheese, grated (about 1/2 cup)
  • 1/2 cup thinly sliced fresh mixed wild mushrooms
  • Crushed red pepper, to taste
  • 4 large eggs

Instructions

Process basil, oil, and garlic in a food processor until smooth, about 25 seconds. Transfer to a small bowl; season with salt and black pepper to taste.

Preheat oven to 450°F with racks in upper third and lower third positions. Lightly grease 2 baking sheets with oil. Dust 1 dough piece with flour, and place on a lightly floured work surface; stretch into a 7-inch circle. Transfer to prepared pan. Repeat with remaining dough pieces.

Sprinkle dough circles evenly with mozzarella, pecorino, and mushrooms, leaving a 1/2-inch border for the crust. Sprinkle pizzas with salt, black pepper, and crushed red pepper to taste. Bake in preheated oven until crusts are puffed and starting to brown, 7 to 9 minutes.

Remove pizzas from oven. Using the back of a spoon, make a small well in center of each pizza. Crack 1 egg into each well. Return pizzas to oven, rotating pans between top and bottom racks from previous bake. Bake at 450°F until egg whites are set but yolks are still runny, 5 to 7 minutes. Serve with basil oil.

]]>
https://thefancypantskitchen.com/recipe/smoky-breakfast-pizzas/feed/ 0
Mexican Matzah Brei https://thefancypantskitchen.com/recipe/mexican-matzah-brei/ https://thefancypantskitchen.com/recipe/mexican-matzah-brei/#respond Fri, 24 Mar 2023 15:03:25 +0000 https://thefancypantskitchen.com/?post_type=ranna_recipe&p=20989

Mexican Matzah Brei is a wonderful addition to our breakfast recipes for Passover.  Since we aren’t eating toast, English muffins or croissants during the 8 days of Passover, we need to get creative for our carbs. Heading in the Mexican food direction for this recipe, we are able to step this traditional egg dish up a notch.  

Matzah Brei is a combination of dampened matzah pieces and beaten eggs that get fried in butter or oil.  There is an ongoing debate in the Jewish community about whether you are a sweet or savory Matzah Brei lover…I only eat it savory, so I will always throw in some onions and lots of salt and pepper.  My kids say only sweet, so I leave out the onions, sprinkle lots of confectioners sugar over the top and serve it with maple syrup on the side.

But, back to the savory Mexican Matzah Brei…this is where it’s at!  Melting Cheddar cheese along with the eggs, onions and matzah is the way to begin this.  Finish it off with salsa, avocados, queso fresco and cilantro, and you will be in heaven!

Begin making this by sautéing chopped onions in vegetable oil until they are lightly browned.

In the meantime, pour boiling water over broken matzah pieces that are in a colander until the pieces are soaked.  Drain them.

Beat the eggs and cheese together in a large bowl and add the broken matzah pieces.  Pour this mixture into the skillet with the onions.

Cook the Matzah Brei, stirring as necessary, until the eggs are set.

To finish, arrange the Matzah Brei on a large plate and dollop spoonfuls of salsa over it.  Garnish it with avocado slices, crumbled queso fresco and chopped cilantro.

I have a feeling that if you were a sweet lover of Matzah Brei, this might change your mind!  Happy Holidays!

For another wonderful savory Matzah Brei recipe, check out Asparagus Matzah Brei.

Share Your Thoughts...

Lastly, if you make Mexican Matzah Brei, be sure to leave a review down below at the bottom of this page (stars are also appreciated)! Above all, I love to hear from you and always do my best to respond to each and every review. And of course, if you do make this recipe, don’t forget to tag me on Instagram! Looking through the photos of recipes you all have made is one of my favorite things to do!

Mexican Matzah Brei

Makes: 4 servings

Prep Time: 5 minutes

Cook Time: 20 minutes

Total Time: 25 minutes

Ingredients

  • 2 tbsp vegetable oil
  • 1 medium yellow onion, diced
  • 4 matzah boards, broken into 1 inch pieces
  • 6 eggs, lightly beaten
  • 1 & 1/2 cup grated sharp Cheddar cheese
  • 1/2 cup salsa
  • 1 avocado, sliced
  • 1/4 cup crumbled queso fresco
  • 2 tbsp chopped cilantro

Instructions

Heat the oil in a 10-inch nonstick skillet over medium heat. Add the diced onion and sauté over medium-low heat until lightly browned, about ten minutes.

Meanwhile, place the broken pieces of matzo in a colander and bring a kettle of water to a boil.  Slowly pour the boiling water over the matzo until all the pieces are soaked. Drain in the colander, shaking gently.

Beat together the eggs and cheese in a large bowl. Add the damp matzo to the egg mixture in the bowl. Pour the egg and matzo mixture into the skillet with the onions.

Cook the matzah brei over medium-low heat, stirring as needed, just until the eggs are set.

Arrange the matzah brei on a large plate and pour the salsa over it. Garnish with avocado slices, crumbled queso fresco and chopped cilantro. Serve hot and pass extra salsa on the side.

]]>
https://thefancypantskitchen.com/recipe/mexican-matzah-brei/feed/ 0
Easy Make-Ahead Breakfast Casserole https://thefancypantskitchen.com/recipe/easy-make-ahead-breakfast-casserole/ https://thefancypantskitchen.com/recipe/easy-make-ahead-breakfast-casserole/#respond Fri, 16 Dec 2022 16:08:27 +0000 https://thefancypantskitchen.com/?post_type=ranna_recipe&p=19466

If you’re looking for the perfect day-after (Christmas, New Years, cocktail party) breakfast, this Easy Make-Ahead Breakfast Casserole is exactly what you need!

It comes together very quickly, is better when it sits overnight, and bakes up beautiful.  It feeds a crowd (even though my photo is 2/3 of the recipe because someone forgot to pick up more eggs) and is thoroughly mouthwatering and satisfying!

It’s adaptable and works with a variety of vegetables, carbs and proteins.  This is a no-stress kind of breakfast to feed a gang of hungry folks!

Begin by browning the sausage.  As the sausage is almost cooked, add veggies and garlic and continue cooking.

In the bottom of a greased baking dish, spread out the crusty bread chunks.  Top the bread with the sausage/vegetable mixture.

Whisk the eggs, milk, cheese and salt & pepper together and pour over the top.  

Cover the dish and sit in the fridge for at least 30 minutes and as long as overnight.  Perfect for make-ahead meals!

When you’re ready to serve it, bake it for 45 minutes or so, until the top is nicely browned and crispy.

All that’s left now is to bring it to the table and feed that crowd!

PS: if you are odd like me, a little drizzle of maple syrup would add just that extra-special bit of sweet to the dish!

Share Your Thoughts...

Lastly, if you make Easy Make-Ahead Breakfast Casserole, be sure to leave a review down below at the bottom of this page (stars are also appreciated)! Above all, I love to hear from you and always do my best to respond to each and every review. And of course, if you do make this recipe, don’t forget to tag me on Instagram! Looking through the photos of recipes you all have made is one of my favorite things to do!

Easy Make-Ahead Breakfast Casserole

Makes: 12 servings

Prep Time: 15 minutes

Bake Time: 45 minutes

Total Time: 1 hour plus chill time 30 minutes minimum

Ingredients

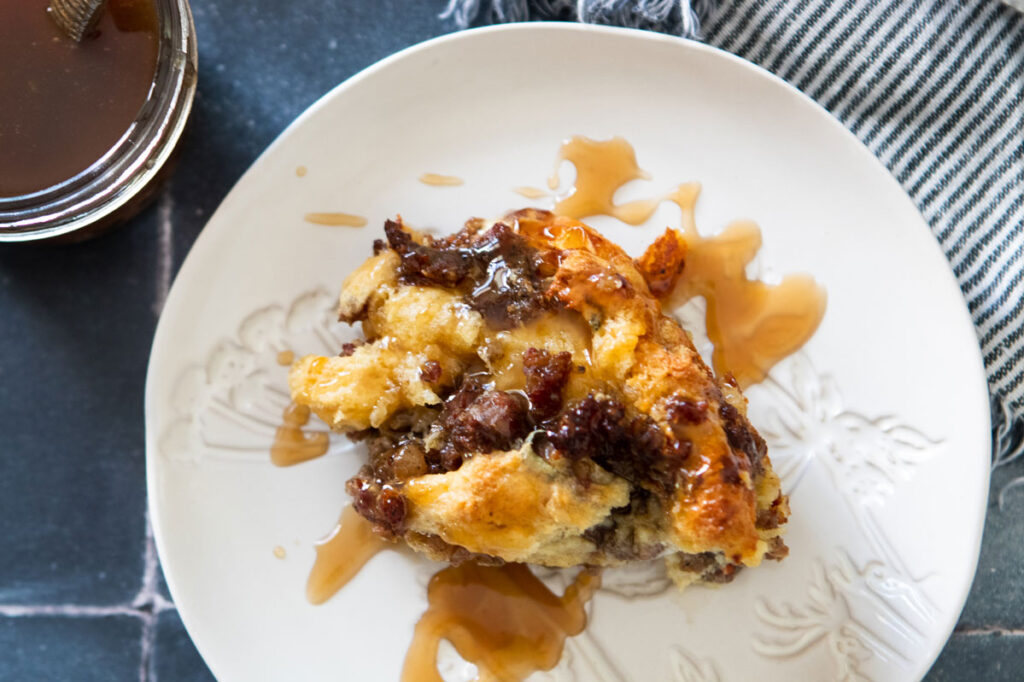
  • 4 cups (175g or 6 oz) cubes of crusty bread*
  • 1 tsp olive oil
  • 1 pound ground pork sausage, casings removed*
  • 1 tsp dried rosemary or Italian seasoning, optional
  • 1/2 medium onion, diced (115g or 3/4 cup)
  • 2 garlic cloves, minced
  • 2 cups diced bell peppers
  • 1 cup sliced mushrooms
  • 1 cup roughly chopped fresh spinach
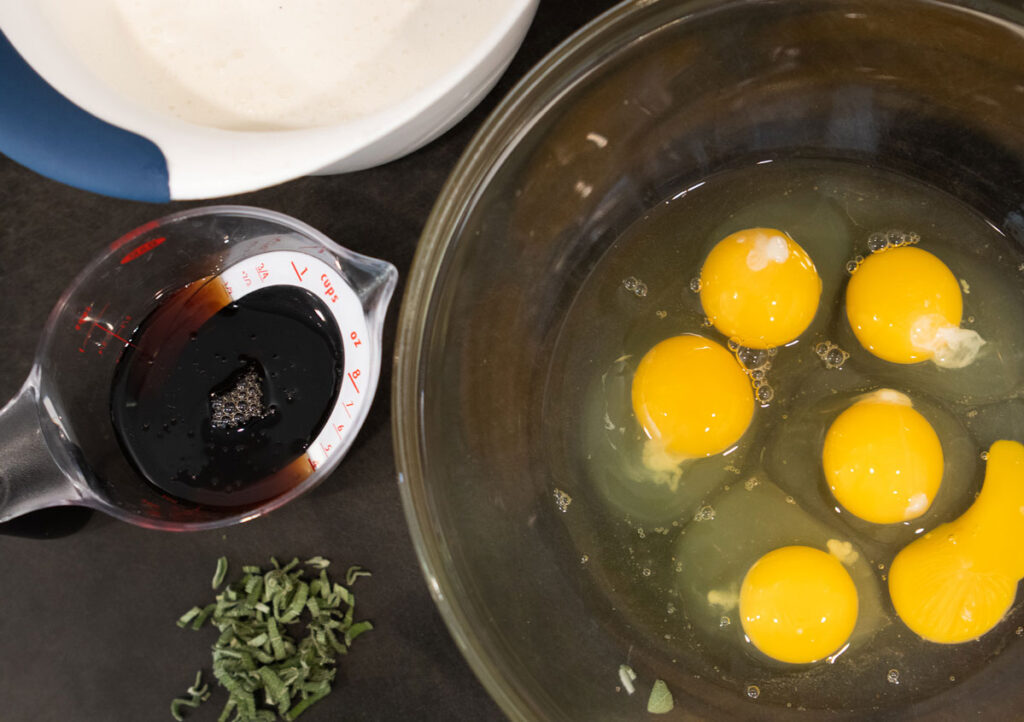
  • 12 large eggs
  • 1/4 tsp salt
  • 1/8 tsp freshly ground black pepper
  • 2/3 cup milk or half-and-half*
  • 1 cup shredded cheddar cheese
  • optional garnish: green onion and/or chopped parsley

Instructions

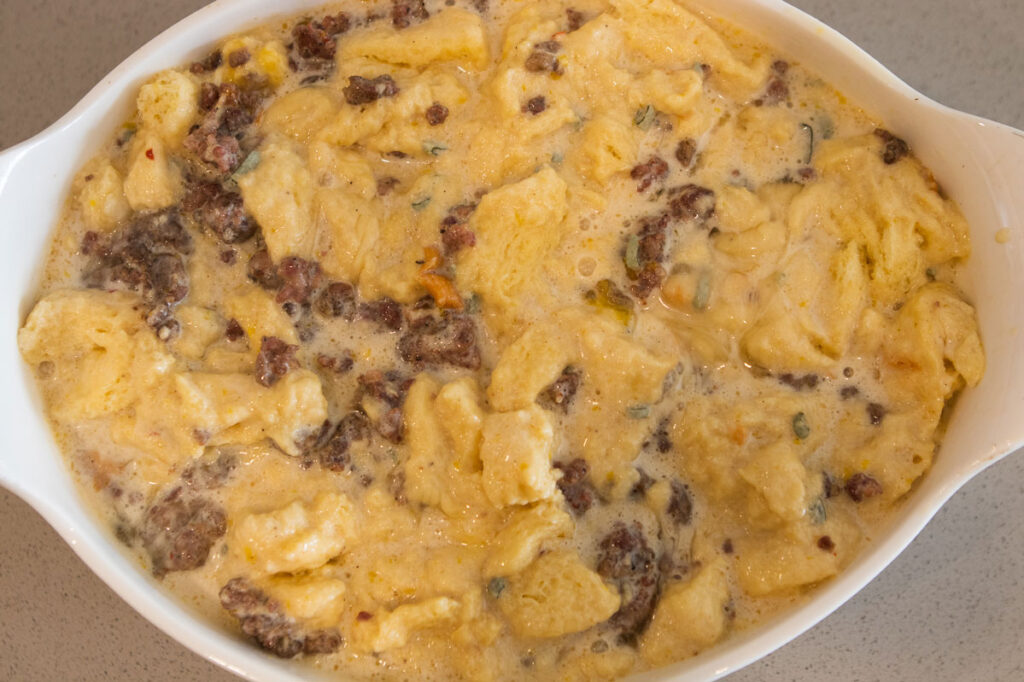
Grease a 9×13-inch or any 3–4-quart oven-safe dish. Arrange bread cubes in an even layer in bottom of pan.

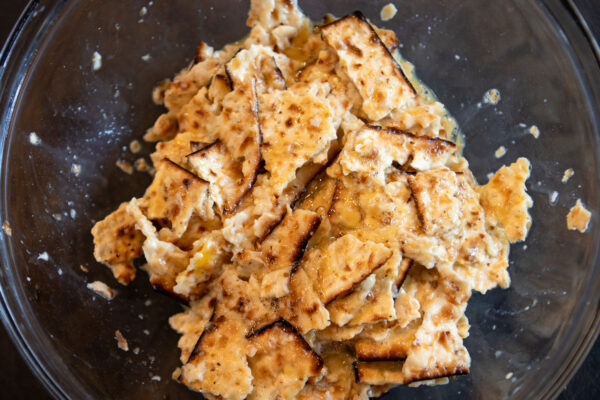
Heat olive oil in a large skillet over medium heat. Add sausage and rosemary/Italian seasoning, if using, and break up the sausage into bite-size pieces with a wooden spoon or rubber spatula as it begins to cook. Add the onion, garlic, peppers, mushrooms, and spinach and cook until everything has slightly softened and sausage is mostly cooked through, about 5–6 minutes.

Remove sausage and vegetable mixture from heat and spread in an even layer on top of bread.

Whisk the eggs, salt, pepper, milk, and cheese together. Evenly pour over sausage/vegetable mixture. Add another sprinkle of salt and pepper on top.

Cover casserole with plastic wrap or aluminum foil and refrigerate for at least 30 minutes and up to 24 hours. (When ready to bake, allow to sit at room temperature for 10–15 minutes as oven preheats.)

Preheat the oven to 375°F. Bake the casserole, uncovered, until the top is golden, edges are crisp, and a toothpick inserted in the center comes out clean, about 40–45 minutes. Cool for 10 minutes, then slice and serve.

Leftovers keep well in the refrigerator for up to 5 days. Reheat in the microwave to your liking.

Recipe from Sally’s Baking Addiction

]]>
https://thefancypantskitchen.com/recipe/easy-make-ahead-breakfast-casserole/feed/ 0
Lox and Bagel Breakfast Bowl https://thefancypantskitchen.com/recipe/lox-and-bagel-breakfast-bowl/ https://thefancypantskitchen.com/recipe/lox-and-bagel-breakfast-bowl/#respond Mon, 18 Apr 2022 20:52:59 +0000 https://thefancypantskitchen.com/?post_type=ranna_recipe&p=14068

For a healthy, simple and gorgeous way to start your morning, try Lox and Bagel Breakfast Bowl.  This fresh bowl filled with all things wonderful and topped with a lemon-honey dressing will satisfy all tastes.

I typically make myself a breakfast that’s very healthy and delicious:  my go-to is a fried egg laid over peppery arugula, with cukes, chopped tomatoes and red bell pepper on the side.  All I need is some good salt and freshly ground pepper and I am very, very happy.

I make my own cured salmon (it’s so easy, you must try it!) and started adding that to my plate instead of the egg, or sometimes with it!  

But, I could never get the look right to be able to photograph it well, so I decided to switch it up a bit…how about a bowl versus a plate?  How about hard-boiled eggs instead of a fried egg?  And how about pickled red onions, capers and dill to top it and pop it? Yes, yes and yes!

The components are simple:

arugula or romaine for the base of the bowl

halved cherry tomatoes

sliced mini or Persian

cucumbers

thinly sliced cured salmon (try either Beet-Cured Salmon Gravlax or Sugar & Salt-Cured Salmon) or store-bought smoked salmon

Quick-pickled red onions

hard-boiled eggs

capers

dill

lemon, honey, olive oil for the dressing

This recipe comes together in no time, especially if the salmon, red onions and hard-boiled eggs are all prepped ahead of time.

Now, time for a relaxing Sunday morning!

Share Your Thoughts...

Lastly, if you make Lox and Bagel Breakfast Bowl, be sure to leave a comment and/or give this recipe a rating! Above all, I love to hear from you and always do my best to respond to each and every comment. And of course, if you do make this recipe, don’t forget to tag me on Instagram! Looking through the photos of recipes you all have made is one of my favorite things to do!

Lox and Bagel Breakfast Bowl

Makes: 4-6 servings

Prep Time: 20 minutes

Total Time: 20 minutes

Ingredients

Lemon Dressing:

  • ¼ cup olive oil
  • 2 tbsp fresh lemon juice
  • 2 tsp honey
  • ¼ tsp lemon zest
  • ¼ tsp kosher salt

Bowl:

  • 8 cups chopped romaine lettuce or arugula
  • 2 cups cherry tomatoes, halved
  • 1 & 1/2 cups sliced cucumber
  • 6 oz Sugar & Salt-Cured Salmon or store-bought smoked salmon, sliced
  • 4 hard boiled eggs, halved
  • 1 tbsp capers, drained
  • 1 tbsp chopped fresh dill
  • Quick Pickled Red Onions, optional
  • Bagels or bagel crisps, for garnish

Instructions

For the dressing, whisk olive oil, lemon juice, honey, lemon zest and salt. Set aside.

To assemble the bowls, place lettuce in 4 serving bowls. Divide tomatoes, cucumbers, smoked salmon, eggs, capers and dill between the bowls. Garnish with Quick Pickled Red Onions, if desired. Drizzle dressing over top and garnish each serving with bagel crisps. Serve with more dressing on the side.

Recipe adapted from Bite Me More

]]>
https://thefancypantskitchen.com/recipe/lox-and-bagel-breakfast-bowl/feed/ 0
Maple and Sausage Bread Pudding https://thefancypantskitchen.com/recipe/maple-and-sausage-bread-pudding/ https://thefancypantskitchen.com/recipe/maple-and-sausage-bread-pudding/#comments Wed, 26 Jan 2022 22:09:16 +0000 https://thefancypantskitchen.com/?post_type=ranna_recipe&p=12429

Maple and Sausage Bread Pudding gives us the best of everything you want in a brunch dish.  It takes like you’ve combined French toast, breakfast sausage and maple syrup into one amazing concoction.  Say it isn’t so!

I have always loved sweet and savory combinations.  Cheese and caramel popcorn.  Ham and cheese crepes drenched in maple syrup.  Matzah Brei sprinkled with powdered sugar.  The list goes on and on.  So, it’s no surprise that this combination of bread and savory sausage works so unbelievably well with the addition of maple syrup.

And, the addition of a secret ingredient goes a long way toward making this a very easy dish!

Typically, when we make a bread pudding, the inclusion of a custard as the base is mandatory. No need in this recipe as we’re melting ice cream (yes, our secret ingredient), combining it with eggs, sage, and maple syrup and then adding brioche and cooked sausage to the bowl.  So easy, and we love easy!

Start by browning the breakfast sausage and then transferring it to a bowl to cool.  Beat the eggs with the melted ice cream, water, sage, salt and 1/2 cup of the maple syrup.  Fold in the cooked sausage and the brioche and pour it all into a baking dish and set it aside for 15 minutes.  This gives the bread time to soak in all of the lovin’ goodness!  Go ahead and bake for 50-60 minutes or until the top is browned and the center is set.

While the pudding is baking, make the maple syrup sauce by boiling 1/2 cup of syrup until it’s reduced to 1/4 cup.  That should take 7 minutes.  Remove it from the heat and whisk in heavy cream.

Once the bread pudding is baked, serve it drizzled with maple syrup sauce.  You are gonna love this!

Share Your Thoughts...

Lastly, if you make Maple and Sausage Bread Pudding, be sure to leave a comment and/or give this recipe a rating! Above all, I love to hear from you and always do my best to respond to each and every comment. And of course, if you do make this recipe, don’t forget to tag me on Instagram! Looking through the photos of recipes you all have made is one of my favorite things to do!

Maple and Sausage Bread Pudding

Makes: 6-8 servings

Prep Time: 30 minutes

Bake Time: 50-60 minutes

Total Time: 1 hour & 30 minutes

Ingredients

  • 1 pound bulk breakfast sausage
  • 6 large eggs
  • 1 pint vanilla or cinnamon ice cream, melted
  • 1/2 cup water
  • 2 tsp thinly sliced sage leaves
  • 2 tsp kosher salt
  • 1 cup pure maple syrup
  • 3/4 pound brioche, crusts removed and bread torn into 1-inch pieces (10 cups)
  • 1/4 cup heavy cream

Instructions

Preheat the oven to 350°F. In a large skillet, cook the sausage over moderately high heat, breaking it up with a wooden spoon, until nicely browned and cooked through, 8 to 10 minutes. Using a slotted spoon, transfer the sausage to a bowl and let cool.

In a large bowl, beat the eggs with the ice cream, water, sage, salt and 1/2 cup of the maple syrup. Fold in the sausage and brioche. Scrape the mixture into a 9-inch square or 2-quart oval baking dish and let stand for 15 minutes. Bake for 50-60 minutes or until the top is browned and the center is set.

Meanwhile, in a small saucepan, boil the remaining 1/2 cup of maple syrup over moderate heat, stirring, until reduced to 1/4 cup, about 7 minutes. Remove from the heat; whisk in the cream. Serve the bread pudding with the maple cream.

Chef’s Note:

The unbaked bread pudding can be made up to 6 hours ahead and refrigerated. Bring to room temperature before baking.

]]>
https://thefancypantskitchen.com/recipe/maple-and-sausage-bread-pudding/feed/ 1
Butternut Squash Bread https://thefancypantskitchen.com/recipe/butternut-squash-bread/ https://thefancypantskitchen.com/recipe/butternut-squash-bread/#respond Fri, 15 Oct 2021 19:51:18 +0000 https://thefancypantskitchen.com/?post_type=ranna_recipe&p=11285

At this time of the year, there are plenty of pumpkin bread recipes, but this Butternut Squash Bread recipe caught my eye, just for the fact that it wasn’t pumpkin bread!  And, when I tasted it, I knew I had made a good decision!

While pumpkin bread is lovely, making this bread with roasted butternut squash purée is divine!  The squash gets roasted with butter and brown sugar (yummm) and puréed with cinnamon and nutmeg.  That becomes the base for the cake batter (ok I know it’s a bread, but it’s truly more like a cake). 

This bread has some reminiscence of chai based on the spices that get added to the batter.  It’s moist and flavorful.  Just the perfect addition to this season’s baking!

This is a typical bread batter in that you mix the wet ingredients and follow with the dry.  The only caveat is that you need to roast the butternut squash first and make a purée.  It’s not complicated, in fact it’s rather simple.  It just adds some extra time.  But this step is crucial and desirable…crucial in that you have to be able to purée the squash and you can’t do that if it’s not soft and desirable because of the wonderful flavor the purée imparts to the bread!

Once you have the purée, combine it with the eggs, oil, water and sugars.   Whisk together all of the dry ingredients and stir that into the butternut squash mixture.

Pour it into the loaf pan, bake it, decorate the top if you’d like, and enjoy the heck out of it!!

Share Your Thoughts...

Lastly, if you make Butternut Squash Bread, be sure to leave a comment and/or give this recipe a rating! Above all, I love to hear from you and always do my best to respond to each and every comment. And of course, if you do make this recipe, don’t forget to tag me on Instagram! Looking through the photos of recipes you all have made is one of my favorite things to do!

Butternut Squash Bread

Makes: 1 9×5-inch loaf

Prep Time: 10 minutes

Bake Time: 1 hour & 5 minutes

Total Time: 1 hour & 15 minutes

Ingredients

  • 1 cup butternut squash purée
  • 2 eggs
  • 1/2 cup vegetable oil
  • 1/4 cup water
  • 1 cup white sugar
  • 1/2 cup brown sugar
  • 1 & 3/4 cups all-purpose flour
  • 1 tsp baking soda
  • 1/2 tsp kosher salt
  • 2 tsp ground cinnamon
  • 1/2 tsp ground nutmeg
  • 1/4 tsp ground cardamom

Instructions

Preheat oven to 350°F. Grease and flour one 8.5 x 4.5 x 2.5 inch loaf pan.

In a large bowl, mix together the butternut squash purée, eggs, oil, water and sugars until thoroughly combined. In a separate bowl, whisk together the flour, baking soda, salt, cinnamon, nutmeg and cardamom. Stir the dry ingredients into the butternut squash mixture. Combine just until incorporated; do not over mix.

Pour into the prepared pan.  Bake for 55-65 minutes or until a wooden skewer inserted into the center of the loaf comes out clean.

Recipe from My Baking Addiction

]]>
https://thefancypantskitchen.com/recipe/butternut-squash-bread/feed/ 0
Portuguese Pancakes https://thefancypantskitchen.com/recipe/portuguese-pancakes/ https://thefancypantskitchen.com/recipe/portuguese-pancakes/#respond Tue, 01 Jun 2021 15:30:38 +0000 https://thefancypantskitchen.com/?post_type=ranna_recipe&p=9739

Portuguese Pancakes are a new addition to my breakfast choices.  They are different than an American pancake in that they include cornmeal in the batter.  Known as panquesa de fuba (pancakes with cornmeal), they are a very traditional Portuguese dish.

I found them interesting:  denser than a typical pancake and a little sweet with the addition of brown sugar to the batter.  They pair up beautifully with maple syrup or honey (my choice) and are topped with fruit, whipped cream, butter or granola.  Or maybe you want them all!  Knock yourself out!

Share Your Thoughts...

Lastly, if you make Portuguese Pancakes, be sure to leave a comment and/or give this recipe a rating! Above all, I love to hear from you and always do my best to respond to each and every comment. And of course, if you do make this recipe, don’t forget to tag me on Instagram! Looking through the photos of recipes you all have made is one of my favorite things to do!

Portuguese Pancakes

Makes: 8  medium pancakes

Prep Time: 5 minutes

Cook Time: 5 minutes

Total Time: 10 minutes

Ingredients

  • 1 egg
  • 2 tbsp unsalted butter, melted plus more for the skillet
  • 1 cup plus 2 tbsp whole milk
  • 1 tsp vanilla
  • 1 cup plus 2 tbsp cornmeal
  • 1/2 cup all-purpose flour
  • 2 tbsp brown sugar, packed
  • Honey or maple syrup, for drizzling
  • Granola, for sprinkling

Instructions

In a bowl, beat the egg lightly with a fork. Add the melted butter, milk and vanilla. Whisk in the corneal, flour and brown sugar.

In a large non-stick skillet, spread a thin layer of butter. Pour 1/4-cup pancakes into skillet (you will probably get three at a time in the skillet depending on the size). When bubbles appear on the surface and they are lightly browned, flip and brown the second side. Repeat with any remaining batter.

Stack the pancakes, serve with honey or maple syrup and top with granola.

]]>
https://thefancypantskitchen.com/recipe/portuguese-pancakes/feed/ 0
Baked Egg Nests https://thefancypantskitchen.com/recipe/baked-egg-nests/ https://thefancypantskitchen.com/recipe/baked-egg-nests/#respond Fri, 30 Apr 2021 15:55:44 +0000 https://thefancypantskitchen.com/?post_type=ranna_recipe&p=9307

If you love breakfast or brunch and love easy and quick recipes, then Baked Egg Nests are for you!  I am a breakfast girl…I know many people aren’t breakfast lovers, but I am.  I’m kind of boring when it comes to this starter meal for the day:  I’ve gone for years eating cut up melons & berries with cottage cheese and sliced almonds.  Then I decided to switch to eggs with a Jerusalem-type salad every morning.  What can I say?  Easy and nutritious!

Sometimes, however, I want to change it up, and when I do, this easy recipe comes to mind.  It’s healthy and so easy. And, these are perfect for a crowd…say Mother’s Day!  Which mom wouldn’t love to see these on the menu (especially when someone else is cooking)?

Begin by lining a cupcake pan with thin slices of baked ham or smoked turkey.  I love a sweeter taste to this so I use a brown-sugar baked ham and a honey turkey.  That’s entirely up to you…mesquite smoked turkey or black forest ham will work very well.

Crack the eggs into the cup and bake until they reach your desired degree of done.  I like them a little firm, so I bake them for 20 minutes.  The photo with the cut nest was after I baked this for 20 minutes.  Based on whether you like them firmer or softer, you can adjust the timing accordingly.

Share Your Thoughts...

Lastly, if you make Baked Egg Nests, be sure to leave a comment and/or give this recipe a rating! Above all, I love to hear from you and always do my best to respond to each and every comment. And of course, if you do make this recipe, don’t forget to tag me on Instagram! Looking through the photos of recipes you all have made is one of my favorite things to do!

Baked Egg Nests

Makes: 6 servings

Prep Time: 10 minutes

Bake Time: 20 minutes

Total Time: 30 minutes

Ingredients

  • 24 thin slices of deli ham, smoked honey turkey or combination (see Chef’s note)
  • 12 eggs
  • 4 tbsp avocado oil
  • 1 & 1/2 tsp paprika
  • 1 tsp Kosher salt
  • 3/4 tsp freshly ground pepper

Instructions

Preheat oven to 375°F. Grease muffin tin with avocado oil. 

Line each muffin cup with two overlapping pieces of ham or turkey. Crack an egg into the center of each ham-lined cup. Season with paprika, salt & pepper.

Bake in the oven for 20 minutes or until egg is set. Remove from oven and serve 2 nests per plate.

Chef’s Note:

I like to use brown sugar or maple ham. If using turkey, I like honey turkey. I often make a combination: some turkey, some ham.

]]>
https://thefancypantskitchen.com/recipe/baked-egg-nests/feed/ 0
Mixed Berry Scones https://thefancypantskitchen.com/recipe/mixed-berry-scones/ https://thefancypantskitchen.com/recipe/mixed-berry-scones/#respond Mon, 29 Mar 2021 06:16:21 +0000 https://thefancypantskitchen.com/?post_type=ranna_recipe&p=8594

Mixed Berry Scones are a wonderful breakfast or brunch offering. Scones, in general, are so versatile with the addition of fruit, nuts, chocolate, cranberries or whatever suits your fancy.  Suiting my fancy was all about mixed berries…  

In this version, I have used frozen berries, so that all year long I can make these bad boys! They get glazed with a sweet honey glaze that adds a delicious flavor to them.

I have sometimes found that bakery scones are a little dry.  It’s why I often avoid them.  Have no fear…this Mixed Berry Scones recipe produces the most delicious, tender scones that are anything but dry!

And, I must say that they come together so easily.  I use a food processor and it makes it a snap to get these in the oven quickly!

Another thing I love about this recipe is that you can use frozen fruit.  I’m a huge advocate of using fresh fruit, but this is a place where frozen fruit works very nicely.  The primary reason for that is that it really helps to keep the dough cold.  For the same reason that you use cold butter when making pastries, frozen fruit helps create air pockets when the heat of the oven hits it, thereby creating a tender, flaky crust.  

The same principal applies with scones.  So, keep frozen mixed berries on hand, and this delightful snack will be the perfect little treat.  Check out all of the berries that run through this scone…it’s hard to beat this recipe!


My favorite accompaniments for these scones are Lemon Curd and Raspberry Curd.

Share Your Thoughts...

Lastly, if you make Mixed Berry Scones, be sure to leave a comment and/or give this recipe a rating! Above all, I love to hear from you and always do my best to respond to each and every comment. And of course, if you do make this recipe, don’t forget to tag me on Instagram! Looking through the photos of recipes you all have made is one of my favorite things to do!

Mixed Berry Scones

Makes: 8 scones

Prep Time: 10 minutes

Bake Time: 25 minutes

Total Time: 45 minut4s

Ingredients

Scones:

  • 1 & 3/4 cups (8 & 3/4 ounces) frozen mixed berries
  • 3 tbsp confectioners’ sugar
  • 3 cups (15 ounces) all-purpose flour
  • 12 tbsp unsalted butter, cut into 1/2-inch pieces, chilled
  • 1/3 cup (2 & 1/3 ounces) granulated sugar
  • 1 tbsp baking powder
  • 1 & 1/4 tsp salt
  • 3/4 cup plus 2 tablespoons whole milk
  • 1 large egg plus 1 large yolk
 

Glaze:

  • 2 tbsp unsalted butter, melted
  • 1 tbsp honey

Instructions

For the Scones:

Adjust oven rack to upper-middle position and heat oven to 425°F. Line rimmed baking sheet with parchment paper. If your berry mix contains strawberries, cut them in half. Toss berries with confectioners’ sugar in bowl; freeze until needed.

Combine flour, 6 tablespoons butter, granulated sugar, baking powder, and salt in food processor and process until butter is fully incorporated, about 15 seconds. Add remaining 6 tablespoons butter and pulse until butter is reduced to pea-size pieces, 10 to 12 pulses. Transfer mixture to large bowl. Stir in berries.
 
Beat milk and egg and yolk together in separate bowl. Make well in center of flour mixture and pour in milk mixture. Using rubber spatula, gently stir mixture, scraping from edges of bowl and folding inward until very shaggy dough forms and some bits of flour remain. Do not over-mix.
 

Turn out dough onto well-floured counter and, if necessary, knead briefly until dough just comes together, about 3 turns. Using your floured hands and bench scraper, shape dough into 12 by 4-inch rectangle, about 1 & 1/2 inches tall. Using knife or bench scraper, cut dough crosswise into 4 equal rectangles. Cut each rectangle diagonally into 2 triangles (you should have 8 scones total). Transfer scones to prepared sheet. Bake until scones are lightly golden on top, 16 to 18 minutes, rotating pan halfway through baking.

For the Glaze:

While scones bake, combine melted butter and honey in small bowl.
 
Remove scones from oven and brush tops evenly with glaze mixture. Return scones to oven and continue to bake until golden brown on top, 5 to 8 minutes longer. Transfer scones to wire rack and let cool for at least 10 minutes before serving.
 

Chef’s Notes:

To make ahead, unbaked scones can be frozen for several weeks. After cutting scones into triangles in step 4, freeze them on baking sheet. Transfer frozen scones to zip-lock freezer bag. When ready to bake, heat oven to 375°F and extend cooking time to 23 to 26 minutes.

To keep the (frozen) berries from bleeding into the dough, we tossed the berries in confectioners’ sugar.
 
To get light and flaky scones, we discovered that treating the butter in two different ways was key. First, we processed half the butter until fully incorporated into the dough. Then, we added the remaining cold butter and processed it until small clumps remained, creating pockets of steam as the scones baked.
 

A simple glaze of butter and honey adds a nice finish to the scones.

Work the dough as little as possible, just until it comes together. Work quickly to keep the butter and berries as cold as possible for the best results. Note that the butter is divided in this recipe. An equal amount of frozen blueberries, raspberries, blackberries, or strawberries (halved) can be used in place of the mixed berries.
 

Recipe is not my original but I can’t find the author.

]]>
https://thefancypantskitchen.com/recipe/mixed-berry-scones/feed/ 0