You all know it’s almost Valentine’s Day, right, and there is nothing better to say “I love you” with than No-Bake Chocolate Cheesecake! And, while it’s not fair that you have to work on Valentine’s Day (isn’t your loved one supposed to be taking you out, bringing you flowers, and all that jazz?), consider it a small price to pay for the most outstanding special dessert!
It is a small price because it’s a no-bake cheesecake. I love anything that is “no-bake” but especially with cheesecake. Cheesecakes can be finicky as they can sometimes crack on the top. That will never happen when it’s a no-bake cake.
And even if your honey is taking you out for V-day, you can have prepared this cheesecake the day prior for a wonderful treat when you get home from dinner! See, you really don’t have to work at all on Valentine’s Day!
This cake starts with a cookie crust. I have used Oreo cookies here (including the white icing in the middle) and it makes a divine base! I have often used chocolate wafer cookies, which I Iove, but Oreos give it that extra nostalgic flavor. Hard not to love that!
Pulse the cookies in a food processor until fine crumbs are made, add the melted butter, and pulse some more. Pour them into a 9-inch springform pan and press them firmly along the bottom and up the sides of the pan. You want the crumbs to be very compacted so that they stay firm when you remove the pan sides. I use a metal measuring cup and press hard to evenly pack the crumbs along the bottom and sides.
Put the crust into the refrigerator to firm up while you make the filling.
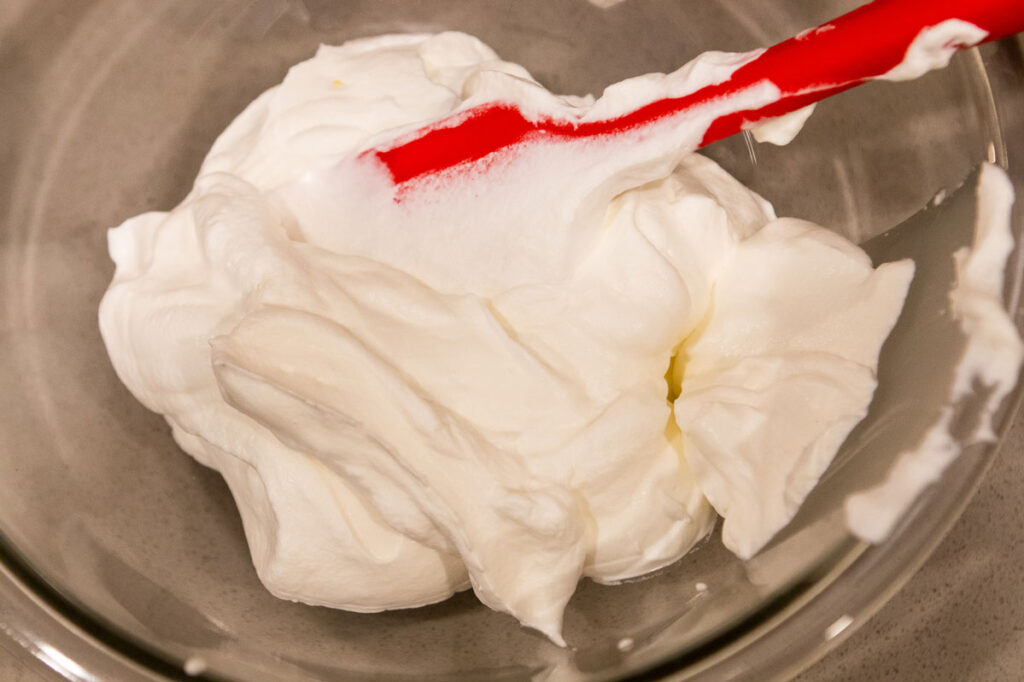
To make the filling, first melt the chocolate in the microwave using 30-second bursts and stirring in between until it’s nice and smooth. In a medium-sized bowl, whip up the cream until stiff peaks form.
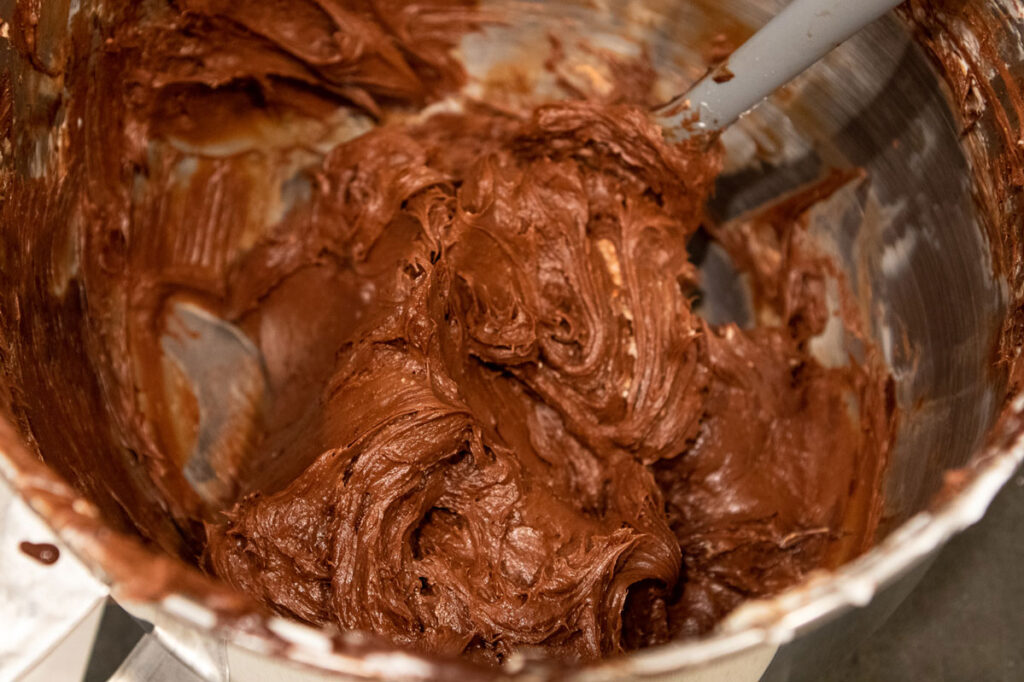
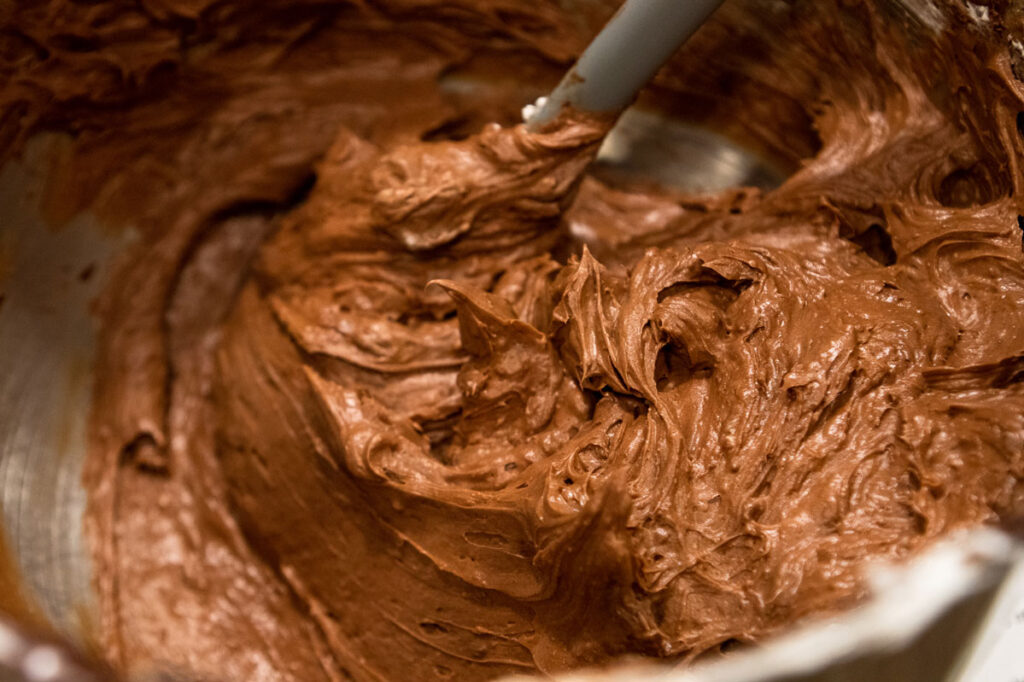
In a larger bowl, beat cream cheese until it’s smooth and creamy. Add the powdered sugar, cocoa powder and salt into the cream cheese. Once combined, pour in the melted chocolate and beat until it’s fully incorporated. The mixture will be thick!
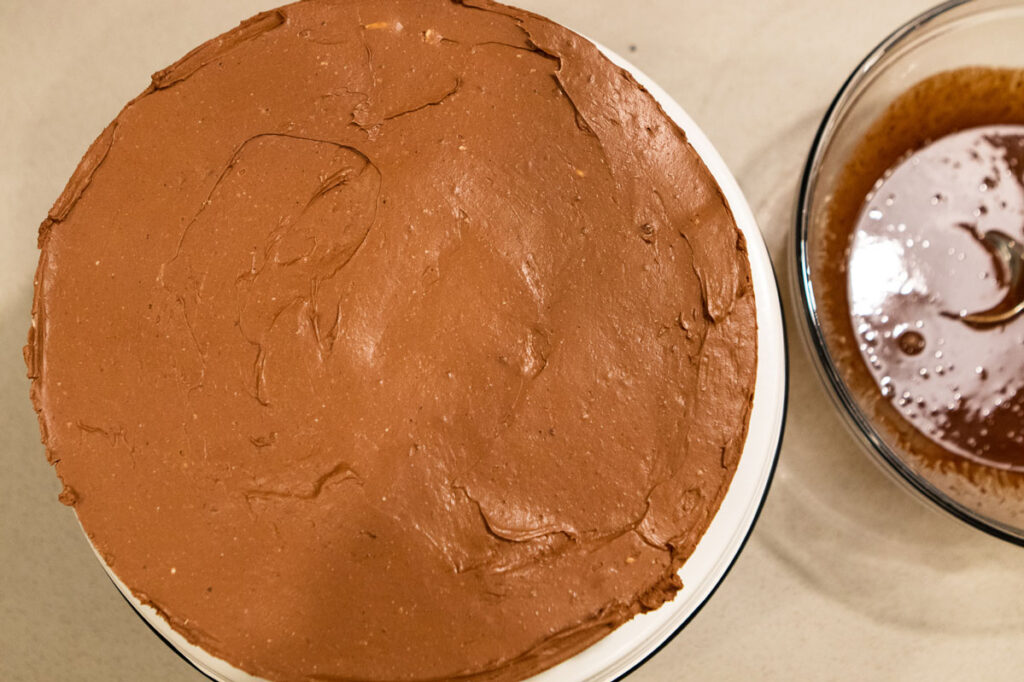
Fold the whipped cream into the chocolate cream cheese mixture. Make sure you gently fold this so that you don’t deflate the whipped cream. Once fully incorporated, remove the crust from the fridge and pour the filling into it. Smooth it with an offset spatula and cover it with plastic wrap. Put it back into the refrigerator and let it firm up for at least 6 hours, but overnight is ideal!
When you are ready to serve this beauty, make the chocolate ganache by heating the cream to a low simmer in a small saucepan. Pour it over the chocolate and let it sit for about 5 minutes. Stir the cream into the chocolate until it’s completely melted and smooth.
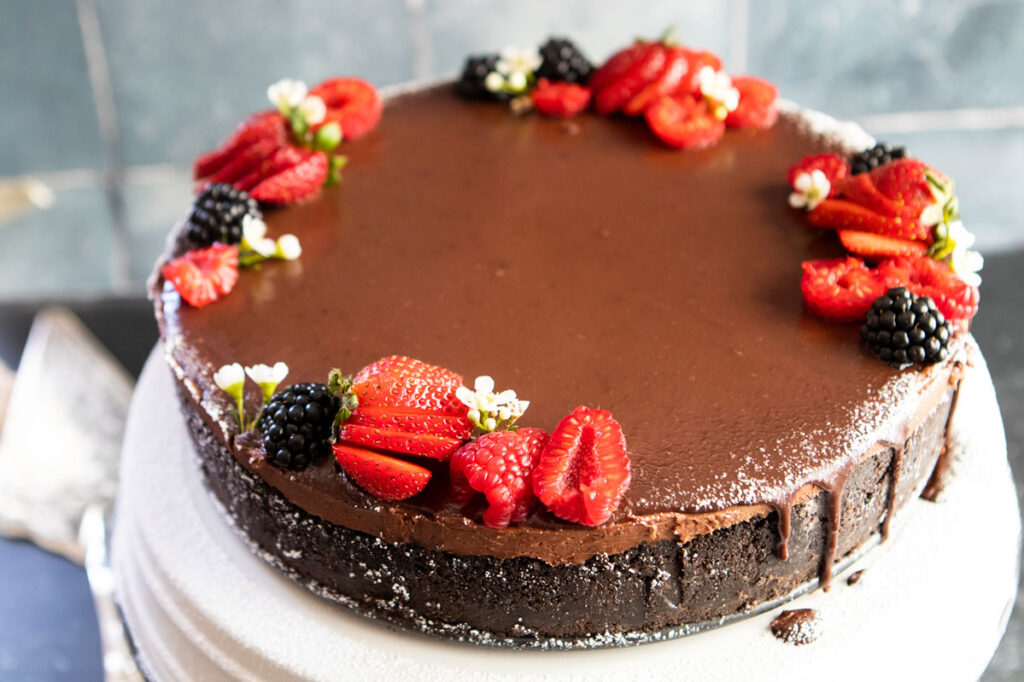
Remove the cheesecake from the fridge and run a knife around the inside of the cake pan to loosen the cake from the side. Remove the side and place the cheesecake onto a serving dish.
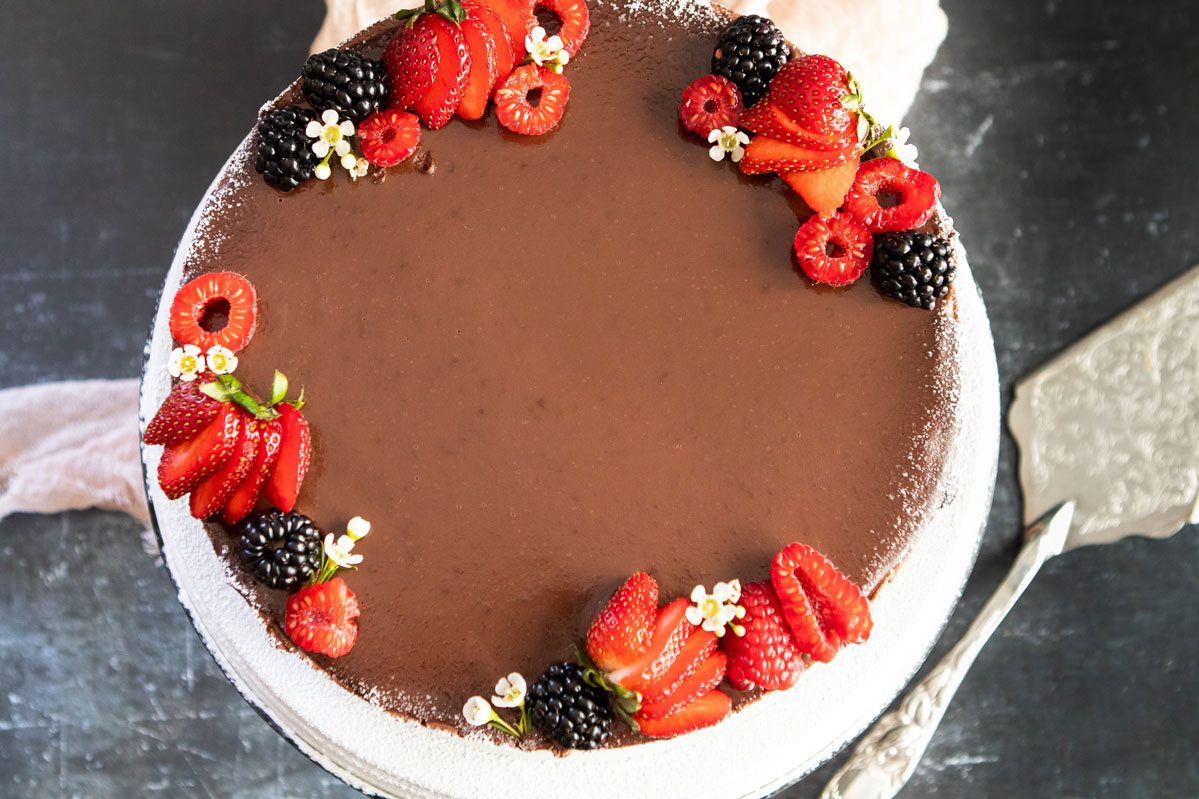
Pour the ganache over the top and smooth it with a spatula. Now you can decorate the top however you like. I used strawberries, raspberries, blackberries, and powdered sugar.
Share Your Thoughts...
Lastly, if you make No-Bake Chocolate Cheesecake, be sure to leave a comment and/or give this recipe a rating! Above all, I love to hear from you and always do my best to respond to each and every comment. And of course, if you do make this recipe, don’t forget to tag me on Instagram! Looking through the photos of recipes you all have made is one of my favorite things to do!
No-Bake Chocolate Cheesecake
Makes: 12 servings
Prep Time: 20 minutes
Chill Time: 6 hours
Total Time: 6 hours & 20 minutes
Ingredients
Oreo Crust:
4 cups Oreo cookies (or 2/3 of a standard 14.3-ounce package)
7 tbsp unsalted butter, melted
Chocolate Cream Cheese Filling:
10 ounces dark chocolate 70%
3 8-ounce blocks cream cheese, room temperature
1 1/3 cup heavy cream, cold
1 1/2 cup powdered icing sugar
2 tbsp cocoa powder
1/2 tsp salt
Chocolate Ganache:
3 1/2 ounces dark chocolate 70%, finely chopped
2/3 cup heavy cream
Berries and sprinkles, for decorating, if desired
Instructions
Oreo Crust:
Add the Oreo cookies to the bowl of a food processor and pulse until the cookies are crumbled finely.Pour in the melted butter and pulse again until the crumbs resemble wet sand.Pour the cookie crumbs into a 9-inch springform pan and pack the crumbs into the base and up the sides. They need to be as compact as possible so that they don’t crumble when cutting the cheesecake later. I recommend using a 1/2-cup measuring cup to press the crumbs up the sides of the pan.
Refrigerate the base for 30 minutes minimum or freeze for 15 minutes while you make the filling.
Chocolate Cream Cheese Filling:
Melt the chocolate in a microwave-safe bowl, using 30-second burst and stirring in between until smooth.
In a medium-sized bowl, add the cold cream and using an electric mixer fitted with the whisk attachment, whip on medium-high speed until stiff peaks form. Set aside.
In a separate bowl, add the cream cheese and using an electric mixer fitted with the paddle attachment, beat on medium speed until smooth and creamy. Scrape down the base and sides of the bowl with a rubber spatula.Sift the powdered icing sugar, cocoa powder and salt into the cream cheese mixture. Pour in the melted chocolate and beat on medium until fully incorporated and smooth. It is quite a thick mixture but will loosen up with the whipped cream.
Add the whipped cream into the chocolate cream cheese mixture and fold through until fully combined.
Remove the crust from the refrigerator, or freezer, and pour the chocolate cream cheese filling into it. Smooth the filling throughout the base and use an offset spatula to smooth off the top.
Cover tightly in plastic wrap and refrigerate the cheesecake for a minimum of 6 hours but overnight is great, too. This gives it the best chance to firm up.
Chocolate Ganache:
Heat the cream in a saucepan on medium heat and bring to a low simmer. Make sure it doesn’t boil otherwise the cream will split.Pour the cream over the chocolate and cover the bowl with a plate for 5 minutes. Stir the cream until the chocolate has fully melted and is combined with the cream.
Remove the cheesecake from the fridge, then using a knife, run the blade around the edge to loosen it, and then release the springform pan rim and remove it carefully. Slide the cheesecake onto a serving plate.
Pour the chocolate ganache liberally over the top of the cheesecake and smooth with an offset spatula.Decorate with fruit such as strawberries and red currants or however your creative heart desires!
Use a clean, sharp knife to cut the cheesecake into slices. Heat the blade of the knife under warm water, wipe dry and slice slowly through the cheesecake. Clean, warm and wipe the blade before each cut for the neatest slices.
Chef’s Notes:
The cheesecake can be stored in the refrigerator wrapped well in plastic wrap, for up to three days. If the ganache has been poured onto the cheesecake, then it will harden in the fridge.
The undecorated cheesecake can be frozen easily. Once it has set in the refrigerator, wrap well with plastic wrap, and then aluminum foil and freeze for up to 2 months. Thaw in the refrigerator and then slice and serve. Do not freeze an unset cheesecake as the texture becomes affected and will turn grainy.
This cheesecake makes for a great make-ahead dessert. You can make the crust 1-2 days ahead of time and keep it in the refrigerator until ready to use. Alternatively, make the cookie crust and filling and refrigerate it undecorated for 2 days. Then make the chocolate ganache and pour it over when ready to serve.


Leave a Review