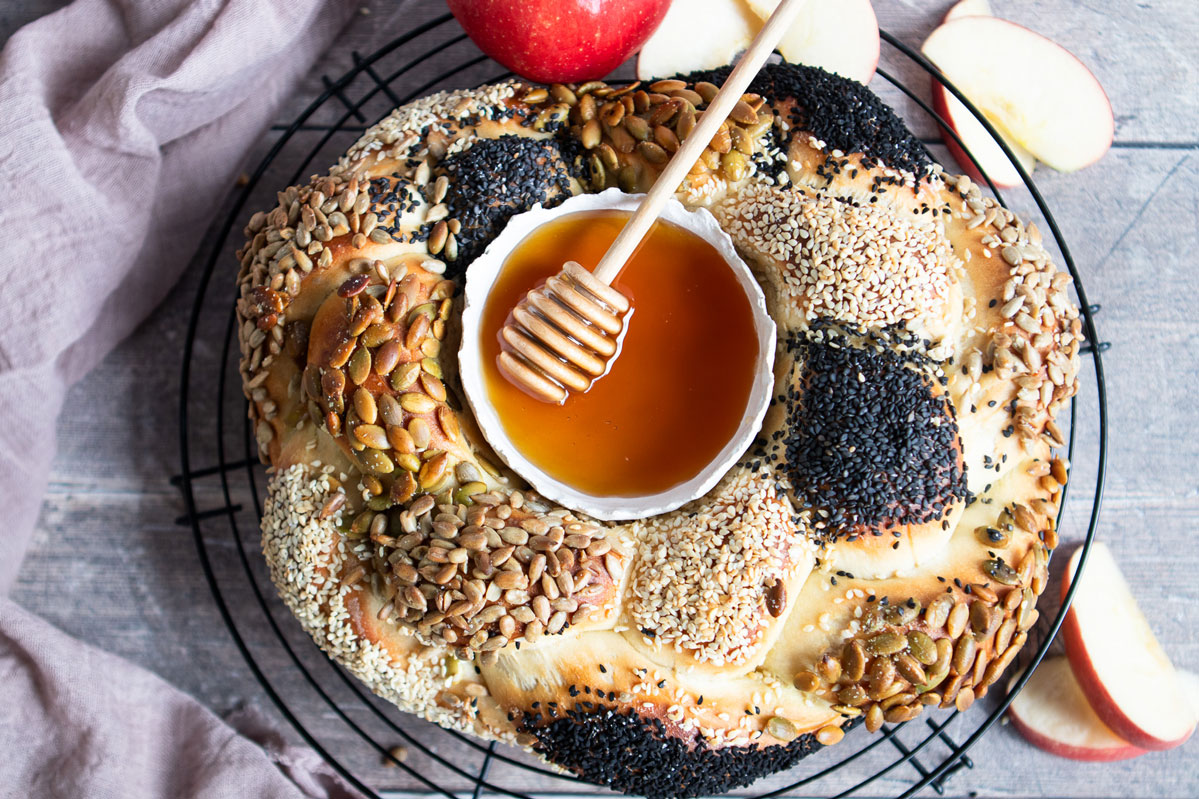
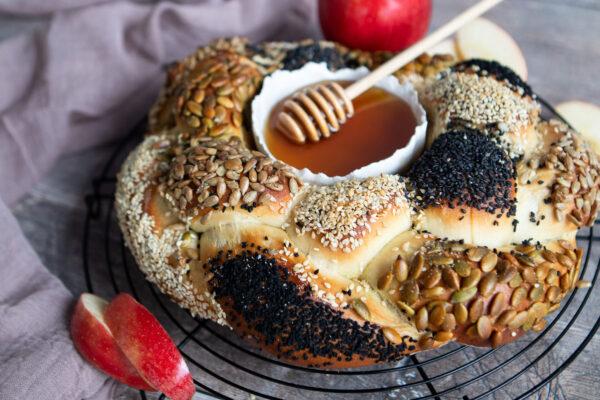
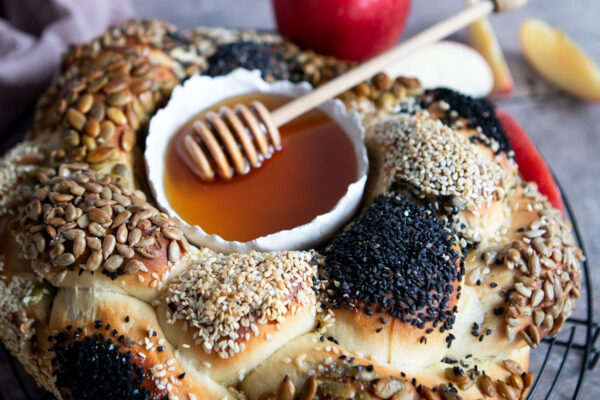
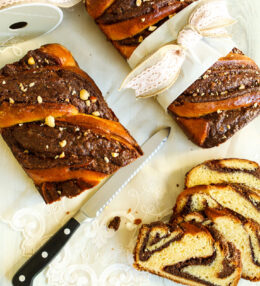
The Jewish New Year (Rosh Hashana) is quickly approaching and to begin the holiday, start with this round Seeded Challah. It’s gorgeous, it’s delicious and it also serves as a wonderful vessel for honey to complement apples, the traditional way to wish folks a sweet new year!
In last year’s post on Black & White Seeded Round Challah, I explained some of the reasons why we serve a round challah at this holiday, but to recap:
It’s traditional to serve a round challah on Erev Rosh Hashana (the night before Rosh Hashana begins). There are many reasons but a couple that I love are as follows:
The round challahs have no end, symbolizing (and actualizing) our wish for a year in which life and blessings continue without end.
The round shape is a reflection of the continuing cycle of years and seasons.
A round challah represents a crown, reminding us of the sovereignty of G-d.
At this time of year, when our thoughts turn to repentance and resolutions of self-improvement, the round challah reminds us that the opportunity for repentance is never-ending.
Whichever reason appeals to you, the result is that this stunning seeded crown is a beautiful tribute to these solemn and deeply holy days.
This particular challah recipe is a bit easier to make than the Black & White Seeded Round Challah, but will still take a bit of time, so plan accordingly!
By using active dry yeast, you can mix all of the dough ingredients together without waiting for the yeast to “bloom”. Add the yeast into the cool water along with flour, eggs, sugar, salt and oil.
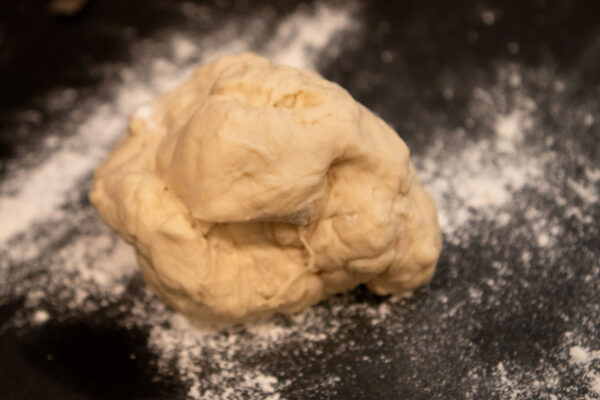
Using a mixer with the dough hook, mix the dough for a few minutes until it comes together. Continue on a higher speed for another 4 minutes or until the dough becomes a bit firmer.
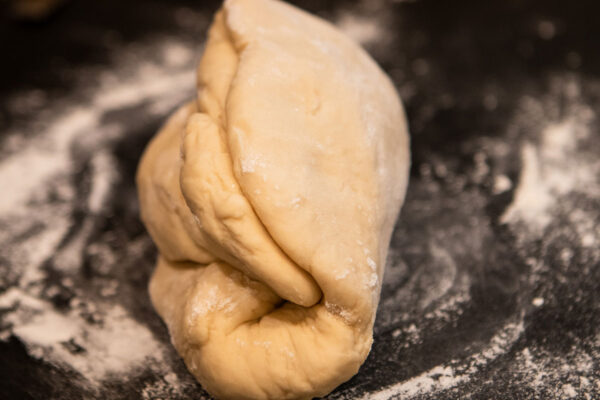
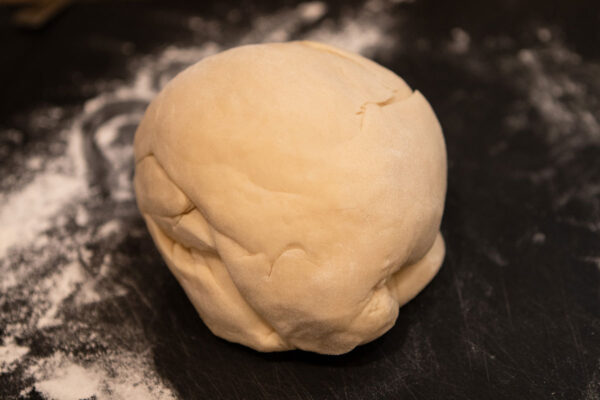
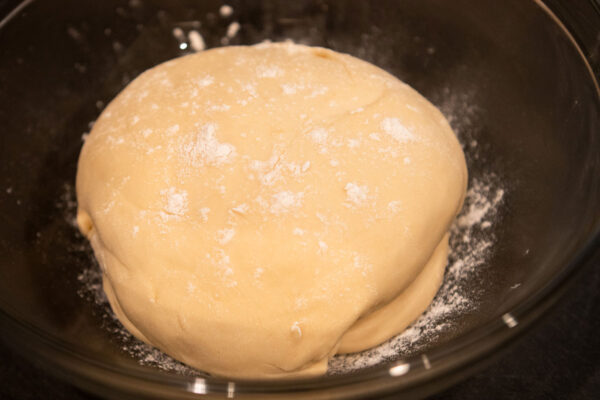
Transfer the dough to a floured work surface and stretch and fold the dough, per the recipe, and then pull the dough into a round ball.
Let the dough rise in the bowl for about 40 minutes until it is about 70% larger than it began.
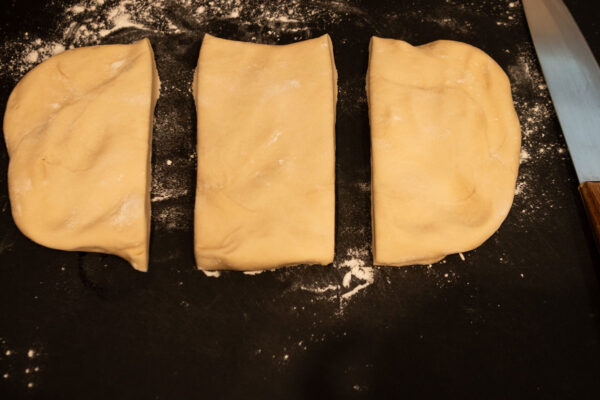
Transfer the dough to a work surface and pull it into a rectangular shape. Divide it into three pieces horizontally.
Flatten each piece into a rectangle and fold the top portion over and press that edge into the flat portion of the dough. Continue folding and pressing 3 more times. You will end up with a cylinder about 7 inches long.
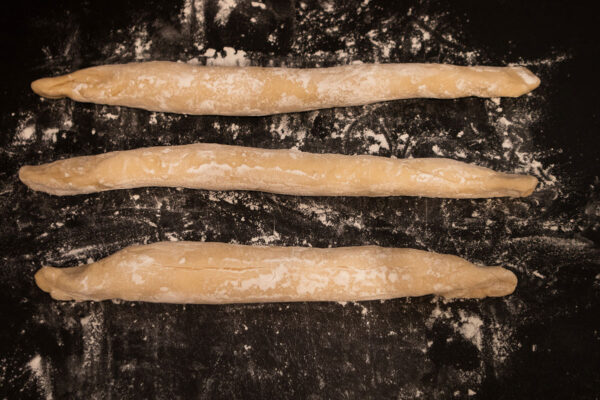
Roll it back and forth to form a rope about 14 inches long. Repeat with the remaining two cylinders.
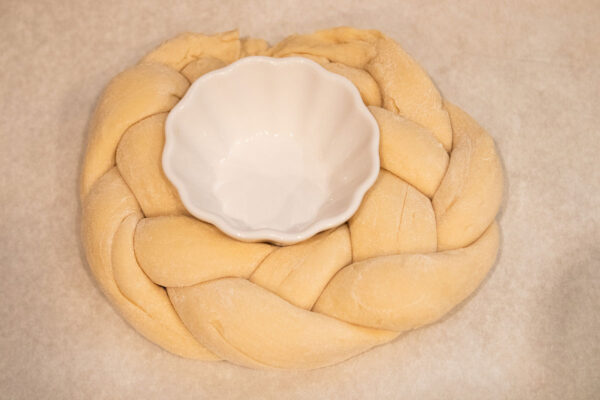
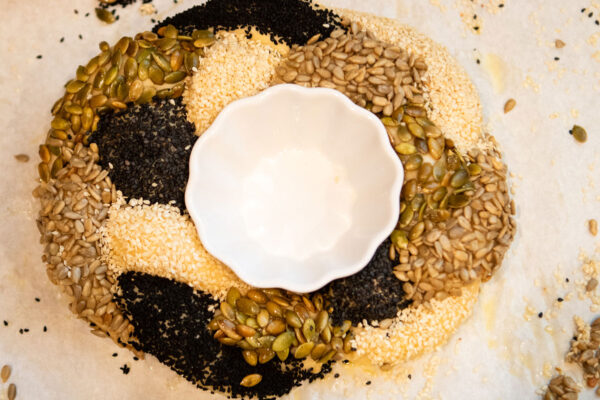
Pinch the three strands together and braid the strand, pinching together the opposite end and forming it into a circle. For a great look, place an oven-safe bowl in the middle of the circle. This will be a perfect place to add honey!
For the seeded look that I have photographed, brush each piece of the braid with egg wash, one at a time, and sprinkle seeds over that part. Then, brush the next part of the braid, brush with egg wash and sprinkle another type of seed. I find that if I brush one portion at a time with egg wash, the seeds that might not stick to the wash don’t get stuck on another part of the challah.
Bake the challah for about 35 minutes until nicely browned.
I changed the bowl that I used to bake the bread with to a more decorative one but that’s entirely up to you.
One final hack: many of you already have your favorite challah dough recipe. Feel free to use that one vs mine. Just follow the technique for seeding the top, and the finished product will be similar! Happy baking!
Share Your Thoughts...
Lastly, if you make Seeded Challah, be sure to leave a review down below at the bottom of this page (stars are also appreciated)! Above all, I love to hear from you and always do my best to respond to each and every review. And of course, if you do make this recipe, don’t forget to tag me on Instagram! Looking through the photos of recipes you all have made is one of my favorite things to do!
Seeded Challah
Makes: 1 large challah
Prep Time: 45 minutes
Bake Time: 25-35 minutes
Total Time: 1 hour & 20 minutes plus rise time 80 minutes
Ingredients
Dough:
3/4 cup plus 2 tbsp (200 grams) room-temperature water
1/2 tbsp plus 3/4 tsp (7.5 grams) active dry yeast
3 & 1/2 cups (500 grams) all-purpose flour (sifted, 11.7%), plus extra for shaping
1/3 cup (45 grams) nigella, poppy, or sesame seeds (or a combination)
Instructions
Make the Dough:
Pour the cool water into the bowl of a stand mixer fitted with the bread hook. Crumble the yeast into the water and use your fingers to rub and dissolve it; if using active dry yeast, whisk the yeast into the water. Add the flour, eggs, sugar, salt, and oil.
Mix the dough on low speed to combine the ingredients, stopping the mixer if the dough climbs up the hook or if you need to work in dry ingredients that have settled on the bottom of the bowl. Scrape the bottom and sides of the bowl as needed. It should take about 2 minutes for the dough to come together. If there are lots of dry bits in the bottom of the bowl that just aren’t getting worked in, add a tablespoon or two of water. On the other hand, if the dough looks softer than in the photo opposite, add a few pinches of flour. (Eventually you’ll be able to feel the dough and know if you need to add water or flour; it’s always better to adjust the ratios when the dough is first coming together at the beginning of mixing rather than wait until the end of the kneading process, since it takes longer for ingredient additions to get worked into the dough mass at this later point and you risk overworking the dough.)
Increase the speed to medium and knead until a smooth dough forms, about 4 minutes. You want the dough to be a bit firm.
Stretch and Fold the Dough:
Lightly dust your work surface with a little flour, and use a dough scraper to transfer the dough from the mixing bowl to the floured surface. Use your palms to push and tear the top of the dough away from you in one stroke, and then fold that section onto the middle of the dough. Give the dough a quarter turn and repeat the push/tear/fold process for about 1 minute. Then push and pull the dough against the work surface to round it into a ball.
Lightly dust a bowl with flour, add the dough, sprinkle just a little flour on top of the dough, and cover the bowl with plastic wrap. Set the bowl aside at room temperature until the dough has risen by about 70%, about 40 minutes (this will depend on how warm your room is—when the dough proofs in a warmer room it will take less time than in a cooler room).
Use a plastic dough scraper to gently lift the dough out of the bowl and transfer it to a lightly floured work surface (take care not to press out the trapped gas in the dough). Gently pull the dough into a rectangular shape. Use a bench scraper or a chef’s knife to divide the dough into 3 equal horizontal strips (you can use a kitchen scale to weigh each piece if you want to be exact).
(Note: It is best not to have an overly floured work surface when rolling dough into cylinders, since the flour makes it hard for the dough to gain enough traction to be shaped into a rope.)
Set a piece of dough lengthwise on your work surface. Use the palm of your hand to flatten the dough into a flat rectangle; then fold the top portion over and use your palm to press the edge into the flat part of the dough. Fold and press 3 more times—the dough will end up as a cylinder about 7 inches long. Set this piece aside and repeat with the other 2 pieces.
Return to the first piece of dough and use both hands to roll the cylinder back and forth to form a long rope, pressing down lightly when you get to the ends of the rope so they are flattened. The rope should be about 14 inches long with tapered ends. Repeat with the remaining 2 cylinders. Lightly flour the long ropes (this allows for the strands of the braid to stay somewhat separate during baking; otherwise, they’d fuse together).
Pinch the ends of 3 ropes together at the top (you can place a weight on top of the ends to hold them in place) and lightly flour the dough. Braid the dough, lifting each piece up and over so the braid is more stacked than it is long; you also want it to be fatter and taller in the middle, and more tapered at the ends. When you get to the end of the ropes and there is nothing left to braid, use your palm to press and seal the ends together, or, for a round festive challah, join both ends of the challah together to form a circle, then flip over so the more attractive side is showing.Place the challah on a parchment paper–lined rimmed sheet pan, cover it with a kitchen towel (or place it inside an unscented plastic bag), and set it aside in a warm, draft-free spot to rise until the loaf has doubled in volume, about 40 minutes (depending on how warm the room is).
Adjust the oven racks to the middle position and preheat the oven to 425°F.
Once the challah loaf has roughly doubled in size, do the press test: Press your finger lightly into the dough, remove it, and see if the depression fills in by half. If the depression fills back in quickly and completely, the dough needs more time to rise; if you press the dough and it slightly deflates, the dough has overproofed and will be heavier and less airy after baking.
Make the egg wash by mixing the egg, water, and salt together in a small bowl. Gently brush one section of the loaf with egg wash, taking care not to let it pool in the creases of the braids. You want a nice thin coating. Generously sprinkle that portion of the loaf with the seeds.It’s important to heavily coat the bread. If you just sprinkle a few pinches over the top, it won’t look very generous or appealing after the bread has expanded and baked, so be generous with the seeds whether sprinkling or rolling.
This will help to keep the seeds from sticking to unwanted sections of challah. Repeat with the remaining sections of dough.I also placed an oven-safe small bowl in the middle of the circle so that I could fill it with honey for Rosh Hashana.
Bake until the loaves are golden brown, about 25-35 minutes . Remove the loaves from the oven and set them aside to cool completely on the sheet pans.


Leave a Review