It’s hard to imagine that this Roast Chicken for Tomorrow recipe has only 3 ingredients, but it does…fresh whole chicken, buttermilk and sea salt. That’s right, only three ingredients. I guess you could say it has a fourth ingredient: time. You must start this recipe the day before you are going to serve it, but besides that, just 3 ingredients!
The method, soak the chicken in buttermilk and sea salt overnight, is reminiscent of southern fried chicken, except we’re roasting the chicken.
This straight-shooting method incorporates all four of Samin Nosrat’s techniques from her amazing cookbook Salt Fat Acid Heat. Salt in the marinade sinks deep into the chicken to season it and allow the proteins to realign so the chicken holds its juiciness. Fat in the buttermilk and the chicken gives the chicken its beautiful lacquered skin. Lactic acid in the buttermilk helps to tenderize the chicken and give it a slight tangy flavor. And heat, concentrated more in the back and sides of the oven, helps the legs cook more evenly with the breast, keeping it from drying out.
What this all means is delicious roast chicken!
Start this chicken the day prior to roasting it as you will want 12 to 24 hours of marinating time.
Season the chicken inside and out with salt and let it sit for 30 minutes.
Combine more salt with buttermilk and stir it to dissolve the salt. Place the chicken in a large resealable bag and pour the buttermilk mixture in. Squish the buttermilk around to ensure that the chicken is covered completely. Place it on a plate and refrigerate for 12-24 hours. Try to remember to turn the bag partway through the marinating process so that every part of the chicken gets marinated.
A couple of hours prior to serving the chicken, remove it from the fridge and let it sit on the counter for an hour, to lose some of the chill.
When you are ready to roast the chicken, remove it from the bag and scrape off much of the marinade with your fingers. Set the chicken in a cast-iron skillet or roasting pan, breast-side up, and tie the legs together with some kitchen twine.
Place the pan in the oven toward the very back and angle the pan so that the legs are pointing toward the back left. After about 20 minutes, turn the heat down and after 10 more minutes, turn the pan so the legs are pointed toward the back right of the oven.
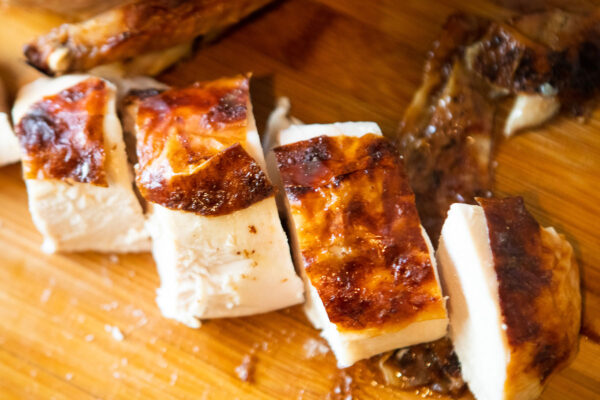
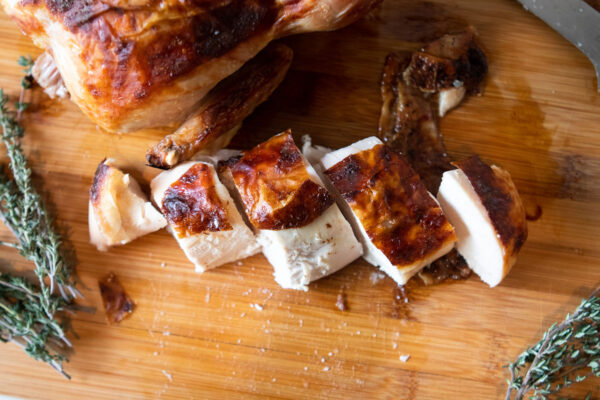
Continue roasting until the chicken is cooked through, and then remove from the oven and pan to a carving board. Let the chicken sit for 10 minutes prior to carving.
This will become a favorite method for making the most mouth-watering chicken you’ve ever had!
Share Your Thoughts...
Lastly, if you make Roast Chicken for Tomorrow, be sure to leave a review down below at the bottom of this page (stars are also appreciated)! Above all, I love to hear from you and always do my best to respond to each and every review. And of course, if you do make this recipe, don’t forget to tag me on Instagram! Looking through the photos of recipes you all have made is one of my favorite things to do!
Roast Chicken for Tomorrow
Makes: 4 servings
Prep Time: 15 hours
Cook Time: 1 hour & 10 minutes
Total Time: 1 hour & 10 minutes plus 15 hours marinate time
Ingredients
1 (3 & 1/2 to 4 pound) chicken
Fine sea salt
2 cups buttermilk
Instructions
The day before you want chicken, set the chicken on a rimmed sheet pan. If there’s a bag of giblets tucked inside the chicken, be sure to pull it out. Cut off the pointy wingtips by slicing through the first wing joint with kitchen shears or a sharp knife (so they don’t burn—save them for stock). Season the chicken inside and out with 1 tablespoon of salt total and let it sit for 30 minutes.
In a large bowl, combine 4 teaspoons salt and the buttermilk and stir with a spoon to dissolve the salt. Lift the chicken into a gallon-size resealable plastic bag and pour in the buttermilk. If the chicken looks like it won’t fit in a gallon-size bag, use a larger resealable bag or double up two larger plastic produce bags to prevent leakage and tie the bag with a piece of twine. If you have no bags that will work, use a bowl and cover it tightly, but you’ll want to turn the chicken a few times to make sure it all gets access to the marinade.
Seal the bag, squish the buttermilk around the chicken, place on a rimmed plate, and refrigerate for 12 to 24 hours. If you remember, turn the bag partway through marinating so every part of the chicken gets marinated, but it’s not essential.
About 2 hours and 15 minutes before you want to eat, get ready to roast: Take the chicken bundle out of the fridge and leave on the counter for 1 hour to lose some chill. Heat the oven to 425°F with a rack in the center.
Find a 10-inch (25cm) cast-iron skillet or shallow roasting pan. Remove the chicken from the plastic bag, scraping off as much buttermilk with your fingers as you reasonably can. Set the chicken in the pan, breast-side up. Tightly tie the legs of the chicken together with a piece of kitchen twine.
Set the pan in the oven on the center rack and slide the pan all the way to the back. Turn the pan so the chicken legs are pointing toward the back left corner and the breast is pointing toward the center of the oven (the back corners are usually the hottest spots in the oven, so this positioning will help keep the breast from overcooking before the legs are done). Close the oven—the chicken should start sizzling soon.
After 20 minutes, and the chicken starts to brown, turn down the heat to 400°F. Roast for another 10 minutes, then use oven mitts to turn the pan so the legs are facing the back right corner of the oven.
Continue cooking until the chicken is beautifully browned all over and, when you insert a knife down to the bone between the leg and the thigh, the meat looks firm and pale, not squishy and pink, and the juices run clear, about 30 minutes more (an instant-read thermometer will register 165°F in the thickest part of the thigh and breast). Using tongs, lift the chicken to a cutting board (preferably with a groove to catch any juices) or platter and let it rest for 10 minutes before carving with a sharp knife and serving.
Chef’s Note:
Roast chicken, tightly sealed in the refrigerator, makes excellent leftovers. You can either carve or pull off all the meat so it’s easier to use throughout the week, or stick the whole bird on a plate and cover it with a reusable beeswax wrap or plastic wrap for 4 days, or freeze in an airtight container for 4 months. Eat it cold, warm, or hot, in sandwiches, soups, grain bowls, tacos, and more.
Hey Francine.
I had guests at my home for dinner the other night. I made the Roast Chicken For Tomorrow and the Spring Jasmine Rice with peas. The guests were delighted and said the chicken was the best they had ever had. The rice/pea dish was the perfect compliment. Both were easy breezy to make.
Thank you for your amazing blog and your fantastic recipes. You never disappoint!


Recipe Reviews